
Enterprise Container Platform in the Cloud: OpenShift on Azure secured by Azure AD


Overview
This article is a collaboration from Rolf Masuch (Microsoft) and Keith Tenzer (Red Hat). It is based on our work together in the field with enterprise customers.
In this article we will explore how to deploy a production ready OpenShift enterprise container platform on the Microsoft Azure Cloud. The entire deployment is completely automated using Ansible and ARM (Azure Resource Manager). Everything is template driven using APIs. The bennefit of this approach is the ability to build-up and tear-down a complete OpenShift environment in the Azure cloud before your coffee gets cold.
Since OpenShift already uses Ansible as its installation and configuration management tool, it made sense to stick with Ansible as opposed to using other tools such as Power Shell. A Red Hat colleague, Ivan McKinley created an Ansible playbook that builds out all the required Azure infrastructure components and integrates the existing OpenShift installation playbook. The result is an optimally configure OpenShift environment on the Azure Cloud. We have used this recipe to deploy real production Environments for customers and it leverages both Microsoft as well as Red Hat best practices.
You can access and contribute improvements to the Ansible playbook under Ivan's Github repository:
https://github.com/ivanthelad/ansible-azure
The following, related articles might also be of Interest in case you want a basic understanding of OpenShift.
The pre-requisites for deploying OpenShift on Azure are a valid OpenShift subscription and a valid Azure subscription.
- If you don't already have a OpenShift Subscription you can purchase one or get an eval by talking to your partner or Red Hat account manager.
- If you don't already have a Microsoft Azure Subscription you can start one here.
Deploying to Azure
Install Fedora 24 workstation for use as deployment workstation. You need very recent versions of python 2.7 (2.7.12) and unfortunately it isn't available in RHEL or CentOS at writing of this article so we used Fedora.
Install Python and Dependencies
# sudo yum install python
# sudo yum install python-pip
# sudo dnf install python-devel
# sudo dnf install redhat-rpm-config
# sudo dnf install openssl-devel
Install Azure CLI
# sudo dnf install npm
# sudo npm install azure-cli -g
# sudo pip install --upgrade pip
# sudo pip install azure==2.0.0rc5
Authenticate Azure CLI
[ktenzer@ktenzer ansible-azure]$ azure login
 info: Executing command login
 \info: To sign in, use a web browser to open the page https://aka.ms/devicelogin. Enter the code CB8P5ZCKP to authenticate.
 -info: Added subscription Pay-As-You-Go
 info: Added subscription ITS - RedHat Openshift
 info: Setting subscription "Pay-As-You-Go" as default
 +
 info: login command OK
List Azure Resource Groups
In order to list resource groups you need your Azure subscription id. You can view this by logging into Azure portal with your user.
[ktenzer@ktenzer ansible-azure]$ azure group list --subscription <subscription id>
 info: Executing command group list
 + Listing resource groups
 data: Name Location Provisioning State Tags:
 data: ------------- ---------- ------------------ -----
 data: OpenShift_POC westeurope Succeeded null
 data: Shared westeurope Succeeded null
 info: group list command OK
Install Ansible Core
# sudo dnf install ansible
Clone OpenShift Azure Ansible Playbooks
# git clone https://github.com/ivanthelad/ansible-azure.git
Update Playbook parameters
# cd ansible-azure
# cp group_vars/all_example group_vars/all
# vi group_vars/all
resource_group_name: <new resource group name>
## Azure AD user.
ad_username: <Azure user e.g. keith.tenzer@domain.onmicrosoft.com>
### Azure AD password
ad_password: <Azure Password>
#### Azure Subscription ID
subscriptionID: "<subscription id from Azure>"
## user to login to the jump host. this user will only be created on the jumphost
adminUsername: <username e.g. ktenzer>
## user pwd for jump host
## Password for the jump host
adminPassword: <password>
##### Public key for jump host
### Access to environment only allowed through jumphost
sshkey: <ssh key e.g. cat /home/ktenzer/.ssh/id_rsa.pub>

# see https://azure.microsoft.com/en-us/documentation/articles/cloud-services-sizes-specs/
### Size for the master
master_vmSize: Standard_DS3_v2
#master_vmSize: Standard_D2_v2
#master_vmSize: Standard_D1_v2

### Size for the nodes
node_vmSize: Standard_DS3_v2
#node_vmSize: Standard_D2_v2
#node_vmSize: Standard_D1_v2

#### Region to deploy in
region: westeurope

## docker info
docker_storage_device: /dev/sdc
create_vgname: docker_vg
filesystem: 'xfs'
create_lvsize: '80%FREE'
#create_lvsize: '2g'

#### subscription information
rh_subscription_user: <Red Hat Subscription User>
rh_subscription_pass: <Red Hat Subscription Password>
openshift_pool_id: <Red Hat Subscription Pool Id>

########### list of node ###########
### Warning, you currently cannot create more infra nodes ####
### this will change in the future
### You can add as many nodes as you want
#####################################
jumphost:
 jumphost1:
 name: jumphost1
 tags:
 region: westeurope
 zone: jumphost
 stage: jumphost

masters:
 master1:
 name: master1
 tags:
 region: westeurope
 zone: infra
 stage: none
 master2:
 name: master2
 tags:
 region: westeurope
 zone: infra
 stage: none
 master3:
 name: master3
 tags:
 region: westeurope
 zone: infra
 stage: none

infranodes:
 infranode1:
 name: infranode1
 tags:
 region: westeurope
 zone: infra
 stage: dev
nodes:
 node1:
 name: node1
 tags:
 region: westeurope
 zone: app
 stage: dev
 node2:
 name: node2
 tags:
 region: westeurope
 zone: app
 stage: dev
Run Ansible Playbook
# ansible-playbook --forks=50 -i inventory.azure playbooks/setup_multimaster.new.yml
Connect to OpenShift environment
In order to connect to OpenShift environment you need to access jump box. The public IP of jumpbox will be set during playbook run, simply look at outputs to get the public IP for jumpbox.
Connect to jumphost
# ssh -i /home/ktenzer/.ssh/id_rsa.pub ktenzer@<jumphost public IP>
Connect to master1
There are three masters and you can connect and manage environment from any of them.
[ktenzer@jumphost1 ~]$ ssh master1
Login as built-in system:admin user
[ktenzer@master1 ~]$ oc login -u system:admin
List OpenShift nodes
[ktenzer@master1 ~]$ oc get nodes
NAME                                                       STATUS AGE
infranode1.KgsZ98734738nshjdsj2.ax.internal.cloudapp.net   Ready  34d
master1.KgsZ98734738nshjdsj2.ax.internal.cloudapp.net      Ready 34d
master2.KgsZ98734738nshjdsj2.ax.internal.cloudapp.net      Ready 34d
master3.KgsZ98734738nshjdsj2.ax.internal.cloudapp.net      Ready 34d
node1.KgsZ98734738nshjdsj2.ax.internal.cloudapp.net        Ready 34d
node2.KgsZ98734738nshjdsj2.ax.internal.cloudapp.net        Ready 34d
The deployment defaults to a highly available three master node OpenShift cluster. It also deploys three nodes, one for infrastructure and other two for applications. Ideally you would want a second infrastructure node so infrastructure services such as routing, image registry, logging and metrics are also highly available. Adding additional nodes is simply a matter of updating the playbook and re-running it. In addition changing OpenShift configuration is also just matter of updating playbook and re-running it.
In order to access the UI get the public URL from the master configuration file. When accessing the public URL traffic is balanced across all three OpenShift master servers.
[root@master1 ~]# cat /etc/origin/master/master-config.yaml |grep masterPublicURL
masterPublicURL: https://master-<Resource Group>.westeurope.cloudapp.azure.com:8443
Azure AD Authentication
OpenShift like most platforms has two layers that govern access to the environment. Authentication grants a user access to the platform and authorization gives a user privileges within the environment. OpenShift supports many authentication providers. In the case of Azure AD openId is used for authentication and OpenShift offloads authentication entirely to Azure AD. Any user permitted to access the OpenShift authentication application in Azure AD is permitted to login to the OpenShift environment. Once a user in Azure AD authenticates to OpenShift, privileges can be given at project level to allow the user access within the environment. We will first configure Azure AD by setting up an authentication application and then allowing access within Azure. Once that is configured we will go through steps to allow OpenShift to use the Azure AD authentication application. Finally we will show how user management works within OpenShift when using Azure AD as authentication provider.
Configure Azure AD Application for OpenShift
The following steps describe how to create an Azure WebApp as your authentication barrier, before accessing the OpenShift Admin portal.
Since you already have installed OpenShift into Azure the normal disclaimers about getting a subscription do not apply here. In case you are just reading through and want to do more in Azure this is the link: http://www.Azure.com
Create Application
To create the application, log in to the Azure portal https://portal.azure.com and click on the plus symbol (1), then on Web + mobile (2) and finally on Web App (3).

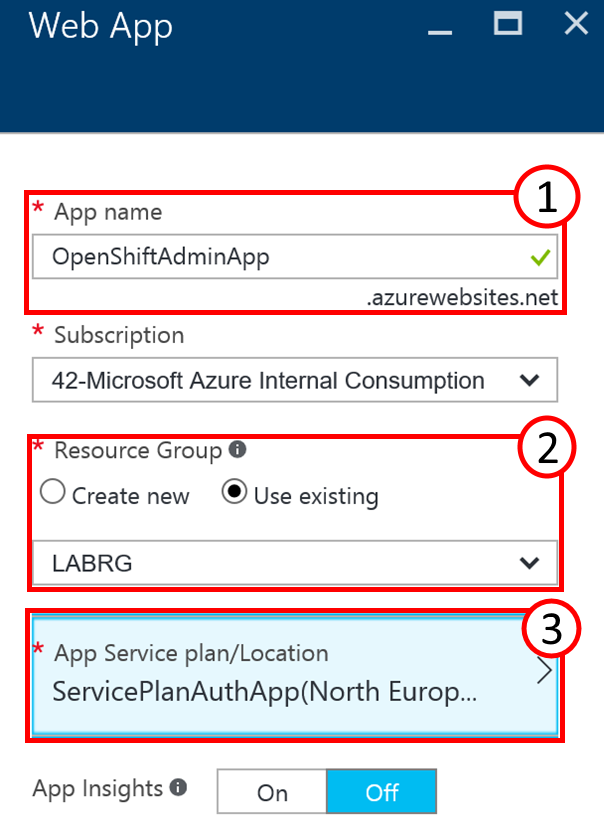
This will open another part on the screen that needs to be filled with further details about the new Web App. These parts are called blades and are used in the Azure portal to present details and configuration options. The first box takes (1) the application name that will become part of the DNS Name of the application. It needs to be unique within the namespace of azurewebsites.net. Your subscription in the following dropdown should be pre-filled. The next option, Resource Group, should be set to“Use existing” from the dropdown (2) and should point to the resource group where your OpenShift installation resides. Special attention is needed for the App Service plan and its location (3). The default location may need adjustment. Click on the tile to configure your service plan. After that click on create at the bottom of the blade to create your Web App. You may want to tick the checkbox “Pin to dashboard” for easier access later.
Enable Authentication for Application
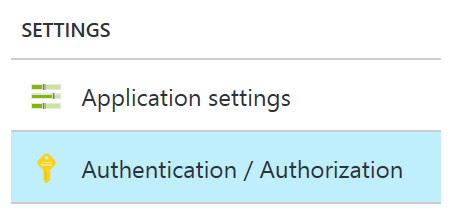
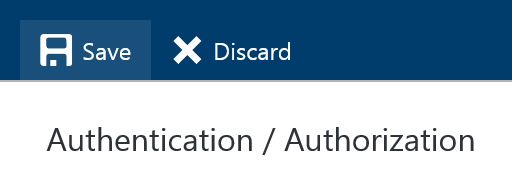
When your application has been deployed click on it to access its blade and continue with the configuration by clicking on Authentication/Authorization in the settings.
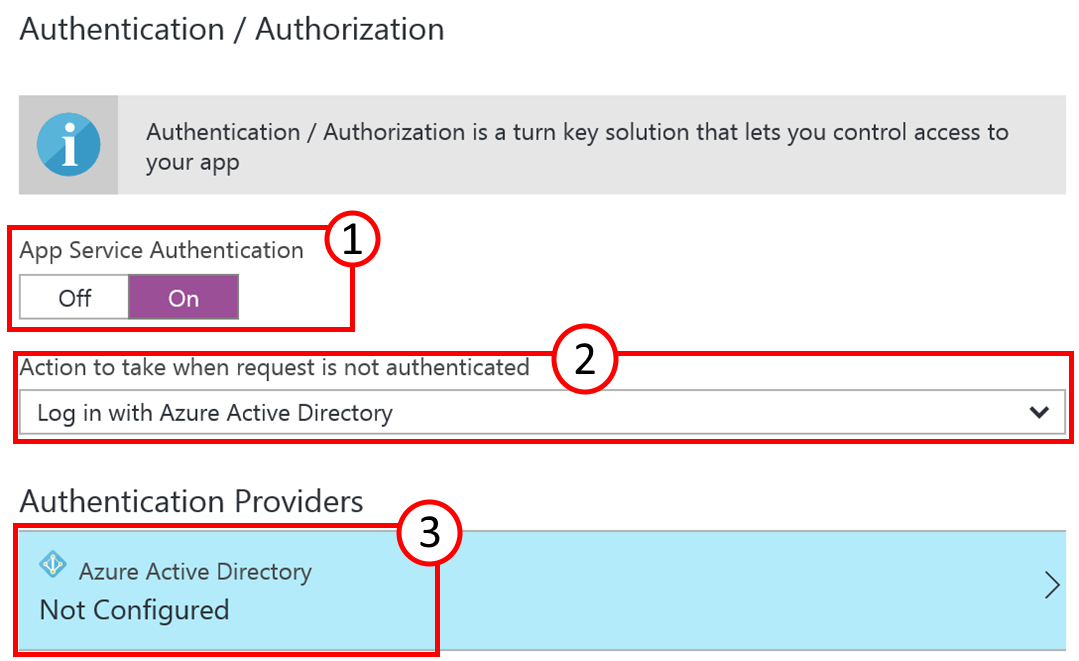
The right side of the blade will change and you can click on the button for App Service Authentication (1) to turn it on. The dropdown for the Authentication providers should show “Log in with Azure Active Directory” (2). Click on the tile below (3) to configure the Azure Active Directory details.
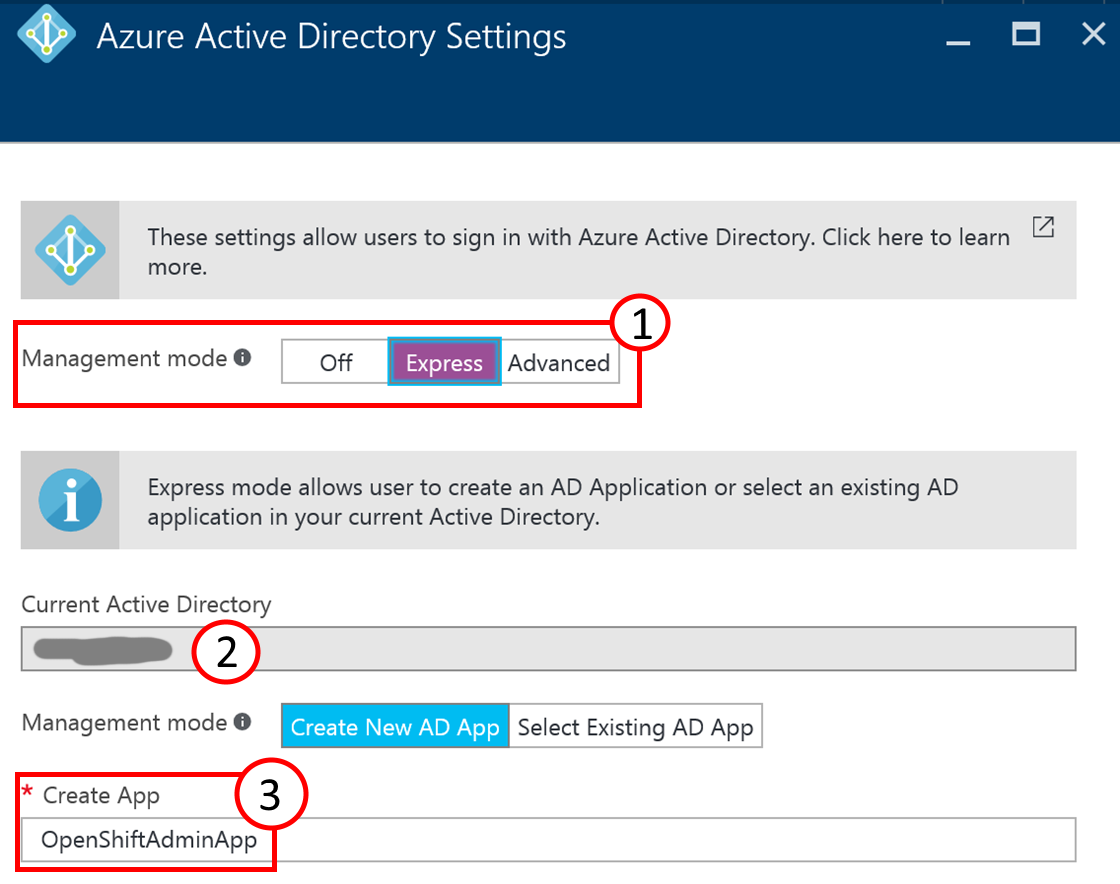
In the Azure Active Directory Settings dialog select the Management mode option (1) “Express”. The Current Active Directory (2) should read your own Azure Active Directory name. In the lower part of the dialog the button “Create New AD App” is pre-selected and you can provide an additional application name under “Create App”. By default it can be the same as the Web App name. After that click on OK at the bottom of the blade.

Don’t forget to click on Save at the top of the blade.
Now that the Web App part is finished you can close all the blades and return to the dashboard. The next steps are done in the new Azure Active Directory blade.

Configure Azure AD for Application
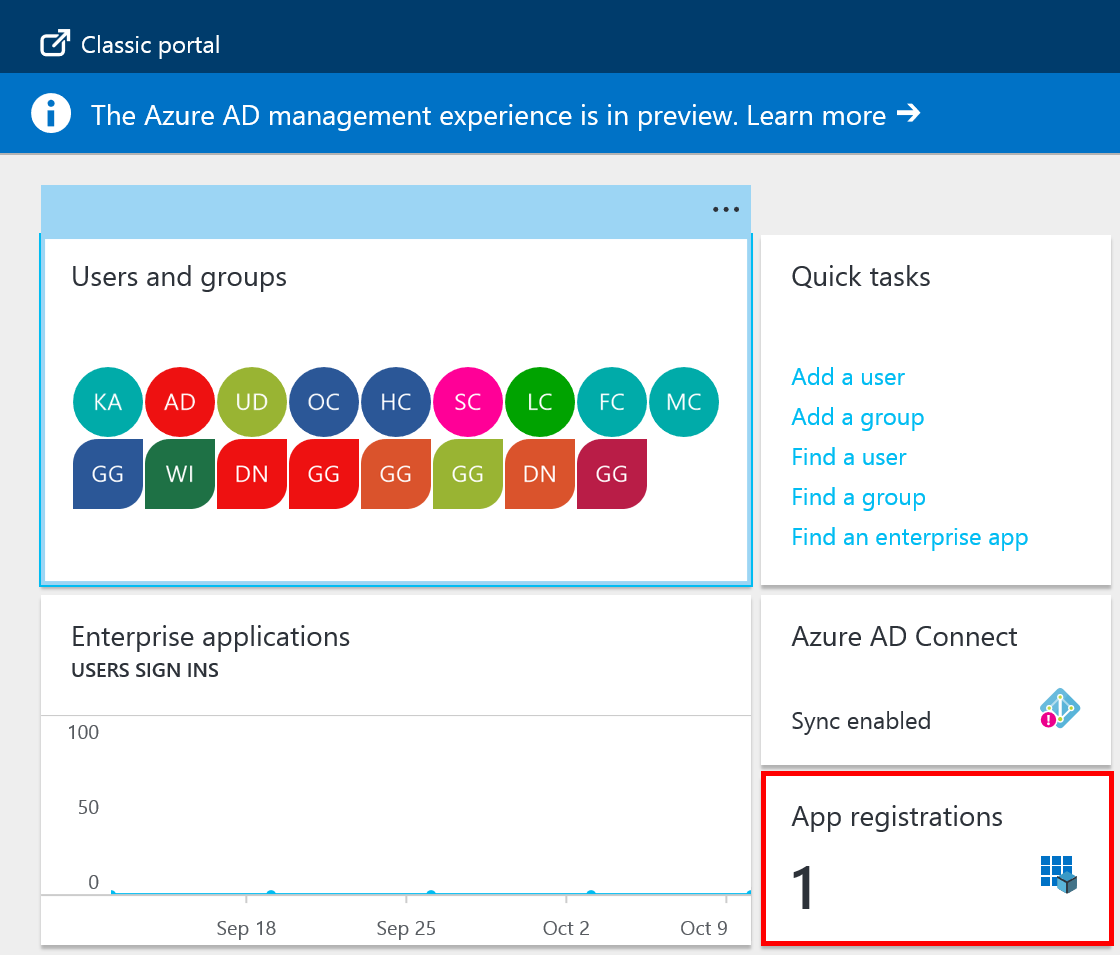
When you click on it the new blade should open with your existing Azure Active Directory details and the tile App registrations should read “1”. Click on that tile to continue.
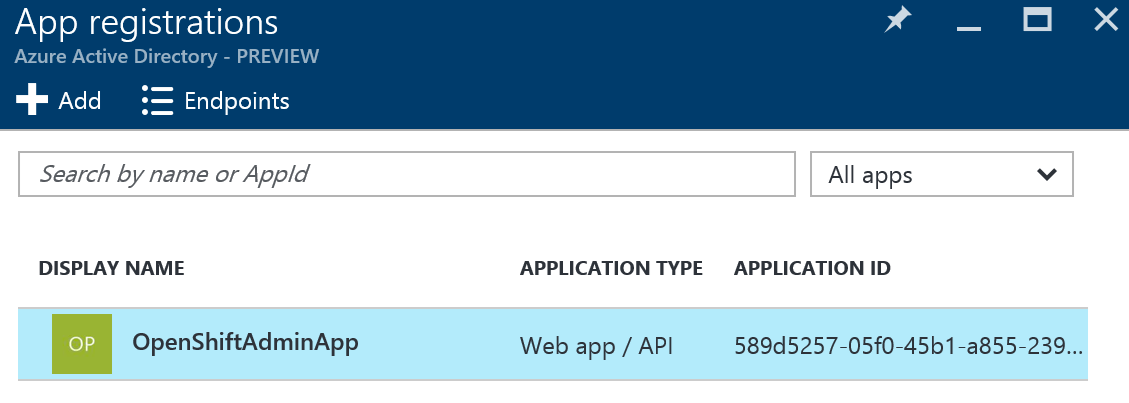
Click on Endpoints in order to retrieve the Azure Tenant Id. It is the number after the https://login.windows.net part. Take note of the tenant id as it is needed in the OpenShift configuration. Click on the Application you configured in the step before to access its details and configuration options.
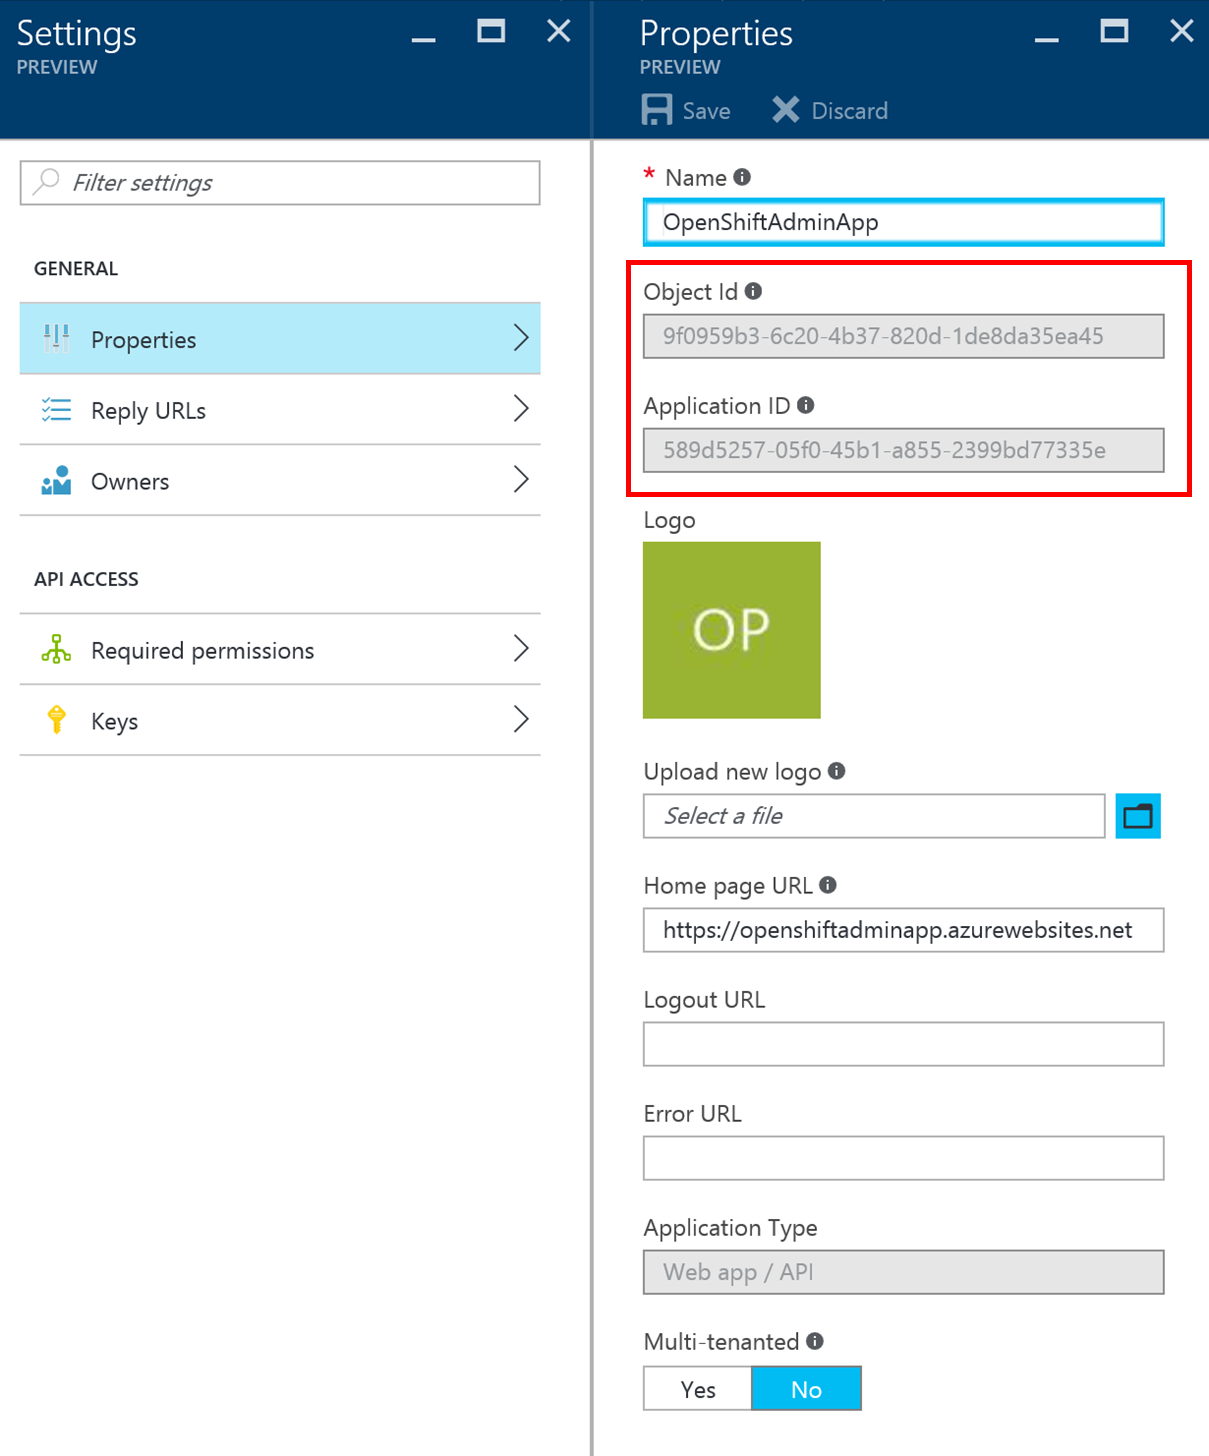
In the settings blade of your app click on Properties (1) to access the applications Application ID. You need this information as well to configure OpenShift to make use of the Azure AD authentication.
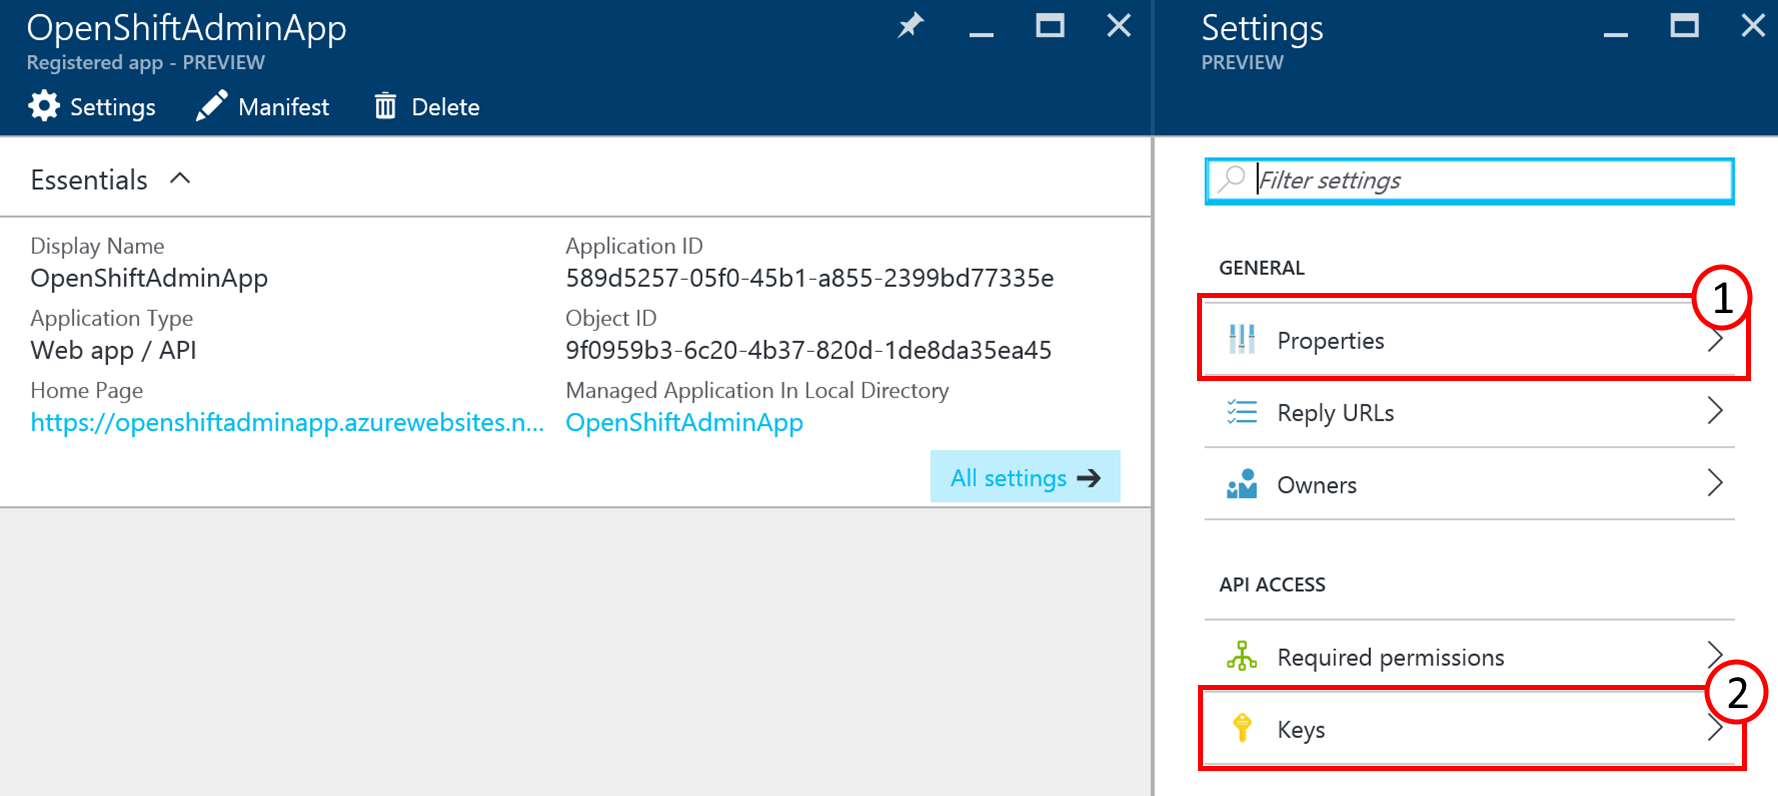
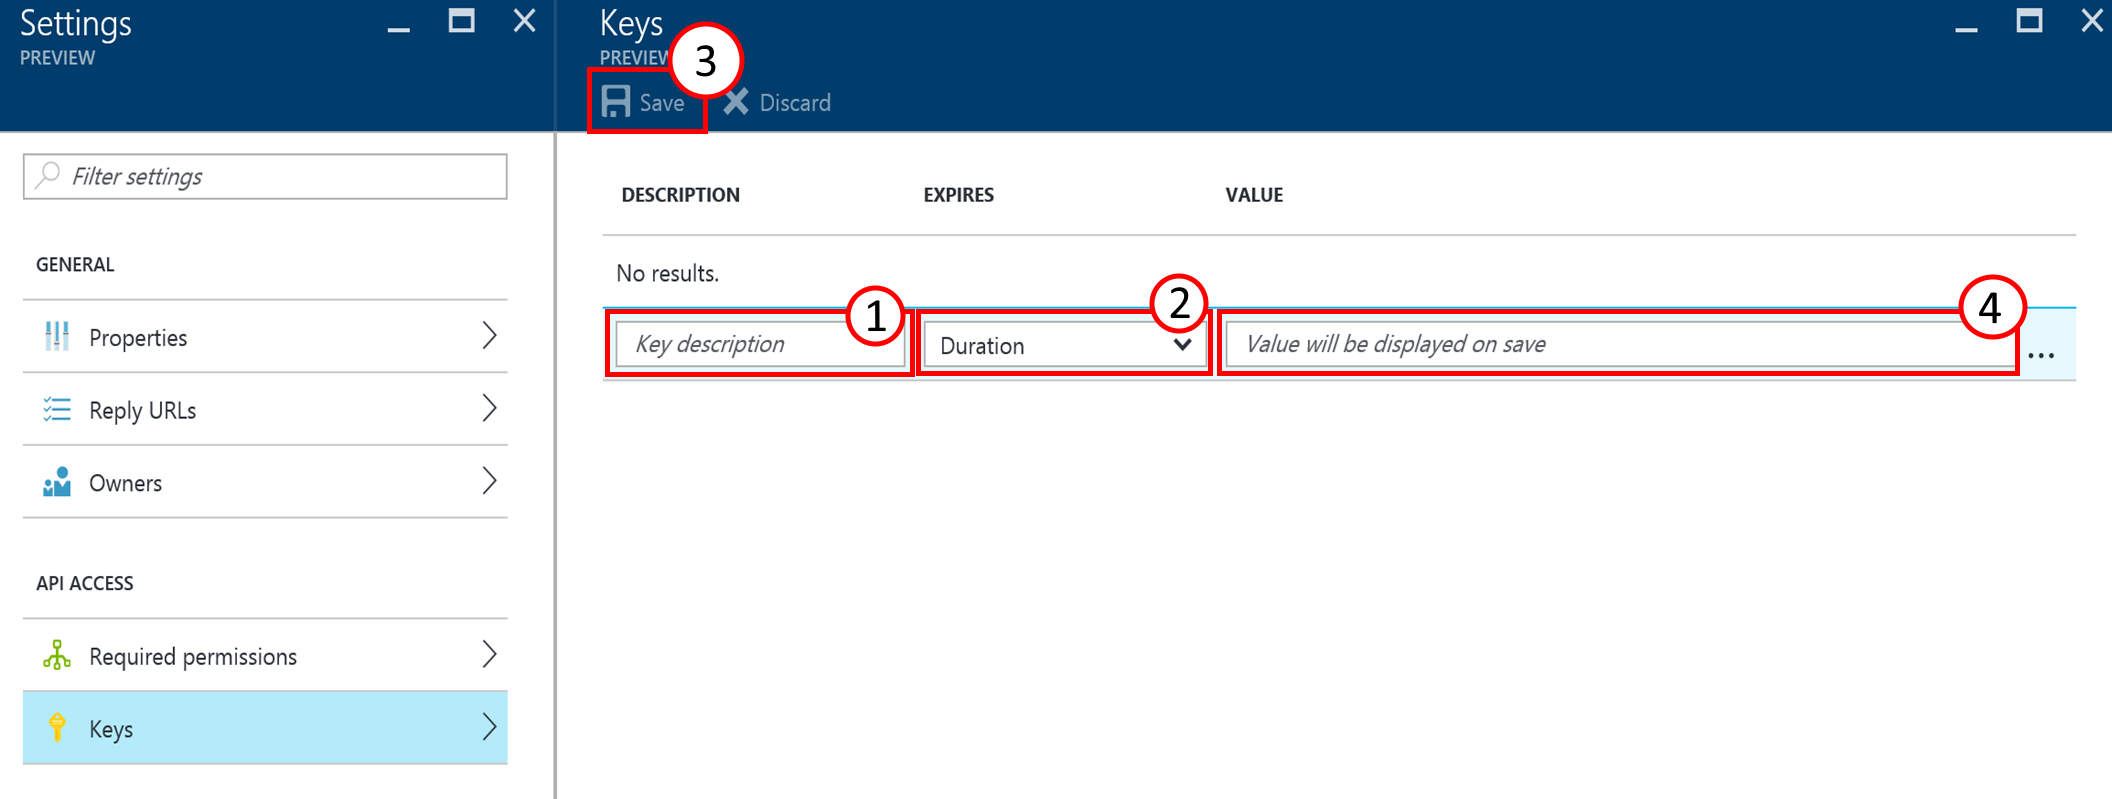
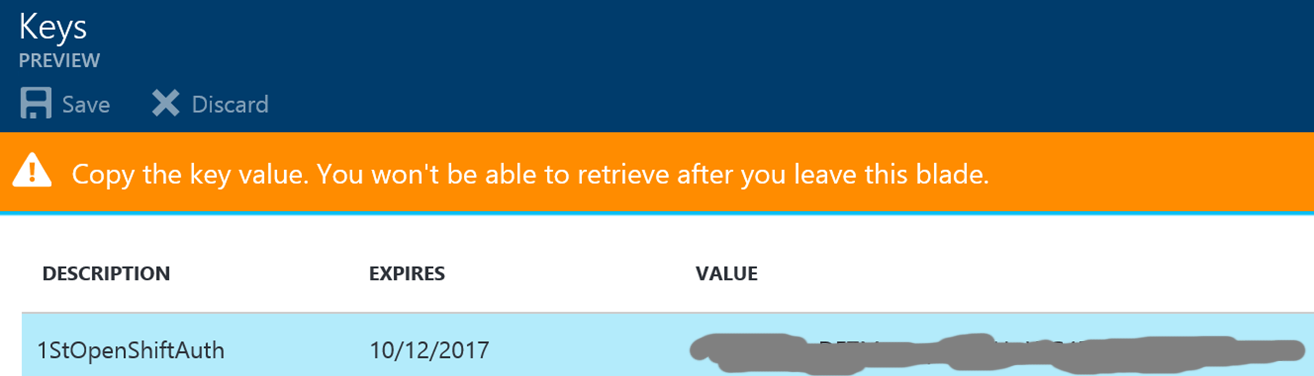
Close the Properties blade and click on Keys (2) in the Settings blade to create an individual access key. This key is also needed for the OpenShift configuration. Add a key description (1), select a duration of one or two years or even unlimited live time under (2) and click on save. Pay special attention to the warning displayed about the key that is now shown in the value (4). Copy that key and verify that it is stored properly somewhere else before leaving that blade!
In general, when you add the gathered information into OpenShift, all access to the URL of the installation will now be verified through Azure Active Directory authentication. In case you want to limit the usage to a certain group of users or even individual users you can configure this also but currently only in the Classic Azure portal under https://manage.windowsazure.com.
You may have to sign out and sign in again to access the portal. Once you have signed in, scroll to the Azure Active directory icon and click on the name of your Azure AD to access the dashboard.

Enable User Access to Applications Azure AD
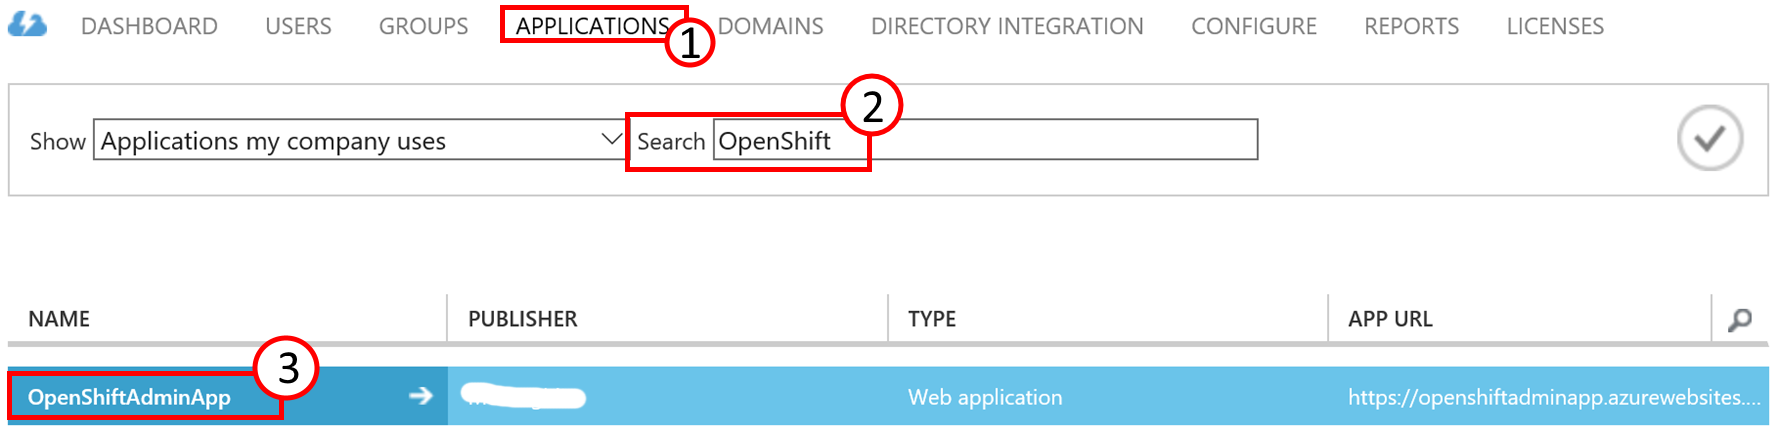
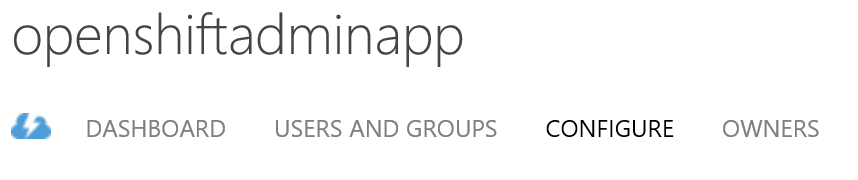
Click on APPLICATIONS (1), search (2) for your application in case there are more than one and click on your applications name (3) to go to its properties.
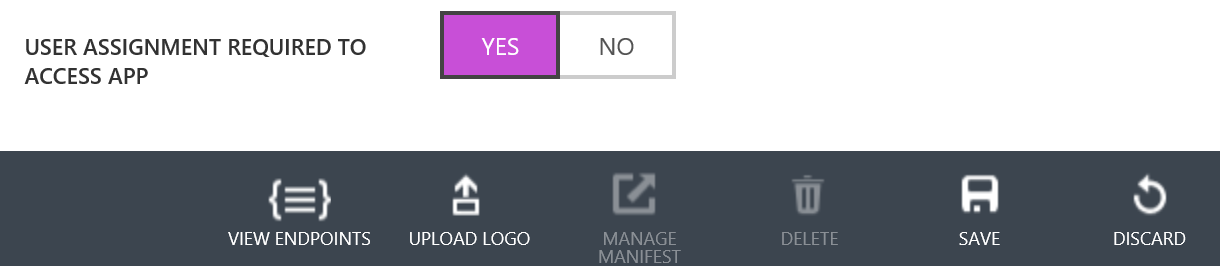
In the properties click on “CONFIGURE” and toggle the button “USER ASSIGNMENT REQUIRED TO ACCESS APP” to “YES” and click on “SAVE” at the bottom of the page.
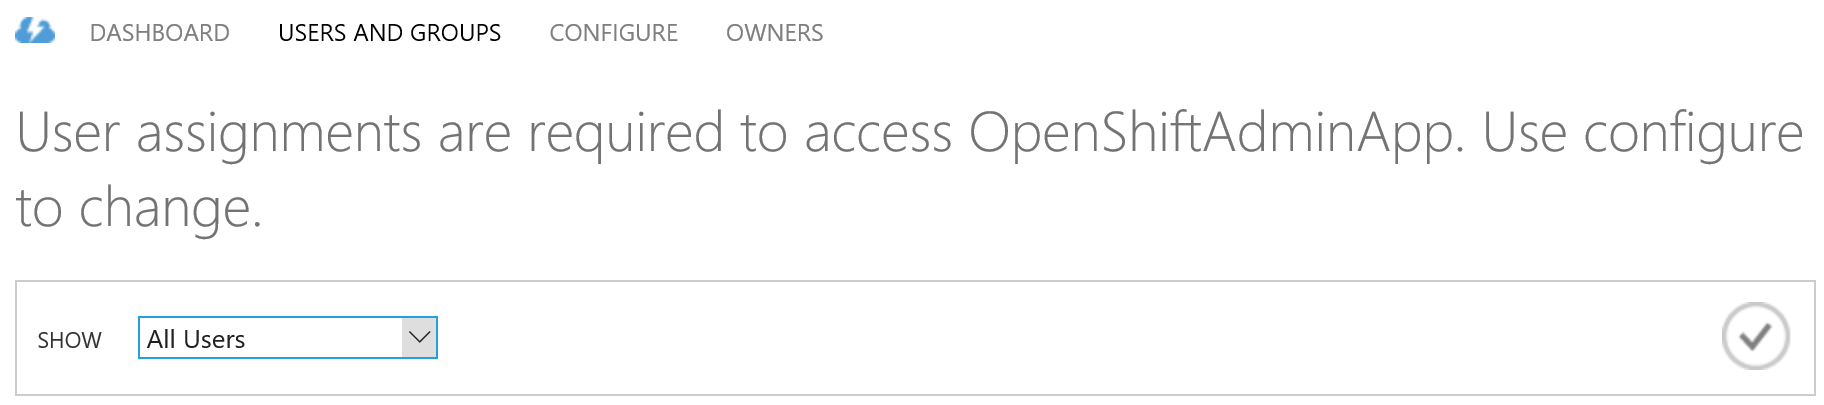
Now that the application is toggled users and/or groups need to be assigned to it. You configure that under “USERS AND GROUPS” on the same page.
Select one of your users, click on assign at the bottom of the page and confirm the dialog. Verify the access by opening a new browser window in private mode and navigate to the OpenShift URL. You should be prompted with an authentication dialog from your Azure AD.


Configure OpenShift for Azure AD Authentication
OpenShift supports many identity providers. In this case we are using OpenId to authenticate users against Azure AD. In order to configure Azure AD authentication in OpenShift the following information from Azure AD is required:
- Tenant Id - The tenant id from any of the endpoint URLs
- Client Id - The Application Id from Azure AD Application
- Client Secret Key - The key that was created for the Application in Azure AD
Configure OpenId Provider
This information should have been captured from the steps above. On all three OpenShift masters edit the master configuration and add openId provider.
[root@master1 ~]# vi /etc/origin/master/master-config.yaml
identityProviders:
 - name: openId
 challenge: false
 login: true
 mappingMethod: claim
 provider:
 apiVersion: v1
 kind: OpenIDIdentityProvider
 clientID: <client id>
 clientSecret: <client secret key>
 claims:
 id:
 - sub
 preferredUsername:
 - preferred_username
 name:
 - name
 email:
 - email
 urls:
 authorize: https://login.microsoftonline.com/<tenant id>/oauth2/authorize
 token: https://login.microsoftonline.com/<tenant id>/oauth2/token
Restart OpenShift on all masters.
[root@master1 ~]# systemctl restart atomic-openshift-master-api
[root@master1 ~]# systemctl restart atomic-openshift-master-controllers
[root@master2 ~]# systemctl restart atomic-openshift-master-api
[root@master2 ~]# systemctl restart atomic-openshift-master-controllers
[root@master3 ~]# systemctl restart atomic-openshift-master-api
[root@master3 ~]# systemctl restart atomic-openshift-master-controllers
Login as Azure AD user
Using the GUI
Verify the access by opening a new browser window in private mode and navigate to the OpenShift URL https://master-Resource-Group.westeurope.cloudapp.azure.com:8443. You should be prompted with an authentication dialog of your Azure AD.
Using the CLI
[root@master1 ~]# oc login -u keith.tenzer@mydomain.onmicrosoft.com -n default
Login failed (401 Unauthorized)
You must obtain an API token by visiting https://master-Resource_Group.westeurope.cloudapp.azure.com:8443/oauth/token/request
[root@master1 ~]# oc login --token=0h9tKLlTicyAr5dYIgW5xiejiMVHIvltEuX6LLVW8CY --server=https://master-Resource-Group.westeurope.cloudapp.azure.com:8443
 Logged into "https://master-<resource group>.westeurope.cloudapp.azure.com:8443" as "G374shPb01h2jwssdjhGhghsghGHJSK" using the token provided.
Notice that the user is actually known to OpenShift is "G374shPb01h2jwssdjhGhghsghGHJSK" not keith.tenzer@mydomain.onmicrosoft.com
List OpenShift users
Once Azure AD users login they are automatically added to OpenShift.
[root@master ~]# oc get users
 NAME                                        UID                                   FULL NAME    IDENTITIES
 G374shPb01h2jwssdjhGhghsghGHJSK             1245fec9f-598f-1656-12as-123g4g936742 Keith Tenzer openId:G374shPb01h2jwssdjhGhghsghGHJSK
List OpenShift identities
[root@master ~]# oc get identity
NAME                                               IDP    NAME                                       IDP USER NAME                   USER NAME                                   USER UID
openId:G374shPb01h2jwssdjhGhghsghGHJSK             openId FGnyqZlyGFzNCI99feUypSdEoNapBAJ03tg5MWlDSZ G374shPb01h2jwssdjhGhghsghGHJSK 1245fec9f-598f-1656-12as-123g4g936742
Give Azure AD user cluster-admin permission
[root@master ~]# oadm policy add-cluster-role-to-user cluster-admin "G374shPb01h2jwssdjhGhghsghGHJSK"
Give user permission to project
[root@master ~]# oadm policy add-role-to-user admin "G374shPb01h2jwssdjhGhghsghGHJSK" -n test
Remove Azure AD user from OpenShift
Delete user
[root@master ~]# oc delete user G374shPb01h2jwssdjhGhghsghGHJSK
Delete identity
[root@master ~]# oc delete identity openId:G374shPb01h2jwssdjhGhghsghGHJSK
Summary
In this article we have detailed how to standup a production-ready OpenShift environment automatically, before your coffee gets cold in the Azure Cloud. We have seen how to integrate OpenShift into Azure AD for authentication. There is no doubt, container platforms are the future for applications. Container technology enables application to be developed and deployed at much faster speeds, greatly improving a organizations ability to innovate and connect to it's market segment. Many enterprises are interested in getting their hands on these technologies and evaluating them rather quickly. There is no faster way then standing up OpenShift in the Azure cloud! We hope you found this article interesting and look forward to your feedback.
Happy OpenShifting in the Azure Cloud!
(c) 2016 Keith Tenzer and Rolf Masuch