
Automated Infrastructure in the On-Premise Datacenter - OpenShift 4.2 on OpenStack 15 (Stein)


Overview
In this article we start a new journey, automated infrastructure in the on-premise datacenter. We will deploy OpenShift 4.2 on OpenStack. As I am sure you are aware, OpenShift is Red Hat's enterprise kubernetes platform. Kubernetes is of course the brains but by itself is not a platform. OpenShift brings with kubernetes, monitoring, aggregate logging, container registry, security, automated deployment/upgrade, developer experience, huge middleware tooling built around JBoss, serverless frameworks, ISTIO (service mesh), CI/CD integration and the key word "ENTERPRISE".
OpenShift 4 brings with it, one thing that I feel is a breakthrough in our industry. It is the single feature I am most excited about and one of the reasons OpenShift 4 was re-designed, Installer Provision Infrastructure (IPI). Using IPI, OpenShift is capable of not only installing itself but deploying as well as managing the underlying infrastructure needed, from compute, to storage and network. Further using IPI OpenShift can also update, even upgrade itself over the air. This is a huge step forward in platform intelligence and where we need to be to deal with today's complexity.
Users can also still opt for User Provisioned Infrastructure (UPI), if they want to bring their own infrastructure, deal with micro-managing everything and waste a lot of time but why? Yeah I thought so too.
Up until now IPI has only supported public clouds: AWS, Azure and Google. Now with OpenShift 4.2 it is supporting OpenStack. For the first time we can bring IPI into the on-premise Datacenter where it is IMHO most needed. This single feature has the potential to revolutionize on-premise environments and bring them into the cloud-age with a single click and that promise is truly something to get excited about!
Pre-requisites
Before we start the installation it is important to understand some pre-requisites and how to properly configure them.
Deploy OpenStack
I have provided a guide for deploying OpenStack Stein (RHOSP 15) using packstack on Hetzner root servers here. Even if you aren't using a Hetzner root server this guide can help you spin up a demo OpenStack environment using RDO packstack. If you have Red Hat OpenStack Platform (RHOSP) 15 even better!
Configure External DNS
If you have problems later, this will likely be the cause, trust me from experience, get your DNS sorted from the beginning.
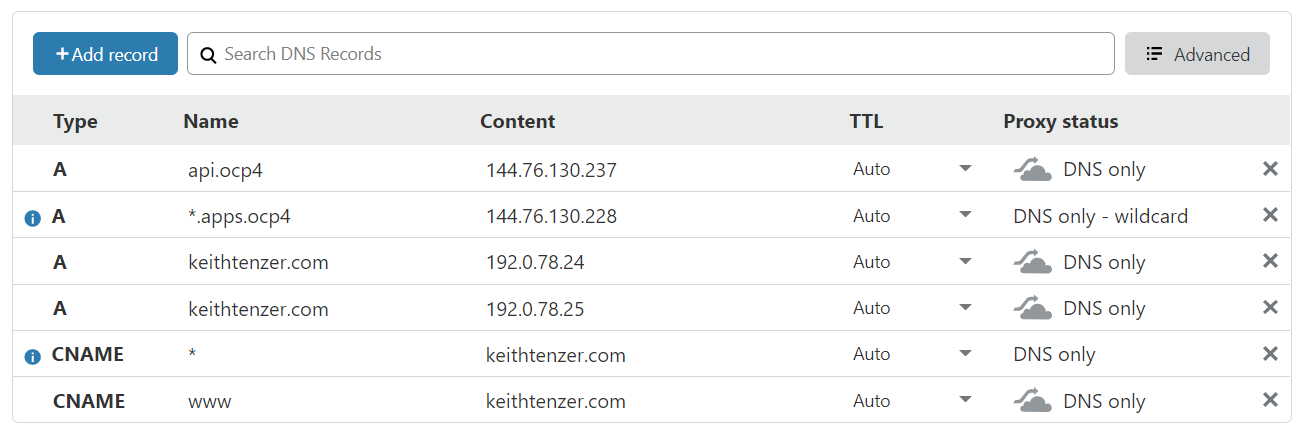
You will need a DNS domain, mine is keithtenzer.com. Once you have a domain you need to manage it somewhere. I can recommend cloudflare, they even have a free tier. Once you have that you need to create two A records under the domain (keithtenzer.com).
api.ocp4 144.76.130.237
The OpenShift installer will ask for a floating ip for API traffic. This is required to install OpenShift. The OpenShift installer will configure an ingres port in OpenStack and use keepalived across the masters.
*.apps.ocp4 144.76.130.228
A DNS wildcard is used to send all application traffic to another IP. An additional IP is needed because the OpenShift router operator (ha-proxy) is responsible for handling application traffic not the API operator. The installer will also not automatically configure this floating ip on the ingress port like it does for API. That needs to be done after the installation.
The diagram below shows my DNS configuration.
OpenStack Configuration
To deploy OpenShift we will need an external (floating ip) network, a compute flavor and setup a project properly.
In order to create an floating ip network you need a subnet of physical IPs that can communicate with the outside world. They don't have to be public but need to be routable to whatever is the "outside world", meaning outside of OpenStack.
In this example we have a flat internet routable network 144.76.130.224/28.
Authenticate to OpenStack
# source /root/keystonerc_admin
Create public network
(keystone_admin)]# openstack network create --provider-network-type flat \
--provider-physical-network extnet2 --external public
Create public subnet
(keystone_admin)]# openstack subnet create --network public \
--allocation-pool start=144.76.130.226,end=144.76.130.238 --no-dhcp \
--subnet-range 144.76.130.224/28 public_subnet
Create OpenStack flavor for OpenShift nodes
(keystone_admin)]# openstack flavor create --ram 16384 --disk 25 \
--vcpu 4 --public ocp.controller
Setup Project
(keystone_admin)]# openstack project create openshift_4
(keystone_admin)]# openstack quota set --ram -1 --cores -1 openshift_4
(keystone_admin)]# openstack quota set --secgroups 3 --secgroup-rules 60 \
openshift_4
(keystone_admin)]# openstack user create --password '<password>' \
openshift_admin
(keystone_admin)]# openstack role add --project openshift_4 --user \
openshift_admin admin
(keystone_admin)]# openstack role add --user openshift_admin --project \
openshift_4 swiftoperator
Create project RC file
# vi keystonerc_openshift_admin
unset OS_SERVICE_TOKEN
export OS_USERNAME=openshift_admin
export OS_PASSWORD='<password>'
export OS_REGION_NAME=RegionOne
export OS_AUTH_URL=http://136.243.43.239:5000/v3
export PS1='[\u@\h \W(keystone_openshift_admin)]\$ '

export OS_PROJECT_NAME=openshift_4
export OS_USER_DOMAIN_NAME=Default
export OS_PROJECT_DOMAIN_NAME=Default
export OS_IDENTITY_API_VERSION=3
Authenticate to OpenShift user
(keystone_admin)]# source /root/keystonerc_openshift_admin
Set temporary key for Swift
The Container OS ignite configuration file used for bootstrapping is stored in Swift (OpenStack Object Store). This allows for URL access using a temporary key.
(keystone_openshift_admin)]# openstack object store account set --property \
Temp-URL-Key=redhat
Download Red Hat OpenStack Container OS image
You can download the Red Hat Container OS (rhcos) qcow2 image from access.redhat.com or this link for the 4.2 release. Once you have the image copy it over to your environment.
Create RHOS Image
First make sure you get the latest RHOS image. Check if the image is a compressed file once downloaded.
(keystone_openshift_admin)]# file rhcos-4.2.0-x86_64-openstack.qcow2
rhcos-4.2.0-x86_64-openstack.qcow2: gzip compressed data
(keystone_openshift_admin)]# mv rhcos-4.2.0-x86_64-openstack.qcow2 \
rhcos-4.2.0-x86_64-openstack.qcow2.gz
(keystone_openshift_admin)]# gunzip rhcos-4.2.0-x86_64-openstack.qcow2.gz
(keystone_openshift_admin)]# file rhcos-4.2.0-x86_64-openstack.qcow2
rhcos-4.2.0-x86_64-openstack.qcow2: QEMU QCOW Image (v3)
(keystone_openshift_admin)]# openstack image create rhcos \
--container-format bare --disk-format qcow2 --public --file \
/root/rhcos-4.2.0-x86_64-openstack.qcow2
Download OpenShift Installer, Command Line Tools and Pull Secret
You can download the installer, command line tools and pull secret at following URL: https://cloud.redhat.com/openshift/install. You will need the pull secret later.
Select your provider, in this case OpenStack.
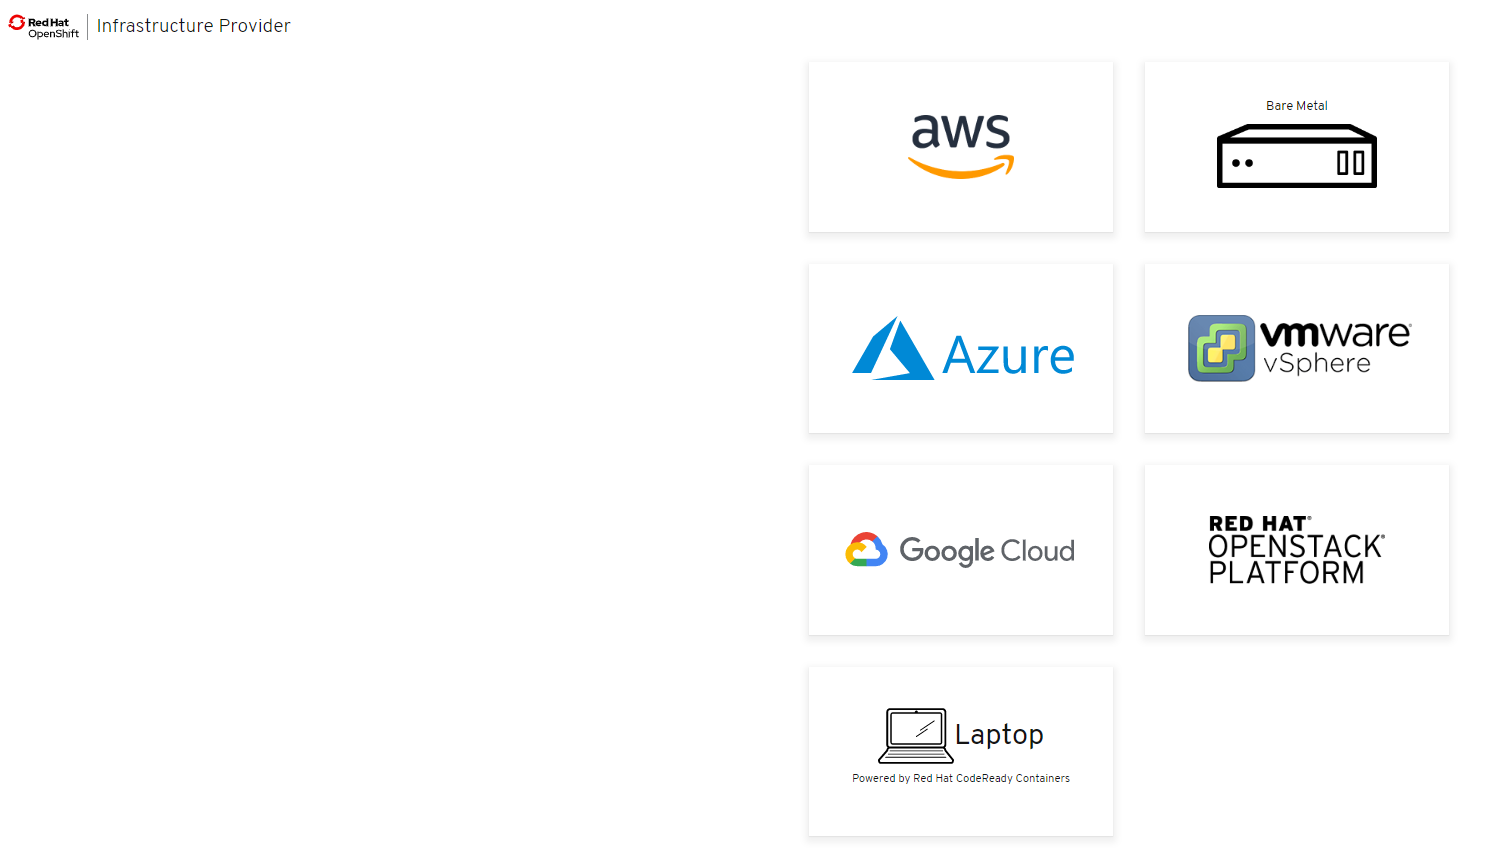
Download the installer, CLI and your pull secret.
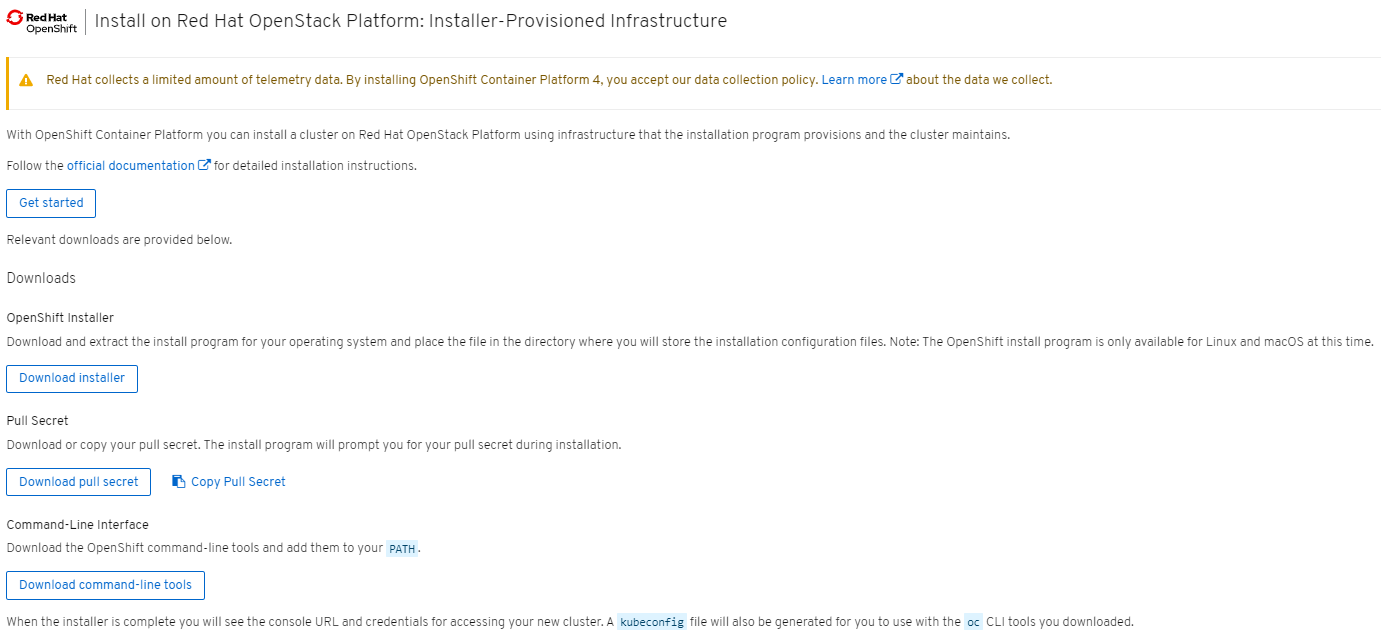
Once you have the installer and CLI tools downloaded, extract them into /usr/bin.
(keystone_openshift_admin)]# tar xvfz openshift-install-linux-4.2.0.tar.gz \
-C /usr/bin/
(keystone_openshift_admin)]# tar xvfz openshift-client-linux-4.2.0.tar.gz \
-C /usr/bin/
Create floating-ip for API
(keystone_openshift_admin)]# openstack floating ip create \
--floating-ip-address 144.76.130.237 public
(keystone_openshift_admin)]# openstack floating ip list
+--------------------------------------+---------------------+------------------+--------------------------------------+--------------------------------------+----------------------------------+
| ID | Floating IP Address | Fixed IP Address | Port | Floating Network | Project |
+--------------------------------------+---------------------+------------------+--------------------------------------+--------------------------------------+----------------------------------+
| fd98ca80-613f-4d36-819f-c5be66522439 | 144.76.130.234 | 10.10.1.186 | e17b2845-a4a2-44f1-8388-549a352a9fff | 0b8817e8-ffcc-4403-956c-eaadfb785e57 | 4e4c6f30c2c843258239efc5e699bec6 |
+--------------------------------------+---------------------+------------------+--------------------------------------+--------------------------------------+----------------------------------+
Configure OpenShift 4.2
Once OpenStack environment is setup properly and we have our external DNS sorted, the installation configuration for OpenShift can begin.
Get Project ID
The OpenStack project id is needed for the next section.
(keystone_openshift_admin)]# openstack project show openshift_4 -c id \
-f value
c36f0b1258fe447fbbbdcf6e2d2e4e0a
Configure clouds.yaml
OpenShift IPI can configure and manage multiple OpenShift on OpenStack clouds. In this section we will just configure one. All the information needed except the project id is available in the keystonerc file.
(keystone_openshift_admin)]# vi clouds.yaml
clouds:
  openstack:
    auth:
      auth_url: http://136.243.43.239:5000/v3
      project_name: openshift_4
      username: openshift_admin
      password: <password>
      user_domain_name: Default
      project_domain_name: Default
      project_id: c36f0b1258fe447fbbbdcf6e2d2e4e0a
Create Install Configuration
OpenShift IPI will create a directory with the installation configuration. The manifests and ignition configs can be optionally created, you should not have to change them but you could nevertheless.
(keystone_openshift_admin)]# openshift-install create install-config \
--dir=ocp_install
? SSH Public Key /root/.ssh/id_rsa.pub
? Platform openstack
? Cloud openstack
? ExternalNetwork public
? APIFloatingIPAddress 144.76.130.237
? FlavorName ocp.controller
? Base Domain keithtenzer.com
? Cluster Name ocp4
? Pull Secret [? for help] ************************************************
Update the installation
We will reduce the number of workers from three to two, set the region, disable octaviaSupport and trunkSupport.
(keystone_openshift_admin)]# vi ocp_install/install-config.yaml
---
- hyperthreading: Enabled
name: worker
platform: {}
replicas: 2
---
octaviaSupport: "0"
region: "RegionOne"
trunkSupport: "0"
---
Create Ignition files (optional)
In case you want to change something in the ignite configuration.
(keystone_openshift_admin)]# openshift-install create ignition-configs --dir
Create Installation Manifests (optional)
In case you want to change something in one of the manifests.
(keystone_openshift_admin)]# openshift-install create manifests --dir ./ocp_install/
Run the Installer
(keystone_openshift_admin)]# time openshift-install --log-level=debug \
create cluster --dir ocp_install
---
INFO Consuming "Install Config" from target directory
INFO Waiting up to 30m0s for the Kubernetes API at https://api.ocp4.keithtenzer.com:6443...
INFO API v1.14.6+2e5ed54 up
INFO Waiting up to 30m0s for bootstrapping to complete...
DEBUG Still waiting for the cluster to initialize: Working towards 4.2.0: 97% complete
DEBUG Still waiting for the cluster to initialize: Working towards 4.2.0: 98% complete
DEBUG Still waiting for the cluster to initialize: Working towards 4.2.0: 98% complete
DEBUG Still waiting for the cluster to initialize: Working towards 4.2.0: 99% complete, waiting on authentication, console, image-registry, ingress, monitoring, operator-lifecycle-manager-packageserver
DEBUG Still waiting for the cluster to initialize: Working towards 4.2.0: 99% complete
DEBUG Still waiting for the cluster to initialize: Working towards 4.2.0: 100% complete, waiting on authentication
DEBUG Cluster is initialized
INFO Waiting up to 10m0s for the openshift-console route to be created...
DEBUG Route found in openshift-console namespace: console
DEBUG Route found in openshift-console namespace: downloads
DEBUG OpenShift console route is created
INFO Install complete!
INFO To access the cluster as the system:admin user when using 'oc', run 'export KUBECONFIG=/root/ocp_install/auth/kubeconfig'
INFO Access the OpenShift web-console here: https://console-openshift-console.apps.ocp4.keithtenzer.com
Once the installation completes we still need to bind the floating-ip for application traffic to the ingres port in OpenStack. In OpenShift 4, everything is an operator, including the console. Accessing any applications will go through the OpenShift router using the wildcard domain. In our case we created *.apps.ocp4.keithtenzer.com with IP 144.76.130.228.
Create Floating-ip for Application Traffic
(keystone_openshift_admin)]# openstack floating ip create \
--floating-ip-address 144.76.130.228 public
Bind Floating-ip to Ingres Port
The port will be called <cluster name>-<clusterID>-ingress-port or in our case ocp4-lq2ww-ingress-port.
(keystone_openshift_admin)]# openstack floating ip set --port \
ocp4-lq2ww-ingress-port 144.76.130.228
At this point you should be able to connect to the console using the kubeadmin account and the password generated by the installer.
Destroy the cluster
Destroying the cluster is just as easy as creating one.
(keystone_openshift_admin)]# time openshift-install --log-level=debug \
destroy cluster --dir ocp_install
(keystone_openshift_admin)]# rm -rf ocp_install/
Validate the Environment
Using the CLI tools we will now authenticate and validate the environment.
Authenticate
To authenticate we simply need to export the kubeconfig created by the installer.
(keystone_openshift_admin)]# export KUBECONFIG=/root/ocp_install/auth/kubeconfig
List all nodes
We can list all controllers and workers and view their status.
(keystone_openshift_admin)]# oc get nodes
NAME                      STATUS   ROLES    AGE    VERSION
ocp4-lq2ww-master-0       Ready    master   166m   v1.14.6+c07e432da
ocp4-lq2ww-master-1       Ready    master   166m   v1.14.6+c07e432da
ocp4-lq2ww-master-2       Ready    master   166m   v1.14.6+c07e432da
ocp4-lq2ww-worker-kxnjh   Ready    worker   155m   v1.14.6+c07e432da
ocp4-lq2ww-worker-zhmfl   Ready    worker   155m   v1.14.6+c07e432da
Get Cluster Version
Shows not only the version but the cluster state.
(keystone_openshift_admin)]#  oc get clusterversion
NAME      VERSION   AVAILABLE   PROGRESSING   SINCE   STATUS
version   4.2.0     True        False         149m    Cluster version is 4.2.0
Get Cluster Operators
Remember in OpenShift 4, everything is an operator. Here we can view their individual status.
(keystone_openshift_admin)]# oc get clusteroperator
authentication                             4.2.0     True        False         False      150m
cloud-credential                           4.2.0     True        False         False      166m
cluster-autoscaler                         4.2.0     True        False         False      158m
console                                    4.2.0     True        False         False      153m
dns                                        4.2.0     True        False         False      165m
image-registry                             4.2.0     True        False         False      155m
ingress                                    4.2.0     True        False         False      156m
insights                                   4.2.0     True        False         False      166m
kube-apiserver                             4.2.0     True        False         False      164m
kube-controller-manager                    4.2.0     True        False         False      163m
kube-scheduler                             4.2.0     True        False         False      163m
machine-api                                4.2.0     True        False         False      166m
machine-config                             4.2.0     True        False         False      165m
marketplace                                4.2.0     True        False         False      158m
monitoring                                 4.2.0     True        False         False      154m
network                                    4.2.0     True        False         False      163m
node-tuning                                4.2.0     True        False         False      162m
openshift-apiserver                        4.2.0     True        False         False      161m
openshift-controller-manager               4.2.0     True        False         False      164m
openshift-samples                          4.2.0     True        False         False      158m
operator-lifecycle-manager                 4.2.0     True        False         False      165m
operator-lifecycle-manager-catalog         4.2.0     True        False         False      165m
operator-lifecycle-manager-packageserver   4.2.0     True        False         False      156m
service-ca                                 4.2.0     True        False         False      166m
service-catalog-apiserver                  4.2.0     True        False         False      162m
service-catalog-controller-manager         4.2.0     True        False         False      162m
storage                                    4.2.0     True        False         False      159m
List All Pods
Operators of course in the end, deploy pods which run containers. Using this command you can get the status of all pods in the cluster.
(keystone_openshift_admin)]# oc get pods -A
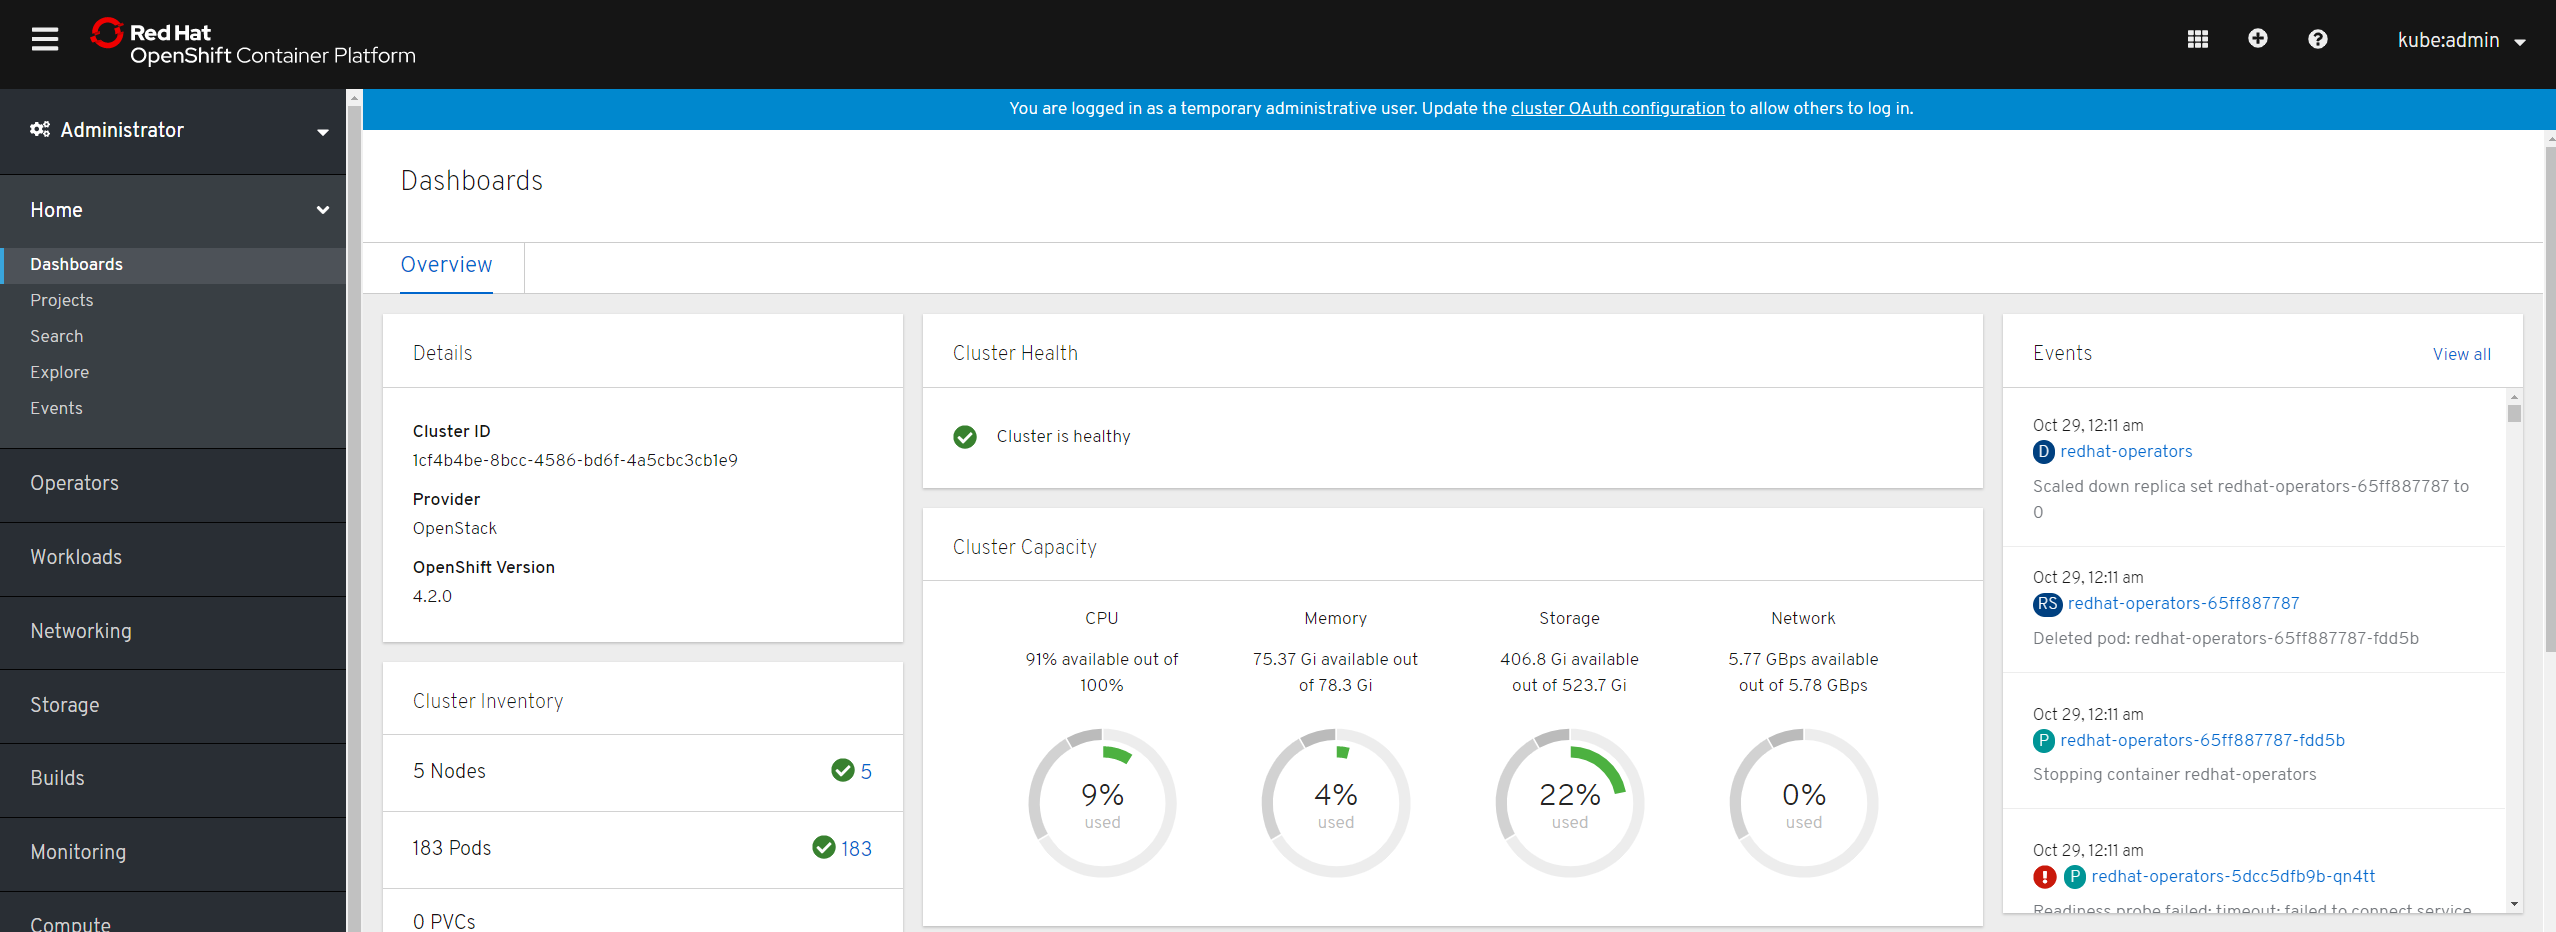
Subscribe Cluster
New in OpenShift 4 is a portal management for OpenShift clusters. Here you can see the overall status, manage subscriptions and even access the console.
Simply login to https://cloud.redhat.com/openshift/ using your credentials.

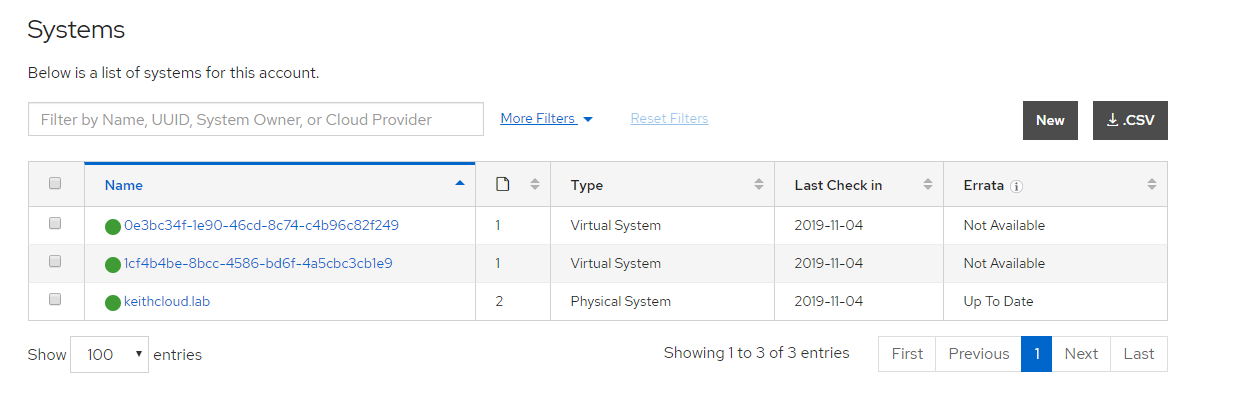
Here we can see that our newly provisioned cluster is not subscribe. To subscribe the cluster login to https://access.redhat.com/management/systems. Here you will see the compute nodes and can simply attach the OpenShift subscription.
Configure Htpasswd Identity Provider
OpenShift integrates with many identity providers. In the case of OpenStack, normally you would likely want to use Keystone. For test environments using htpasswd is also an option. To configure htpasswd we will create a user/password, store it in a secret and then configure the identity provider by creating a custom resource. In OpenShift 4, custom resource definitions are how you integrate other technologies with the platform in an API consistent way.
Create htpasswd file
# htpasswd -c -B -b /root/ocp.htpasswd admin <password>
Create Secret
# oc create secret generic htpass-secret \
--from-file=htpasswd=/root/ocp.htpasswd -n openshift-config
Create Custom Resource
# vi htpasswd-cr.yaml
apiVersion: config.openshift.io/v1
kind: OAuth
metadata:
  name: cluster
spec:
  identityProviders:
  - name: my_htpasswd_provider
    mappingMethod: claim
    type: HTPasswd
    htpasswd:
      fileData:
        name: htpass-secret
# oc apply -f htpasswd-cr.yaml
Add role cluster-admin to user
The admin user exists in our htpasswd identity provider but needs to be given permission in OpenShift.
# oc adm policy add-cluster-role-to-user cluster-admin admin
Login using admin user
# oc login -u admin
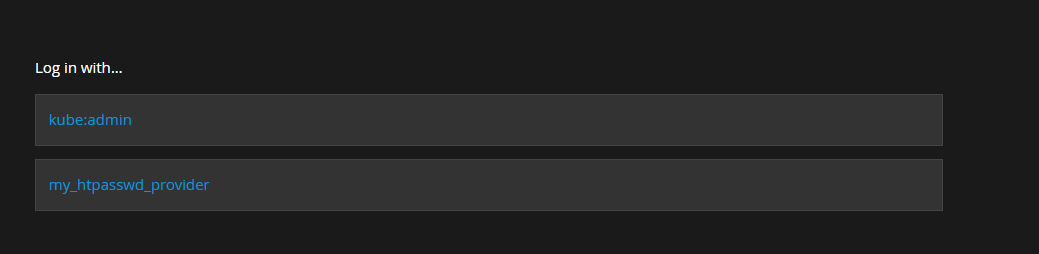
OpenShift 4 support multiple identity providers. Once we have added our htpasswd provider we need to select it when logging into the web console.
Adding Nodes and Changing Flavor
The beauty of the OpenStack Installer Provisioned Infrastructure (IPI) is you can easily scale nodes and even change their flavors.
First we can see what machine sets exist in OpenShift.
$ oc get machinesets -n openshift-machine-api
NAME                DESIRED   CURRENT   READY   AVAILABLE   AGE
ocp4-qchw8-worker   2         2         1       1           8d
Next we can see details of our machine set.
 oc get machinesets ocp4-qchw8-worker -n openshift-machine-api -o yaml
apiVersion: machine.openshift.io/v1beta1
kind: MachineSet
metadata:
  creationTimestamp: "2020-01-20T12:52:43Z"
  generation: 1
  labels:
    machine.openshift.io/cluster-api-cluster: ocp4-qchw8
    machine.openshift.io/cluster-api-machine-role: worker
    machine.openshift.io/cluster-api-machine-type: worker
  name: ocp4-qchw8-worker
  namespace: openshift-machine-api
  resourceVersion: "3797711"
  selfLink: /apis/machine.openshift.io/v1beta1/namespaces/openshift-machine-api/machinesets/ocp4-qchw8-worker
  uid: c0183898-3b83-11ea-9ccb-fa163e99d432
spec:
  replicas: 2
  selector:
    matchLabels:
      machine.openshift.io/cluster-api-cluster: ocp4-qchw8
      machine.openshift.io/cluster-api-machineset: ocp4-qchw8-worker
  template:
    metadata:
      creationTimestamp: null
      labels:
        machine.openshift.io/cluster-api-cluster: ocp4-qchw8
        machine.openshift.io/cluster-api-machine-role: worker
        machine.openshift.io/cluster-api-machine-type: worker
        machine.openshift.io/cluster-api-machineset: ocp4-qchw8-worker
    spec:
      metadata:
        creationTimestamp: null
      providerSpec:
        value:
          apiVersion: openstackproviderconfig.openshift.io/v1alpha1
          cloudName: openstack
          cloudsSecret:
            name: openstack-cloud-credentials
            namespace: openshift-machine-api
          flavor: ocp.controller
          image: rhcos
          kind: OpenstackProviderSpec
          metadata:
            creationTimestamp: null
          networks:
          - filter: {}
            subnets:
            - filter:
                name: ocp4-qchw8-nodes
                tags: openshiftClusterID=ocp4-qchw8
          securityGroups:
          - filter: {}
            name: ocp4-qchw8-worker
          serverMetadata:
            Name: ocp4-qchw8-worker
            openshiftClusterID: ocp4-qchw8
          tags:
          - openshiftClusterID=ocp4-qchw8
          trunk: true
          userDataSecret:
            name: worker-user-data
status:
  availableReplicas: 1
  fullyLabeledReplicas: 2
  observedGeneration: 1
  readyReplicas: 1
  replicas: 2
Notice our machine set has two replicas, meaning we have two worker nodes in our OpenShift cluster. If we want to scale our cluster to three workers we just run a simple command. OpenShift takes care of everything, including provisioning the infrastructure.
$ oc scale --replicas=3 machineset ocp4-qchw8-worker -n openshift-machine-api
If we want to change our flavor we can just update the machine set configuration.
$ oc edit machineset ocp4-qchw8-worker -n openshift-machine-api
---
cloudsSecret:
  name: openstack-cloud-credentials
  namespace: openshift-machine-api
flavor: ocp.controller2
image: rhcos
kind: OpenstackProviderSpec
---
In order to change the flavor you need to scale the worker machine set to 0. In order to do that you must relocate the router pods in the openshift-ingress project. You can also kill the router pods after scaling to 0 as simple workaround. OpenShift will not delete the last node until the router pod is killed.
Configuring Retention for Prometheus
In OpenShift 4 prometheus is used to store metrics used in monitoring and alerting. By default prometheus will store data locally using 'empty dir'. It's default retention is 15 days but you can change it to your desire. You can also add a persistent volume so the data will survive node restarts.
First create a new config map.
$ oc -n openshift-monitoring create configmap \
cluster-monitoring-config
Edit config map and add retention.
$ oc -n openshift-monitoring edit configmap cluster-monitoring-config
---
data:
  config.yaml: |
    prometheusK8s:
      retention: 24h
---
Summary
In this article we discussed OpenShift 4 and the value of installer provisioned infrastructure. It goes well beyond installation, that is just the starting point. OpenShift 4 is capable of operating itself to a certain degree, including automated upgrades. This will not only increase availability but also give operations teams a lot of time back to do work on more innovative, productive projects. We showed how to properly prepare for an OpenShift 4.2 installation on OpenStack using IPI. Finally, using IPI we successfully deployed and validated an OpenShift 4.2 cluster running on OpenStack. I look forward to hearing about your feedback as we explore this brave new world together.
Happy OpenShifting!
(c) 2019 Keith Tenzer