OpenShift 4 AWS IPI Installation Getting Started Guide
Happy new year as this will be the first post of 2021! 2020 was obviously a challenging year, my hope is I will have more time to devote to blogging in 2021. Please reach out and let me know what topics would be most helpful.
Overview
In this Article we will walk through an OpenShift deployment using the IPI (Installer Provisioned Infrastructure) method on AWS. OpenShift offers two possible deployment methods: IPI (as mentioned) and UPI (User Provisioned Infrastructure). The difference is the degree of automation and customization. IPI will not only deploy OpenShift but also all infrastructure components and configurations. IPI is supported in various environments including AWS, Azure, GCE, VMware Vsphere and even Baremetal. IPI is tightly coupled with the infrastructure layer whereas UPI is not and will allow the most customization and work anywhere.
Ultimately IPI vs UPI is usually dictated by the requirements. My view is unless you have special requirements (like a stretch cluster or specific integrations with infrastructure that require UPI) always default to IPI. It is far better to have the vendor, in this case Red Hat own more of the share of responsibility and ensure proper, tested infrastructure configurations are being deployed as well as maintained throughout the cluster lifecycle.
Create Hosted Zone
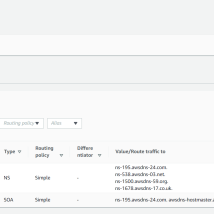
Before a cluster can be deployed we need to access AWS console and add a hosted zone to the route53 service. In the diagram below, we are adding the domain rh-southwest.com.

Download and Install CLI Tools
Red Hat provides a CLI tools for deploying and managing OpenShift clusters. The CLI tools wrap kubectl, podman (docker image manipulation) and other tools to provide a single easy-to-use interface. You can of course also use kubectl and individual tooling for manipulating images (docker or podman).
Download CLI Tools
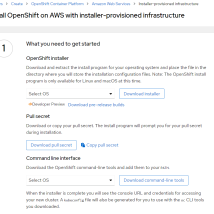
Access https://cloud.redhat.com/openshift/install using your Red Hat account. Select AWS as infrastructure provider and the installer provisioned option. Download both the CLI and OpenShift install.
Copy Pull Secret
The pull secret is used to automatically authenticate to Red Hat content repositories for OpenShift during the install. You will need to provide the pull secret as part of a later step.

Install CLI Tools
The CLI tools can be simply extracted into /usr/bin.
$ sudo tar xvf openshift-client-linux.tar.gz -C /usr/bin
$ sudo tar xvf openshift-install-linux.tar.gz -C /usr/bin
Check CLI Version
$ openshift-install version openshift-install 4.6.9
Install Configuration
Create Install Config
When creating an install config you will need to provide the platform, in this case AWS, the domain configured in route53, a name for the OpenShift cluster and of course the pull secret.
$ openshift-install create install-config \
--dir=ocp_install
? SSH Public Key /root/.ssh/id_rsa.pub
? Platform aws
? Cloud aws
? Base Domain rh-southwest.com
? Cluster Name ocp4
? Pull Secret [? for help] ************************************************
Edit Install Config
$ vi ocp_install/install-config.yaml
...
compute:
  architecture: amd64
  hyperthreading: Enabled
  name: worker
  platform:
    aws:
      type: m5.large
      userTags:
        Contact: myemail@mydomain.com
        AlwaysUp: True
        DeleteBy: NEVER
  replicas: 3
controlPlane:
  architecture: amd64
  hyperthreading: Enabled
  name: master
  platform:
    aws:
      type: m5.xlarge
      userTags:
        Contact: myemail@mydomain.com
        AlwaysUp: True
        DeleteBy: NEVER
  replicas: 3
...
User tags allow you to label or tag the AWS VMs. In this case we have some automation that will shutdown any clusters that are not supposed to be always available or delete any clusters that have an expiration date set.
Deploy OpenShift Cluster
Now that we have adjusted the configuration we can deploy the cluster and grab a coffee.
$ [ktenzer@localhost ~]$ time openshift-install create cluster --dir=ocp_install --log-level=debug
Verify Cluster
Once the deployment has completed successfully we can verify cluster. In order to gain access to cluster we can use the default system account created during deployment by exporting the kubeconfig.
$ export KUBECONFIG=ocp_install/auth/kubeconfig
$ oc get nodes
NAME                                       STATUS ROLES  AGE VERSION
ip-10-0-147-102.us-east-2.compute.internal Ready  worker 27m v1.19.0+7070803
ip-10-0-159-222.us-east-2.compute.internal Ready  master 33m v1.19.0+7070803
ip-10-0-161-231.us-east-2.compute.internal Ready  worker 24m v1.19.0+7070803
ip-10-0-178-131.us-east-2.compute.internal Ready  master 33m v1.19.0+7070803
ip-10-0-194-232.us-east-2.compute.internal Ready  worker 24m v1.19.0+7070803
ip-10-0-218-84.us-east-2.compute.internal Ready   master 33m v1.19.0+7070803
Show Cluster Version
$ oc get clusterversion
NAME    VERSION AVAILABLE PROGRESSING SINCE STATUS
version 4.6.9   True      False       7m44s Cluster version is 4.6.9
Configure OAUTH
OpenShift supports oauth2, there is a lot of choice with the identification provider. Usually you would integrate with your enterprise LDAP provider. In this case or for test environments you can use the htpasswd provider.
Create Htpasswd file
$ htpasswd -c -B -b ocp_install/ocp.htpasswd admin pasword123
Create Secret for Htpasswd
$ oc create secret generic htpass-secret --from-file=ocp.htpasswd -n openshift-config
Configure Htpasswd in Oauth
$ vi ocp_install/htpasswd-cr.yaml
apiVersion: config.openshift.io/v1
kind: OAuth
metadata:
  name: cluster
spec:
  identityProviders:
  - name: my_htpasswd_provider
    mappingMethod: claim
    type: HTPasswd
    htpasswd:
      fileData:
        name: htpass-secret
$ oc apply -f ocp_install/htpasswd-cr.yaml
Add Cluster Role
Once we have added htpasswd as a oauth provider we need to add cluster-admin role to the admin user we already created.
$ oc adm policy add-cluster-role-to-user cluster-admin admin
Summary
In this article we discussed the IPI and UPI deployment methods provided by OpenShift. Most organizations will want to choose IPI where possible. It not only simplifies the deployment of OpenShift but also improves the supportability likely leading to a higher SLA or quicker resolution of any potential issues. If not possible, UPI provides all the flexibility needed to deploy OpenShift into any environment albeit with a little more oversight and ownership required. Finally we walked through the IPI deployment of OpenShift on AWS including showing how to configure OAUTH htpasswd provider.
(c) 2021 Keith Tenzer


