
Storage for Containers using Container Native Storage – Part III

Overview
In this article we will focus on a new area of storage for containers called Container Native Storage. This article is a collaboration between Daniel Messer (Technical Marketing Manager Storage @RedHat) and Keith Tenzer (Sr. Solutions Architect @RedHat).
- Storage for Containers Overview – Part I
- Storage for Containers using Gluster – Part II
- Storage for Containers using Container Native Storage – Part III
- Storage for Containers using Ceph – Part IV
- Storage for Containers using NetApp ONTAP NAS – Part V
- Storage for Containers using NetApp SolidFire – Part VI
So What is Container Native Storage?
Essentially container native storage or CNS is a hyper-converged approach to storage and compute in the context of containers. Each container host or node supplies both compute and storage allowing storage to be completely integrated or absorbed by the platform itself. A software-defined storage system running in containers on the platform, consumes disks provided by nodes and provides a cluster-wide storage abstraction layer. The software-defined storage system then provides capabilities such as high-availability, dynamic provisioning and general storage management. This enables DevOps from a storage perspective, allows storage to grow with the container platform and delivers a high level of efficiency.
Container Native Storage Overview
CNS is realized by containerizing GlusterFS in a Docker container. This is deployed on a running OpenShift or Kubernetes cluster using native container orchestration provided by the platform. To provide integration with the storage provisioning framework an additional management component is added to GlusterFS called heketi. It serves as an API and CLI front-end for storage lifecyle operations. In addition it supports multiple deployment scenarios. Heketi runs containerized along side the GlusterFS pods on OpenShift or Kubernetes cluster. The entire deployment of this infrastructure is automated using a utility called cns-deploy.
Container Native Storage Pre-requisites
There are several container orchestration technologies such as Docker Swarm, Marathon (Mesos), Diego (CloudFoundry) and Kubernetes (OpenShift). Container Native Storage applies to Kubernetes and OpenShift as Kubernetes supports both stateless and stateful applications. In order to use CNS you need an OpenShift cluster. To setup OpenShift you can follow this article. As the article focuses on an all-in-one setup, meaning a single VM you will need to make a few minor changes.
Create minimum of three VMs
Each VM should have following spec:
- RHEL 7.2 or 7.3
- 2 vCPUs
- 4GB RAM
- 30 GB Root Disk
- 25 GB Docker Disk
- 3 x 20GB CNS Disks
Update OpenShift Ansible Inventory
Since the article only deploys a single VM we need to change the inventory to reflect 3 nodes.
...
# host group for masters
[masters]
ose3-master.lab.com

# host group for nodes, includes region info
[nodes]
ose3-master.lab.com openshift_schedulable=True
ose3-node1.lab.com
ose3-node2.lab.com
...
Once OpenShift deployment is complete you should see three nodes that are ready.
# oc get nodes
NAME STATUS AGE
ose3-master.lab.com Ready 5m
ose3-node1.lab.com Ready 5m
ose3-node2.lab.com Ready 5m
Install and Configure Container Native Storage
These steps should be done on OpenShift master node(s).
Enable repository for CNS
subscription-manager repos --enable=rh-gluster-3-for-rhel-7-server-rpms
Install CNS Tools
yum install cns-deploy heketi-client
Update Firewall Rules
On all OpenShift nodes the firewall rules need to be updated.
# vi /etc/sysconfig/iptables
...
-A OS_FIREWALL_ALLOW -p tcp -m state --state NEW -m tcp --dport 24007 -j ACCEPT
-A OS_FIREWALL_ALLOW -p tcp -m state --state NEW -m tcp --dport 24008 -j ACCEPT
-A OS_FIREWALL_ALLOW -p tcp -m state --state NEW -m tcp --dport 2222 -j ACCEPT
-A OS_FIREWALL_ALLOW -p tcp -m state --state NEW -m multiport --dports 49152:49664 -j ACCEPT
...
# systemctl reload iptables
Create Project in OpenShift for CNS
oc new-project storage-project
Enable deployment of priviledged containers
# oadm policy add-scc-to-user privileged -z default
# oadm policy add-scc-to-user privileged -z router
# oadm policy add-scc-to-user privileged -z default
Update dnsmasq for Router
On OpenShift master we need to setup external resolution to the CNS nodes. If you have a real DNS server this should be done there.
# vi /etc/dnsmasq.conf
...
address=/.apps.lab.com/192.168.122.61
...
# systectl restart dnsmasq
Add localhost as nameserver
# vi /etc/resolv.conf
...
nameserver 127.0.0.1
...
Create Configuration Template for CNS
The template identifies all nodes in the CNS cluster. It also identifies which devices should be used. CNS requires at a minimum three nodes. Data will be by default replicated three times hence why three nodes are required.
# cp /usr/share/heketi/topology-sample.json vi /usr/share/heketi/topology.json
# vi /usr/share/heketi/topology.json
{
    "clusters": [
        {
            "nodes": [
                {
                    "node": {
                        "hostnames": {
                            "manage": [
                                "ose3-master.lab.com"
                            ],
                            "storage": [
                                "192.168.122.61"
                            ]
                        },
                        "zone": 1
                    },
                    "devices": [
                        "/dev/vdc",
                        "/dev/vdd",
                        "/dev/vde"
                    ]
                },
                {
                    "node": {
                        "hostnames": {
                            "manage": [
                                "ose3-node1.lab.com"
                            ],
                            "storage": [
                                "192.168.122.62"
                            ]
                        },
                        "zone": 2
                    },
                    "devices": [
                        "/dev/vdc",
                        "/dev/vdd",
                        "/dev/vde"
                    ]
                },
                {
                    "node": {
                        "hostnames": {
                            "manage": [
                                "ose3-node2.lab.com"
                            ],
                            "storage": [
                                "192.168.122.63"
                            ]
                        },
                        "zone": 2
                    },
                    "devices": [
                        "/dev/vdc",
                        "/dev/vdd",
                        "/dev/vde"
                    ]
                }
            ]
        }
    ]
}
Deploy Container Native Storage
# cns-deploy -n storage-project -g /usr/share/heketi/topology.json
 Welcome to the deployment tool for GlusterFS on Kubernetes and OpenShift.

Before getting started, this script has some requirements of the execution
 environment and of the container platform that you should verify.

The client machine that will run this script must have:
 * Administrative access to an existing Kubernetes or OpenShift cluster
 * Access to a python interpreter 'python'
 * Access to the heketi client 'heketi-cli'

Each of the nodes that will host GlusterFS must also have appropriate firewall
 rules for the required GlusterFS ports:
 * 2222 - sshd (if running GlusterFS in a pod)
 * 24007 - GlusterFS Daemon
 * 24008 - GlusterFS Management
 * 49152 to 49251 - Each brick for every volume on the host requires its own
 port. For every new brick, one new port will be used starting at 49152. We
 recommend a default range of 49152-49251 on each host, though you can adjust
 this to fit your needs.

In addition, for an OpenShift deployment you must:
 * Have 'cluster_admin' role on the administrative account doing the deployment
 * Add the 'default' and 'router' Service Accounts to the 'privileged' SCC
 * Have a router deployed that is configured to allow apps to access services
 running in the cluster

Do you wish to proceed with deployment?

[Y]es, [N]o? [Default: Y]: Y
 Multiple CLI options detected. Please select a deployment option.
 [O]penShift, [K]ubernetes? [O/o/K/k]: O
 Using OpenShift CLI.
 NAME STATUS AGE
 storage-project Active 4m
 Using namespace "storage-project".
 template "deploy-heketi" created
 serviceaccount "heketi-service-account" created
 template "heketi" created
 template "glusterfs" created
 node "ose3-master.lab.com" labeled
 node "ose3-node1.lab.com" labeled
 node "ose3-node2.lab.com" labeled
 daemonset "glusterfs" created
 Waiting for GlusterFS pods to start ... OK
 service "deploy-heketi" created
 route "deploy-heketi" created
 deploymentconfig "deploy-heketi" created
 Waiting for deploy-heketi pod to start ... OK
 % Total % Received % Xferd Average Speed Time Time Time Current
 Dload Upload Total Spent Left Speed
 100 17 100 17 0 0 864 0 --:--:-- --:--:-- --:--:-- 894
 Creating cluster ... ID: 4bfec05e6fa80e5178c4314bec238786
 Creating node ose3-master.lab.com ... ID: f95eabc360cddd6f5c6419094c1ae085
 Adding device /dev/vdc ... OK
 Adding device /dev/vdd ... OK
 Adding device /dev/vde ... OK
 Creating node ose3-node1.lab.com ... ID: 82fa6bf3a37dffa4376c77935f37d44a
 Adding device /dev/vdc ... OK
 Adding device /dev/vdd ... OK
 Adding device /dev/vde ... OK
 Creating node ose3-node2.lab.com ... ID: c26872fc64f2408f2ddea664698e3964
 Adding device /dev/vdc ... OK
 Adding device /dev/vdd ... OK
 Adding device /dev/vde ... OK
 Saving heketi-storage.json
 secret "heketi-storage-secret" created
 endpoints "heketi-storage-endpoints" created
 service "heketi-storage-endpoints" created
 job "heketi-storage-copy-job" created
 deploymentconfig "deploy-heketi" deleted
 route "deploy-heketi" deleted
 service "deploy-heketi" deleted
 pod "deploy-heketi-1-z8ite" deleted
 job "heketi-storage-copy-job" deleted
 secret "heketi-storage-secret" deleted
 service "heketi" created
 route "heketi" created
 deploymentconfig "heketi" created
 Waiting for heketi pod to start ... OK
 % Total % Received % Xferd Average Speed Time Time Time Current
 Dload Upload Total Spent Left Speed
 100 17 100 17 0 0 2766 0 --:--:-- --:--:-- --:--:-- 2833
 heketi is now running.
List Pods in Storage Project
Once deployment is complete you should see three GlusterFS pods, the heketi pod (CNS management) and a router.
# oc get pods -o wide
 NAME READY STATUS RESTARTS AGE IP NODE
 glusterfs-eedk4 1/1 Running 0 4m 192.168.122.63 ose3-node2.lab.com
 glusterfs-kyrz1 1/1 Running 0 4m 192.168.122.62 ose3-node1.lab.com
 glusterfs-y6w8n 1/1 Running 0 4m 192.168.122.61 ose3-master.lab.com
 heketi-1-zq0ie 1/1 Running 0 2m 10.129.0.10 ose3-master.lab.com
 storage-project-router-1-nnobe 1/1 Running 0 8m 192.168.122.61 ose3-master.lab.com
Setup Heketi CLI
Heketi is a management tool for CNS. We need to export the path to the server in order to use the CLI.
# export HEKETI_CLI_SERVER=$(oc describe svc/heketi | grep "Endpoints:" | awk '{print "http://"$2}')
# echo $HEKETI_CLI_SERVER
http://10.129.0.10:8080
Show CNS Topology
# heketi-cli topology info

Cluster Id: 4bfec05e6fa80e5178c4314bec238786

Volumes:

Name: heketidbstorage
 Size: 2
 Id: e64a8b64f58bf5248afdb1db34ba420f
 Cluster Id: 4bfec05e6fa80e5178c4314bec238786
 Mount: 192.168.122.61:heketidbstorage
 Mount Options: backup-volfile-servers=192.168.122.62,192.168.122.63
 Durability Type: replicate
 Replica: 3
 Snapshot: Disabled

Bricks:
 Id: 2504dbb5b0b9fd38c3c8eaa25c19e6e0
 Path: /var/lib/heketi/mounts/vg_4b315e3d01f3398ea371cc3ec44a46ab/brick_2504dbb5b0b9fd38c3c8eaa25c19e6e0/brick
 Size (GiB): 2
 Node: f95eabc360cddd6f5c6419094c1ae085
 Device: 4b315e3d01f3398ea371cc3ec44a46ab

Id: 30fea25c05c3c7b252590b81c3f38369
 Path: /var/lib/heketi/mounts/vg_001e9e13cf06727862b157283b22051d/brick_30fea25c05c3c7b252590b81c3f38369/brick
 Size (GiB): 2
 Node: c26872fc64f2408f2ddea664698e3964
 Device: 001e9e13cf06727862b157283b22051d

Id: d7c2b9e7b80ed2726309ad516dd253cf
 Path: /var/lib/heketi/mounts/vg_4f8745833e2577ff9a1eb302d9811551/brick_d7c2b9e7b80ed2726309ad516dd253cf/brick
 Size (GiB): 2
 Node: 82fa6bf3a37dffa4376c77935f37d44a
 Device: 4f8745833e2577ff9a1eb302d9811551
 Nodes:

Node Id: 82fa6bf3a37dffa4376c77935f37d44a
 State: online
 Cluster Id: 4bfec05e6fa80e5178c4314bec238786
 Zone: 2
 Management Hostname: ose3-node1.lab.com
 Storage Hostname: 192.168.122.62
 Devices:
 Id:26333a53457037df86243d164d280f07 Name:/dev/vdc State:online Size (GiB):29 Used (GiB):0 Free (GiB):29
 Bricks:
 Id:4f8745833e2577ff9a1eb302d9811551 Name:/dev/vde State:online Size (GiB):29 Used (GiB):2 Free (GiB):27
 Bricks:
 Id:d7c2b9e7b80ed2726309ad516dd253cf Size (GiB):2 Path: /var/lib/heketi/mounts/vg_4f8745833e2577ff9a1eb302d9811551/brick_d7c2b9e7b80ed2726309ad516dd253cf/brick
 Id:c1520ae2b0adbf0fec0b0ffd5fd5a0f7 Name:/dev/vdd State:online Size (GiB):29 Used (GiB):0 Free (GiB):29
 Bricks:

Node Id: c26872fc64f2408f2ddea664698e3964
 State: online
 Cluster Id: 4bfec05e6fa80e5178c4314bec238786
 Zone: 2
 Management Hostname: ose3-node2.lab.com
 Storage Hostname: 192.168.122.63
 Devices:
 Id:001e9e13cf06727862b157283b22051d Name:/dev/vde State:online Size (GiB):29 Used (GiB):2 Free (GiB):27
 Bricks:
 Id:30fea25c05c3c7b252590b81c3f38369 Size (GiB):2 Path: /var/lib/heketi/mounts/vg_001e9e13cf06727862b157283b22051d/brick_30fea25c05c3c7b252590b81c3f38369/brick
 Id:705d793971aeb2c3315ea674af0aace1 Name:/dev/vdd State:online Size (GiB):29 Used (GiB):0 Free (GiB):29
 Bricks:
 Id:cc542ecd46d872a8db41819f2f9f69fe Name:/dev/vdc State:online Size (GiB):29 Used (GiB):0 Free (GiB):29
 Bricks:

Node Id: f95eabc360cddd6f5c6419094c1ae085
 State: online
 Cluster Id: 4bfec05e6fa80e5178c4314bec238786
 Zone: 1
 Management Hostname: ose3-master.lab.com
 Storage Hostname: 192.168.122.61
 Devices:
 Id:4b315e3d01f3398ea371cc3ec44a46ab Name:/dev/vdd State:online Size (GiB):29 Used (GiB):2 Free (GiB):27
 Bricks:
 Id:2504dbb5b0b9fd38c3c8eaa25c19e6e0 Size (GiB):2 Path: /var/lib/heketi/mounts/vg_4b315e3d01f3398ea371cc3ec44a46ab/brick_2504dbb5b0b9fd38c3c8eaa25c19e6e0/brick
 Id:dc37c4b891c0268f159f1b0b4b21be1e Name:/dev/vde State:online Size (GiB):29 Used (GiB):0 Free (GiB):29
 Bricks:
 Id:fab4c9f1f82010164a26ba162411211a Name:/dev/vdc State:online Size (GiB):29 Used (GiB):0 Free (GiB):29
 Bricks:
Using CNS in OpenShift
In order to create persistent volumes using dynamic provisioning a storage class must be created. Storage classes in Kubernetes provide Kubernetes (OpenShift) with access and permissions to the storage system. A plugin exists for the storage provider (in this case GlusterFS) that knows how to provision and reclaim storage.
Create Storage Class
A storage class just like anything in Kubernetes is an object defined by YAML or JSON.
# vi /root/glusterfs-storage-class.yaml

apiVersion: storage.k8s.io/v1beta1
 kind: StorageClass
 metadata:
 name: glusterfs-container
 provisioner: kubernetes.io/glusterfs
 parameters:
 resturl: "http://10.129.0.10:8080"
 restuser: "admin"
 secretNamespace: "default"
 secretName: "heketi-secret"
Create storage class from YAML using oc command
# oc create -f /root/glusterfs-storage-class.yaml
Setup Secret
Secrets are used in OpenShift to grant access to services, in this case CNS.
Create password.
# echo -n "mypassword" | base64
bXlwYXNzd29yZA==
Create a secret object for CNS
# vi /root/glusterfs-secret.yaml

apiVersion: v1
 kind: Secret
 metadata:
 name: heketi-secret
 namespace: default
 data:
 key: bXlwYXNzd29yZA==
 type: kubernetes.io/glusterfs
Create secret using YAML file.
# oc create -f glusterfs-secret.yaml
Create Persistent Volume Claim Using CLI
Persistent volume claim is what developers issue when they need storage. It binds a persistent volume to a Pod in OpenShift. In our case since CNS supports dynamic provisioning creating a claim will also create the volume and as such provision storage.
#vi /root/glusterfs-pvc-1.yaml
{
  "kind": "PersistentVolumeClaim",
  "apiVersion": "v1",
  "metadata": {
    "name": "claim1",
    "annotations": {
        "volume.beta.kubernetes.io/storage-class": "glusterfs-container"
    }
  },
  "spec": {
    "accessModes": [
      "ReadWriteOnce"
    ],
    "resources": {
      "requests": {
        "storage": "4Gi"
      }
    }
  }
}
Show Persistent Volume Claim
# oc get pvc
NAME STATUS VOLUME CAPACITY ACCESSMODES AGE
claim1 Bound pvc-6b4599fa-0813-11e7-a395-525400c9c97e 4Gi RWO 13s
Show Persistent Volume
# oc get pv
NAME CAPACITY ACCESSMODES RECLAIMPOLICY STATUS CLAIM REASON AGE
pvc-6b4599fa-0813-11e7-a395-525400c9c97e 4Gi RWO Delete Bound storage-project/claim1 2m
Using Persistent Volume Claim
Once a developer has a claim they simply need to add the ClaimName to their Pod YAML file. This can also be done easily via the GUI as we will see shortly. Below is an example using CLI.
apiVersion: v1
kind: Pod
metadata:
  name: busybox
spec:
  containers:
    - image: busybox
      command:
        - sleep
        - "3600"
      name: busybox
      volumeMounts:
        - mountPath: /usr/share/busybox
          name: mypvc
  volumes:
    - name: mypvc
      persistentVolumeClaim:
        claimName: claim1
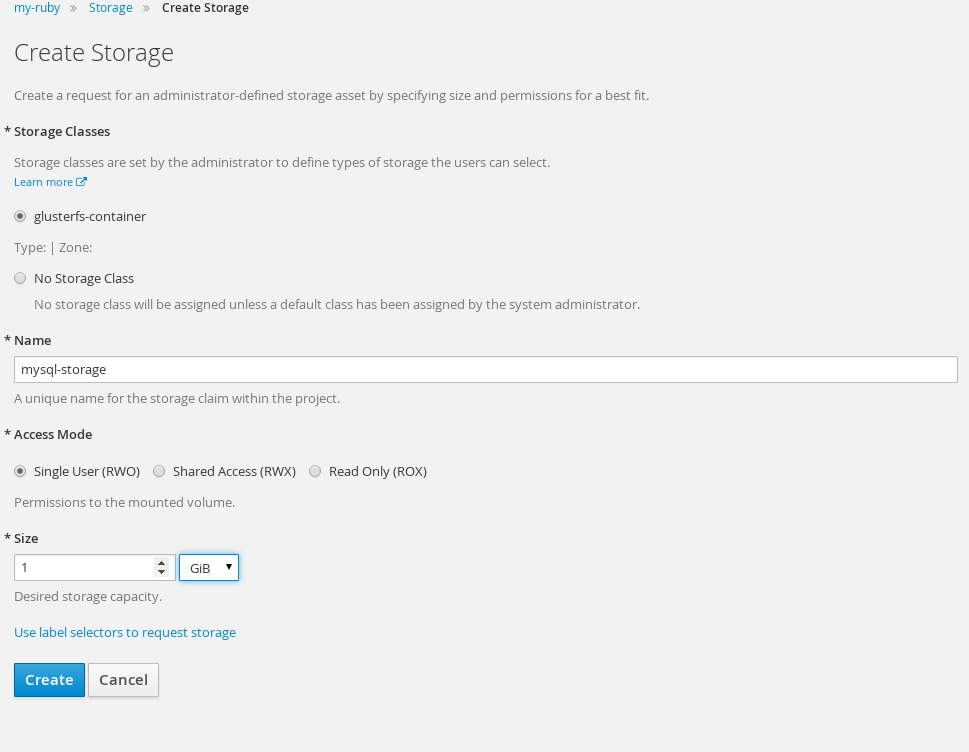
Create Persistent Volume Claim Using GUI
Under the project in OpenShift choose 'Storage' and 'create storage' button on far right. Specify name, access mode and size. Click 'create' and OpenShift will create the persistent volume and persistent volume claim.
Once the persistent volume claim is created it will show up under storage tab of OpenShift project.

At this point you can use the persistent volume claim for any Pods.
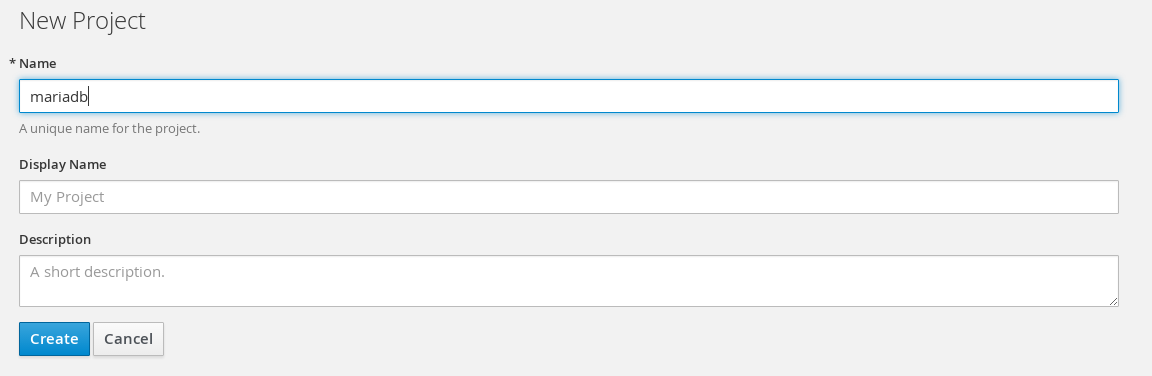
Another way to do things is to deploy application from pre-defined template. Such templates exist out-of-the-box in OpenShift. Here we will deploy mariadb using the 'mariadb-persistent' template.
Create new project 'mariadb'.
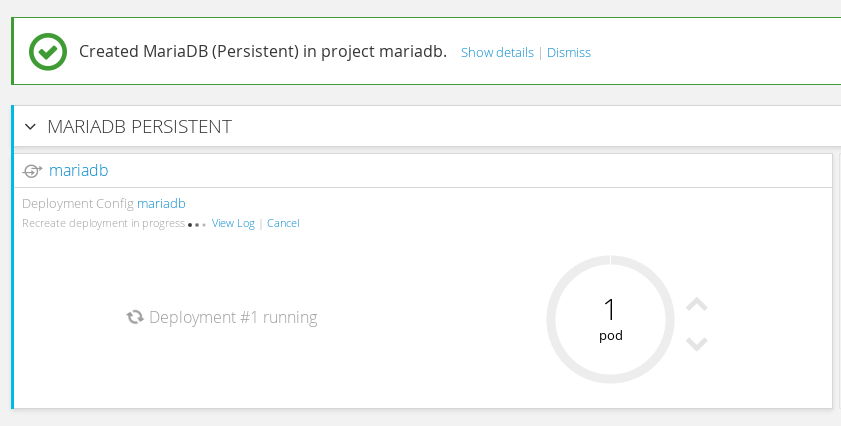
Type in 'mariadb' in search field of catalog to narrow down choices. Select 'MariadDB (Persistent'.

Select defaults to launch mariadb Pod on next screen. The Pod will stay in pending state because it's persistent volume is not mapped to a storage class. This can be of course updated in the storage class itself. To specify a default cluster-wide storage class update the annotations section of the storage class.
...
annotations:
  storageclass.beta.kubernetes.io/is-default-class: true
...
Under storage select the persistent volume claim 'mariadb'. On the right under actions select 'edit yaml'. Add following to persistent volume claim yaml.
...
annotations:
 volume.beta.kubernetes.io/storage-class: glusterfs-container
...
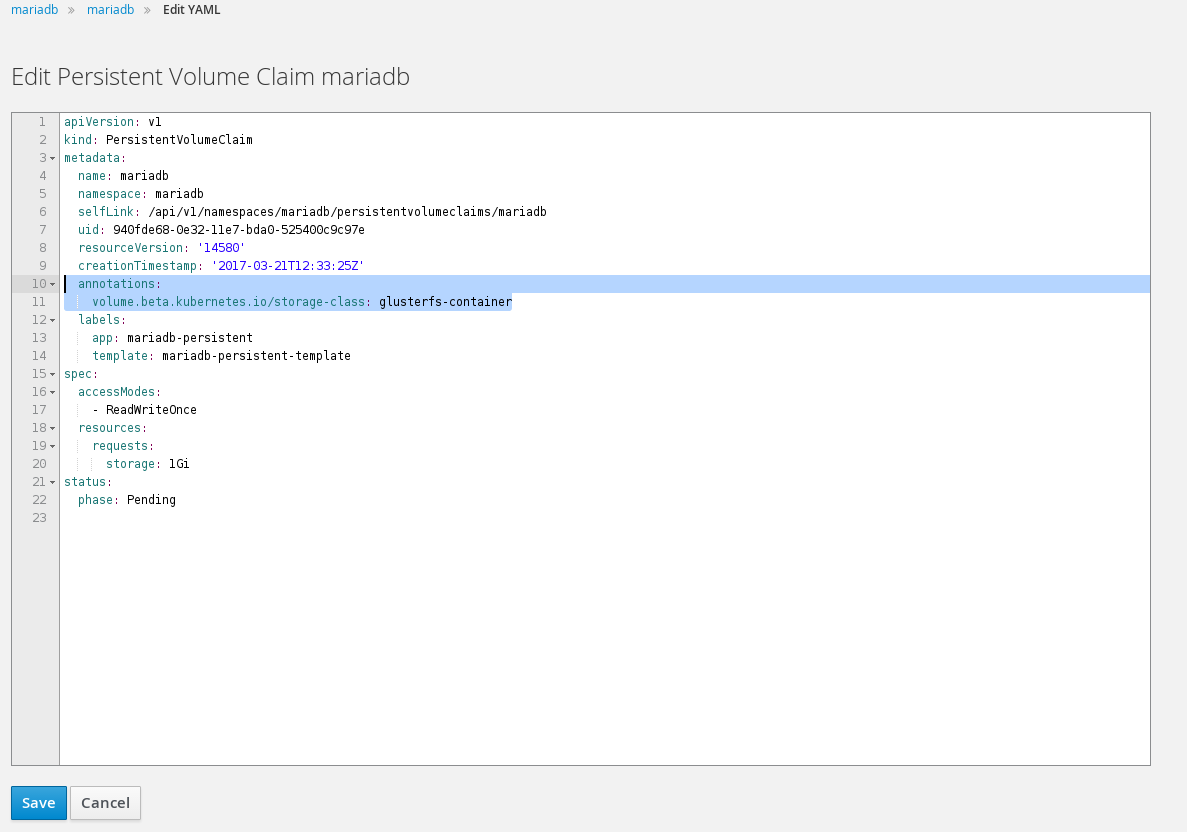
Once we click save on next screen we should see our volume is bound after a few moments. This means that OpenShift provisioned a volume from CNS.

Finally our mariadb Pod should now be able to start.

CNS Deep Dive
Now that we have seen how to use CNS in context of OpenShift let us take a closer look into the storage itself and understand how persistent volumes are mapped to GlusterFS volumes.
Get Glusterfs Volume
If we look at the YAML for the persistent volume (pv) we can get the GlusterFS volume.
# oc get pv pvc-acbade81-0818-11e7-a395-525400c9c97e -o yaml
 apiVersion: v1
 kind: PersistentVolume
 metadata:
 annotations:
 pv.beta.kubernetes.io/gid: "2001"
 pv.kubernetes.io/bound-by-controller: "yes"
 pv.kubernetes.io/provisioned-by: kubernetes.io/glusterfs
 volume.beta.kubernetes.io/storage-class: glusterfs-container
 creationTimestamp: 2017-03-13T18:12:59Z
 name: pvc-acbade81-0818-11e7-a395-525400c9c97e
 resourceVersion: "10271"
 selfLink: /api/v1/persistentvolumes/pvc-acbade81-0818-11e7-a395-525400c9c97e
 uid: b10085a3-0818-11e7-a395-525400c9c97e
 spec:
 accessModes:
 - ReadWriteOnce
 capacity:
 storage: 1Gi
 claimRef:
 apiVersion: v1
 kind: PersistentVolumeClaim
 name: mariadb
 namespace: my-ruby
 resourceVersion: "10262"
 uid: acbade81-0818-11e7-a395-525400c9c97e
 glusterfs:
 endpoints: gluster-dynamic-mariadb
 path: vol_094f7fc95d623fdc88c72aa5cb303b24
 persistentVolumeReclaimPolicy: Delete
 status:
 phase: Bound
Connect to Glusterfs Node
Under the project 'storage-project' get list of the GlusterFS pods. These are the pods the cns-deploy stood up as part of the initial install. They are part of a Kubernetes DaemonSet with a node selector. All nodes with the label storagenode=glusterfs will be part of this DaemonSet and hence run a GlusterFS pod. This allows for easy expansion of additional pods later.
# oc project storage-project
 Already on project "storage-project" on server "https://ose3-master2.lab.com:8443".
# oc get pods
NAME READY STATUS RESTARTS AGE
glusterfs-eedk4 1/1 Running 0 1h
glusterfs-kyrz1 1/1 Running 0 1h
glusterfs-y6w8n 1/1 Running 0 1h
heketi-1-zq0ie 1/1 Running 0 1h
storage-project-router-1-nnobe 1/1 Running 0 1h
Choose one of the glusterfs nodes and connect to Pod using 'oc' command.
# oc exec -ti glusterfs-eedk4 /bin/sh
List Gluster Volumes
From a GlusterFS node we can list volumes. We can see the volume name and mountpoint highlighted in bold below.
sh-4.2# gluster volume info all

Volume Name: heketidbstorage
 Type: Replicate
 Volume ID: 17779abc-870d-4f4f-9e29-60eea6d5e01e
 Status: Started
 Number of Bricks: 1 x 3 = 3
 Transport-type: tcp
 Bricks:
 Brick1: 192.168.122.63:/var/lib/heketi/mounts/vg_001e9e13cf06727862b157283b22051d/brick_30fea25c05c3c7b252590b81c3f38369/brick
 Brick2: 192.168.122.61:/var/lib/heketi/mounts/vg_4b315e3d01f3398ea371cc3ec44a46ab/brick_2504dbb5b0b9fd38c3c8eaa25c19e6e0/brick
 Brick3: 192.168.122.62:/var/lib/heketi/mounts/vg_4f8745833e2577ff9a1eb302d9811551/brick_d7c2b9e7b80ed2726309ad516dd253cf/brick
 Options Reconfigured:
 performance.readdir-ahead: on

Volume Name: vol_094f7fc95d623fdc88c72aa5cb303b24
 Type: Replicate
 Volume ID: e29be8b3-b733-4c2e-a536-70807d948fd6
 Status: Started
 Number of Bricks: 1 x 3 = 3
 Transport-type: tcp
 Bricks:
 Brick1: 192.168.122.63:/var/lib/heketi/mounts/vg_cc542ecd46d872a8db41819f2f9f69fe/brick_818bd64213310df8f7fa6b05734d882d/brick
 Brick2: 192.168.122.62:/var/lib/heketi/mounts/vg_c1520ae2b0adbf0fec0b0ffd5fd5a0f7/brick_be228a22ac79112b7474876211e0686f/brick
 Brick3: 192.168.122.61:/var/lib/heketi/mounts/vg_fab4c9f1f82010164a26ba162411211a/brick_635253e7ef1e8299b993a273fa808cf6/brick
 Options Reconfigured:
 performance.readdir-ahead: on

Volume Name: vol_e462bd9fa459d0ba088198892625e00d
 Type: Replicate
 Volume ID: 9272b326-bf9c-4a6a-b570-d43c6e2cba83
 Status: Started
 Number of Bricks: 1 x 3 = 3
 Transport-type: tcp
 Bricks:
 Brick1: 192.168.122.63:/var/lib/heketi/mounts/vg_705d793971aeb2c3315ea674af0aace1/brick_165ecbfd4e8923a8efcb8d733a601971/brick
 Brick2: 192.168.122.62:/var/lib/heketi/mounts/vg_c1520ae2b0adbf0fec0b0ffd5fd5a0f7/brick_4008026414bf63a9a7c26ac7cd09cf16/brick
 Brick3: 192.168.122.61:/var/lib/heketi/mounts/vg_fab4c9f1f82010164a26ba162411211a/brick_003626574ffc4c9c96f22f7cda5ea8af/brick
 Options Reconfigured:
 performance.readdir-ahead: on

Look for local mount usi
 sh-4.2# mount | grep heketi
 /dev/mapper/rhel-root on /var/lib/heketi type xfs (rw,relatime,seclabel,attr2,inode64,noquota)
 /dev/mapper/vg_001e9e13cf06727862b157283b22051d-brick_30fea25c05c3c7b252590b81c3f38369 on /var/lib/heketi/mounts/vg_001e9e13cf06727862b157283b22051d/brick_30fea25c05c3c7b252590b81c3f38369 type xfs (rw,noatime,seclabel,nouuid,attr2,inode64,logbsize=256k,sunit=512,swidth=512,noquota)
 /dev/mapper/vg_705d793971aeb2c3315ea674af0aace1-brick_165ecbfd4e8923a8efcb8d733a601971 on /var/lib/heketi/mounts/vg_705d793971aeb2c3315ea674af0aace1/brick_165ecbfd4e8923a8efcb8d733a601971 type xfs (rw,noatime,seclabel,nouuid,attr2,inode64,logbsize=256k,sunit=512,swidth=512,noquota)
 /dev/mapper/vg_cc542ecd46d872a8db41819f2f9f69fe-brick_818bd64213310df8f7fa6b05734d882d on /var/lib/heketi/mounts/vg_cc542ecd46d872a8db41819f2f9f69fe/brick_818bd64213310df8f7fa6b05734d882d type xfs (rw,noatime,seclabel,nouuid,attr2,inode64,logbsize=256k,sunit=512,swidth=512,noquota)
List Contents of Mountpoint
Once we have mountpoint we can do an 'ls' to list the contents. Here we can see mariadb files since this is the volume owned by our mariadb Pod.
sh-4.2# ls /var/lib/heketi/mounts/vg_cc542ecd46d872a8db41819f2f9f69fe/brick_818bd64213310df8f7fa6b05734d882d/brick/
aria_log.00000001 aria_log_control ib_logfile0 ib_logfile1 ibdata1 mariadb-1-wwuu4.pid multi-master.info mysql performance_schema sampledb tc.log test
Sunmmary
In this article we focused on Container Native Storage (CNS). We discussed the need for CNS in order to make storage completely integrated into DevOps. This is a very exciting time for storage and CNS is an approach to do storage differently, making storage a first-class DevOps citizen instead of taking traditional storage and bolting it on somehow. We explored OpenShift pre-requisites for CNS as well as installed and configured CNS on OpenShift. Using the CLI and GUI we saw how developers can manage storage enabled by CNS from within OpenShift. Finally we took a bit of a deep-dive to examine how CNS maps to persistent volume claims in OpenShift. Hopefully you found this article interesting and useful. Looking forward to any and all feedback!
Happy Container Native Storaging!
(c) 2017 Keith Tenzer