
Storage for Containers using Gluster – Part II

Overview
This article is a collaboration between Daniel Messer (Technical Marketing Manager Storage @RedHat) and Keith Tenzer (Solutions Architect @RedHat).
- Storage for Containers Overview – Part I
- Storage for Containers using Gluster – Part II
- Storage for Containers using Container Native Storage – Part III
- Storage for Containers using Ceph – Part IV
- Storage for Containers using NetApp ONTAP NAS – Part V
- Storage for Containers using NetApp SolidFire – Part VI
Gluster as Container-Ready Storage (CRS)
In this article we will look at one of the first options of storage for containers and how to deploy it. Support for GlusterFS has been in Kubernetes and OpenShift for some time. GlusterFS is a good fit because it is available across all deployment options: bare-metal, virtual, on-premise and public cloud. The recent addition of GlusterFS running in a container will be discussed later in this series.
GlusterFS is a distributed filesystem at heart with a native protocol (GlusterFS) and various other protocols (NFS, SMB,...). For integration with OpenShift, nodes will use the native protocol via FUSE to mount GlusterFS volumes on the node itself and then have them bind-mount'ed into the target containers. OpenShift/Kubernetes has a native provisioner that implements requesting, releasing and (un-)mounting GlusterFS volumes.
CRS Overview
On the storage side there is an additional component managing the cluster at the request of OpenShift/Kubernetes called "heketi". This is effectively a REST API for GlusterFS and also ships a CLI version. In the following steps we will deploy heketi among 3 GlusterFS nodes, use it to deploy a GlusterFS storage pool, connect it to OpenShift and use it to provision storage for containers via PersistentVolumeClaims. In total we will deploy 4 Virtual Machines. One for OpenShift (lab setup) and three for GlusterFS.
Note: your system should have at least a quad-core CPU, 16GB RAM and 20 GB of free disk space.
Deploying OpenShift
At first you will need an OpenShift deployment. An All-in-One deployment in a VM is sufficient, instructions can be found in the "OpenShift Enterprise 3.4 all-in-one Lab Environment" article.
Make sure your OpenShift VM can resolve external domain names. Edit /etc/dnsmasq.conf and add the following line to use Google DNS:
server=8.8.8.8
Restart it:
# systemctl restart dnsmasq
# ping -c1 google.com
Deploying Gluster
For GlusterFS at least 3 VMs are required with the following specs:
- RHEL 7.3
- 2 CPUs
- 2 GB RAM
- 30 GB disk for OS
- 10 GB disk for GlusterFS bricks
It is necessary to provide local name resolution for the 3 VMs and the OpenShift VM via a common /etc/hosts file.
For example (feel free to adjust the domain and host names to your environment):
# cat /etc/hosts
127.0.0.1      localhost localhost.localdomain localhost4 localhost4.localdomain4
::1            localhost localhost.localdomain localhost6 localhost6.localdomain6
172.16.99.144  ocp-master.lab ocp-master
172.16.128.7   crs-node1.lab crs-node1
172.16.128.8   crs-node2.lab crs-node2
172.16.128.9   crs-node3.lab crs-node3
Execute the following steps on all 3 GlusterFS VMs:
# subscription-manager repos --disable="*"
# subscription-manager repos --enable=rhel-7-server-rpms
If you have a GlusterFS subscription you can use it and enable the rh-gluster-3-for-rhel-7-server-rpms repository.
If you don't you can use the unsupported GlusterFS community repositories for testing via EPEL:
# yum -y install http://dl.fedoraproject.org/pub/epel/epel-release-latest-7.noarch.rpm
# rpm --import http://dl.fedoraproject.org/pub/epel/RPM-GPG-KEY-EPEL-7
Create a file named glusterfs-3.10.repo in /etc/yum.repos.d/
[glusterfs-3.10]
name=glusterfs-3.10
description="GlusterFS 3.10 Community Version"
baseurl=https://buildlogs.centos.org/centos/7/storage/x86_64/gluster-3.10/
gpgcheck=0
enabled=1
Verify the repository is active:
# yum repolist
You should now be able to install GlusterFS
# yum -y install glusterfs-server
A couple of basic TCP ports need to be opened for GlusterFS peers to communicate and provide storage to OpenShift:
# firewall-cmd --add-port=24007-24008/tcp --add-port=49152-49664/tcp --add-port=2222/tcp
# firewall-cmd --runtime-to-permanent
Now we are ready to start the GlusterFS daemon:
# systemctl enable glusterd
# systemctl start glusterd
That's it. GlusterFS is up and running. The rest of the configuration will be done via heketi.
Install heketi on one of the GlusterFS VMs:
[root@crs-node1 ~]# yum -y install heketi heketi-client
Update for for EPEL users
If you don't have a Red Hat Gluster Storage subscription you will get heketi from EPEL. At the time of writing this is version 3.0.0-1.el7 from October 2016 which is not working with OpenShift 3.4. You will need to update to a more current version:
[root@crs-node1 ~]# yum -y install wget
[root@crs-node1 ~]# wget https://github.com/heketi/heketi/releases/download/v4.0.0/heketi-v4.0.0.linux.amd64.tar.gz
[root@crs-node1 ~]# tar -xzf heketi-v4.0.0.linux.amd64.tar.gz
[root@crs-node1 ~]# systemctl stop heketi
[root@crs-node1 ~]# cp heketi/heketi* /usr/bin/
[root@crs-node1 ~]# chown heketi:heketi /usr/bin/heketi*
Create a file in /etc/systemd/system/heketi.service for the updated syntax of the v4 heketi binary:
[Unit]
Description=Heketi Server

[Service]
Type=simple
WorkingDirectory=/var/lib/heketi
EnvironmentFile=-/etc/heketi/heketi.json
User=heketi
ExecStart=/usr/bin/heketi --config=/etc/heketi/heketi.json
Restart=on-failure
StandardOutput=syslog
StandardError=syslog

[Install]
WantedBy=multi-user.target
[root@crs-node1 ~]# systemctl daemon-reload
[root@crs-node1 ~]# systemctl start heketi
Heketi will use SSH to configure GlusterFS on all nodes. Create an SSH key pair and copy the public key to all 3 nodes (including the first node you are logged on):
[root@crs-node1 ~]# ssh-keygen -f /etc/heketi/heketi_key -t rsa -N ''
[root@crs-node1 ~]# ssh-copy-id -i /etc/heketi/heketi_key.pub root@crs-node1.lab
[root@crs-node1 ~]# ssh-copy-id -i /etc/heketi/heketi_key.pub root@crs-node2.lab
[root@crs-node1 ~]# ssh-copy-id -i /etc/heketi/heketi_key.pub root@crs-node3.lab
[root@crs-node1 ~]# chown heketi:heketi /etc/heketi/heketi_key*
The only thing left is to configure heketi to use SSH. Edit the /etc/heketi/heketi.json to look like the below (changed parts highlighted are underlined):
{
   "_port_comment":"Heketi Server Port Number",
   "port":"8080",
   "_use_auth":"Enable JWT authorization. Please enable for deployment",
   "use_auth":false,
   "_jwt":"Private keys for access",
   "jwt":{
      "_admin":"Admin has access to all APIs",
      "admin":{
         "key":"My Secret"
      },
      "_user":"User only has access to /volumes endpoint",
      "user":{
         "key":"My Secret"
      }
   },
   "_glusterfs_comment":"GlusterFS Configuration",
   "glusterfs":{
      "_executor_comment":[
         "Execute plugin. Possible choices: mock, ssh",
         "mock: This setting is used for testing and development.",
         " It will not send commands to any node.",
         "ssh: This setting will notify Heketi to ssh to the nodes.",
         " It will need the values in sshexec to be configured.",
         "kubernetes: Communicate with GlusterFS containers over",
         " Kubernetes exec api."
      ],
      "executor":"ssh",
      "_sshexec_comment":"SSH username and private key file information",
      "sshexec":{
         "keyfile":"/etc/heketi/heketi_key",
         "user":"root",
         "port":"22",
         "fstab":"/etc/fstab"
      },
      "_kubeexec_comment":"Kubernetes configuration",
      "kubeexec":{
         "host":"https://kubernetes.host:8443",
         "cert":"/path/to/crt.file",
         "insecure":false,
         "user":"kubernetes username",
         "password":"password for kubernetes user",
         "namespace":"OpenShift project or Kubernetes namespace",
         "fstab":"Optional: Specify fstab file on node. Default is /etc/fstab"
      },
      "_db_comment":"Database file name",
      "db":"/var/lib/heketi/heketi.db",
      "_loglevel_comment":[
         "Set log level. Choices are:",
         " none, critical, error, warning, info, debug",
         "Default is warning"
      ],
      "loglevel":"debug"
   }
}
Finished. heketi will listen on port 8080, let's make sure the firewall allows that:
# firewall-cmd --add-port=8080/tcp
# firewall-cmd --runtime-to-permanent
Now restart heketi:
# systemctl enable heketi
# systemctl restart heketi
Test if it's running:
# curl http://crs-node1.lab:8080/hello
Hello from Heketi
Good. Time to put heketi to work. We will use it to configure our GlusterFS storage pool. The software is already running on all our VMs but it's unconfigured. To change that to a functional storage system we will describe our desired GlusterFS storage pool in a topology file, like below:
# vi topology.json
{
  "clusters": [
    {
      "nodes": [
        {
          "node": {
            "hostnames": {
              "manage": [
                "crs-node1.lab"
              ],
              "storage": [
                "172.16.128.7"
              ]
            },
            "zone": 1
          },
          "devices": [
            "/dev/sdb"
          ]
        },
        {
          "node": {
            "hostnames": {
              "manage": [
                "crs-node2.lab"
              ],
              "storage": [
                "172.16.128.8"
              ]
            },
            "zone": 1
          },
          "devices": [
            "/dev/sdb"
          ]
        },
        {
          "node": {
            "hostnames": {
              "manage": [
                "crs-node3.lab"
              ],
              "storage": [
                "172.16.128.9"
              ]
            },
            "zone": 1
          },
          "devices": [
            "/dev/sdb"
          ]
        }
      ]
    }
  ]
}
Despite the formatting the file is relatively simple. It basically tells heketi to create a 3 node cluster with each node being known by a FQDN, an IP address and with at least one spare block device which will be used as a GlusterFS brick.
Now feed this file to heketi:
# export HEKETI_CLI_SERVER=http://crs-node1.lab:8080
# heketi-cli topology load --json=topology.json
Creating cluster ... ID: 78cdb57aa362f5284bc95b2549bc7e7d
 Creating node crs-node1.lab ... ID: ffd7671c0083d88aeda9fd1cb40b339b
 Adding device /dev/sdb ... OK
 Creating node crs-node2.lab ... ID: 8220975c0a4479792e684584153050a9
 Adding device /dev/sdb ... OK
 Creating node crs-node3.lab ... ID: b94f14c4dbd8850f6ac589ac3b39cc8e
 Adding device /dev/sdb ... OK
Now heketi has configured a 3 node GlusterFS storage pool. Easy! You can see that the 3 VMs have successfully formed what's called a Trusted Storage Pool in GlusterFS
[root@crs-node1 ~]# gluster peer status
Number of Peers: 2

Hostname: crs-node2.lab
Uuid: 93b34946-9571-46a8-983c-c9f128557c0e
State: Peer in Cluster (Connected)
Other names:
crs-node2.lab

Hostname: 172.16.128.9
Uuid: e3c1f9b0-be97-42e5-beda-f70fc05f47ea
State: Peer in Cluster (Connected)
Now back to OpenShift!
Integrating Gluster with OpenShift
For integration in OpenShift two things are needed: a dynamic Kubernetes Storage Provisioner and a StorageClass. The provisioner ships out of the box with OpenShift. It does the actual heavy lifting of attaching storage to containers. The StorageClass is an entity that users in OpenShift can make PersistentVolumeClaims against, which will in turn trigger a provisioner to implement the actual provisioning and represent the result as Kubernetes PersistentVolume (PV).
Like everything else in OpenShift the StorageClass is simply defined as a YAML file:
# cat crs-storageclass.yaml
kind: StorageClass
apiVersion: storage.k8s.io/v1beta1
metadata:
 name: container-ready-storage
 annotations:
 storageclass.beta.kubernetes.io/is-default-class: "true"
provisioner: kubernetes.io/glusterfs
parameters:
 resturl: "http://crs-node1.lab:8080"
 restauthenabled: "false"
Our provisioner is kubernetes.io/glusterfs and we make it point to our heketi instance. We name the class "container-ready-storage" and at the same time make it the default StorageClass for all PersistentVolumeClaims that do not explicitly specify one.
Create the StorageClass for your GlusterFS pool:
# oc create -f crs-storageclass.yaml
Using Gluster with OpenShift
Let's look at how we would use GlusterFS in OpenShift. First create a playground project on the OpenShift VM:
# oc new-project crs-storage --display-name="Container-Ready Storage"
To request storage in Kubernetes/OpenShift a PersistentVolumeClaim (PVC) is issued. It's a simple object describing at the minimum how much capacity we need and in which access mode it should be supplied (non-shared, shared, read-only). It's usually part of an application template but let's just create a standalone PVC:
# cat crs-claim.yaml
apiVersion: v1
kind: PersistentVolumeClaim
metadata:
 name: my-crs-storage
 namespace: crs-storage
spec:
 accessModes:
 - ReadWriteOnce
 resources:
 requests:
 storage: 1Gi
Issue the claim:
# oc create -f crs-claim.yaml
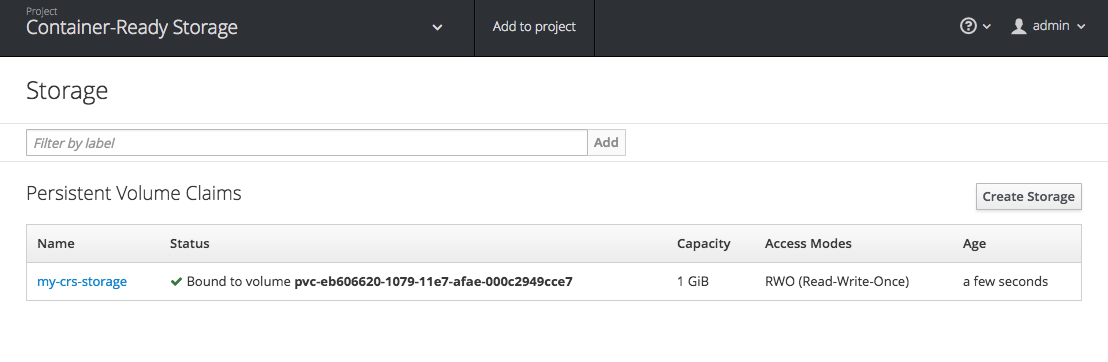
Watch the PVC being processed and fulfilled with a dynamically created volume in OpenShift:
# oc get pvc
NAME             STATUS    VOLUME                                     CAPACITY   ACCESSMODES   AGE
my-crs-storage   Bound     pvc-41ad5adb-107c-11e7-afae-000c2949cce7   1Gi        RWO           58s
Great! You have now storage capacity available for use in OpenShift without any interaction with the storage system directly. Let's look at the volume that got created:
# oc get pv/pvc-41ad5adb-107c-11e7-afae-000c2949cce7
Name:		pvc-41ad5adb-107c-11e7-afae-000c2949cce7
Labels:
StorageClass:	container-ready-storage
Status:		Bound
Claim:		crs-storage/my-crs-storage
Reclaim Policy:	Delete
Access Modes:	RWO
Capacity:	1Gi
Message:
Source:
    Type:		Glusterfs (a Glusterfs mount on the host that shares a pod's lifetime)
    EndpointsName:	gluster-dynamic-my-crs-storage
    Path:		vol_85e444ee3bc154de084976a9aef16025
    ReadOnly:		false
The volume has been created specifically according to the design specifications in the PVC. In the PVC we did not explicitly specify which StorageClass we wanted to use because the GlusterFS StorageClass using heketi was defined as the system-wide default.
What happened in the background was that when the PVC reached the system, our default StorageClass reached out to the GlusterFS Provisioner with the volume specs from the PVC. The provisioner in turn communicates with our heketi instance which facilitates the creation of the GlusterFS volume, which we can trace in it's log messages:
[root@crs-node1 ~]# journalctl -l -u heketi.service
...
Mar 24 11:25:52 crs-node1.lab heketi[2598]: [heketi] DEBUG 2017/03/24 11:25:52 /src/github.com/heketi/heketi/apps/glusterfs/volume_entry.go:298: Volume to be created on cluster e
Mar 24 11:25:52 crs-node1.lab heketi[2598]: [heketi] INFO 2017/03/24 11:25:52 Creating brick 9e791b1daa12af783c9195941fe63103
Mar 24 11:25:52 crs-node1.lab heketi[2598]: [heketi] INFO 2017/03/24 11:25:52 Creating brick 3e06af2f855bef521a95ada91680d14b
Mar 24 11:25:52 crs-node1.lab heketi[2598]: [heketi] INFO 2017/03/24 11:25:52 Creating brick e4daa240f1359071e3f7ea22618cfbab
...
Mar 24 11:25:52 crs-node1.lab heketi[2598]: [sshexec] INFO 2017/03/24 11:25:52 Creating volume vol_85e444ee3bc154de084976a9aef16025 replica 3
...
Mar 24 11:25:53 crs-node1.lab heketi[2598]: Result: volume create: vol_85e444ee3bc154de084976a9aef16025: success: please start the volume to access data
...
Mar 24 11:25:55 crs-node1.lab heketi[2598]: Result: volume start: vol_85e444ee3bc154de084976a9aef16025: success
...
Mar 24 11:25:55 crs-node1.lab heketi[2598]: [asynchttp] INFO 2017/03/24 11:25:55 Completed job c3d6c4f9fc74796f4a5262647dc790fe in 3.176522702s
...
Success! In just about 3 seconds the GlusterFS pool was configured and provisioned a volume. The default as of today is replica 3, which means the data will be replicated across 3 bricks (GlusterFS speak for backend storage) of 3 distinct nodes. The process is orchestrated via heketi on behalf of OpenShift.
You can see this information on the volume from GlusterFS perspective:
[root@crs-node1 ~]# gluster volume list
vol_85e444ee3bc154de084976a9aef16025
[root@crs-node1 ~]# gluster volume info vol_85e444ee3bc154de084976a9aef16025

Volume Name: vol_85e444ee3bc154de084976a9aef16025
Type: Replicate
Volume ID: a32168c8-858e-472a-b145-08c20192082b
Status: Started
Snapshot Count: 0
Number of Bricks: 1 x 3 = 3
Transport-type: tcp
Bricks:
Brick1: 172.16.128.8:/var/lib/heketi/mounts/vg_147b43f6f6903be8b23209903b7172ae/brick_9e791b1daa12af783c9195941fe63103/brick
Brick2: 172.16.128.9:/var/lib/heketi/mounts/vg_72c0f520b0c57d807be21e9c90312f85/brick_3e06af2f855bef521a95ada91680d14b/brick
Brick3: 172.16.128.7:/var/lib/heketi/mounts/vg_67314f879686de975f9b8936ae43c5c5/brick_e4daa240f1359071e3f7ea22618cfbab/brick
Options Reconfigured:
transport.address-family: inet
nfs.disable: on
Notice how the volume name in GlusterFS corresponds to the "path" of the Kubernetes Persistent Volume in OpenShift.
Alternatively you can also use the OpenShift UI to provision storage, which allows you to conveniently select among all known StorageClasses in the system:
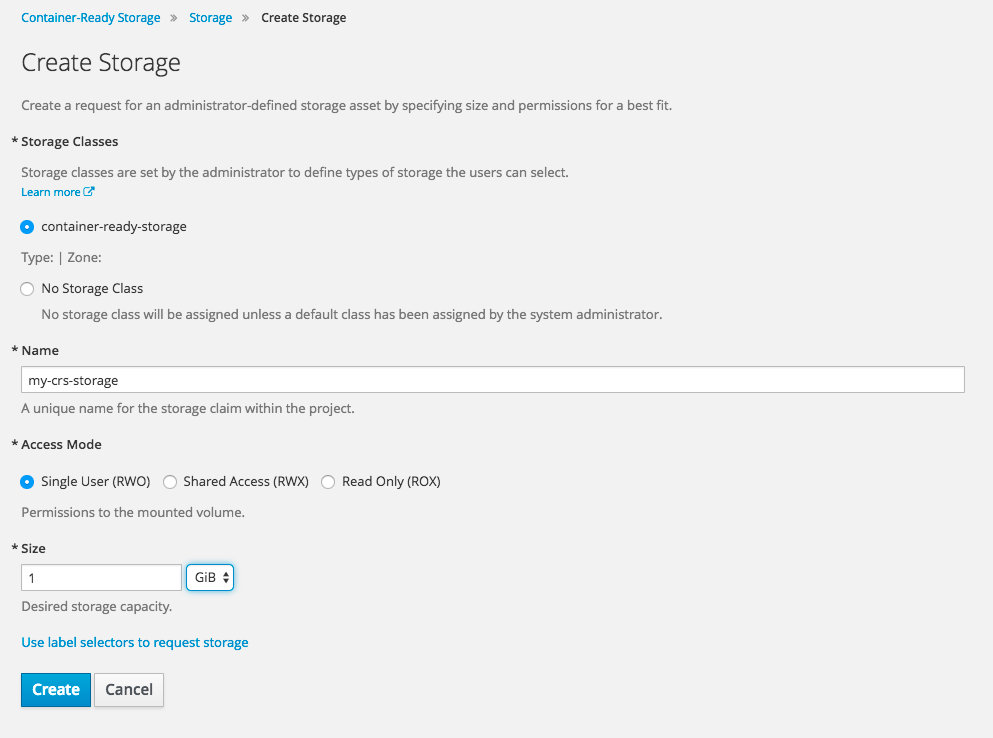
Let's make this a little more interesting and run a workload on OpenShift.
On our OpenShift VM still being in the crs-storage project:
# oc get templates -n openshift
You should see a nice list of application and database templates for easy consumption in OpenShift to get your app development project kickstarted.
We will use MySQL to demonstrate how to host a stateful application on OpenShift with persistent and elastic storage. The mysql-persistent template includes a PVC of 1G for the MySQL database directory. For demonstration purposes all default values are fine.
# oc process mysql-persistent -n openshift | oc create -f -
Wait for the deployment to finish. You can observe the progress in the UI or via
# oc get pods
NAME            READY     STATUS    RESTARTS   AGE
mysql-1-h4afb   1/1       Running   0          2m
Nice. This template created a service, secrets, a PVC and a pod. Let's use it (your pod name will differ):
# oc rsh mysql-1-h4afb
You have successfully attached to the MySQL pod. Let's connect to the database:
sh-4.2$ mysql -u $MYSQL_USER -p$MYSQL_PASSWORD -h $HOSTNAME $MYSQL_DATABASE
Conveniently all vital configuration like MySQL credentials, database name, etc are part of environment variables in the pod template and hence available in the pod as shell environment variables too. Let's create some data:
mysql> show databases;
+--------------------+
| Database           |
+--------------------+
| information_schema |
| sampledb           |
+--------------------+
2 rows in set (0.02 sec)

mysql> \u sampledb
Database changed
mysql> CREATE TABLE IF NOT EXISTS equipment (
    ->     equip_id int(5) NOT NULL AUTO_INCREMENT,
    ->     type varchar(50) DEFAULT NULL,
    ->     install_date DATE DEFAULT NULL,
    ->     color varchar(20) DEFAULT NULL,
    ->     working bool DEFAULT NULL,
    ->     location varchar(250) DEFAULT NULL,
    ->     PRIMARY KEY(equip_id)
    ->     );
Query OK, 0 rows affected (0.13 sec)

mysql> INSERT INTO equipment (type, install_date, color, working, location)
    -> VALUES
    -> ("Slide", Now(), "blue", 1, "Southwest Corner");
Query OK, 1 row affected, 1 warning (0.01 sec)

mysql> SELECT * FROM equipment;
+----------+-------+--------------+-------+---------+------------------+
| equip_id | type  | install_date | color | working | location         |
+----------+-------+--------------+-------+---------+------------------+
|        1 | Slide | 2017-03-24   | blue  |       1 | Southwest Corner |
+----------+-------+--------------+-------+---------+------------------+
1 row in set (0.00 sec)
This means the database is functional. Great!
Do you want to see where the data is stored? Easy! Look at the mysql volume that got created as part of the template:
# oc get pvc/mysql
NAME      STATUS    VOLUME                                     CAPACITY   ACCESSMODES   AGE
mysql     Bound     pvc-a678b583-1082-11e7-afae-000c2949cce7   1Gi        RWO           11m
# oc describe pv/pvc-a678b583-1082-11e7-afae-000c2949cce7
Name:		pvc-a678b583-1082-11e7-afae-000c2949cce7
Labels:
StorageClass:	container-ready-storage
Status:		Bound
Claim:		crs-storage/mysql
Reclaim Policy:	Delete
Access Modes:	RWO
Capacity:	1Gi
Message:
Source:
    Type:		Glusterfs (a Glusterfs mount on the host that shares a pod's lifetime)
    EndpointsName:	gluster-dynamic-mysql
    Path:		vol_6299fc74eee513119dafd43f8a438db1
    ReadOnly:		false
Note the path to GlusterFS volume name vol_6299fc74eee513119dafd43f8a438db1.
Return to one of your GlusterFS VMs and issue:
# gluster volume info vol_6299fc74eee513119dafd43f8a438db

Volume Name: vol_6299fc74eee513119dafd43f8a438db1
Type: Replicate
Volume ID: 4115918f-28f7-4d4a-b3f5-4b9afe5b391f
Status: Started
Snapshot Count: 0
Number of Bricks: 1 x 3 = 3
Transport-type: tcp
Bricks:
Brick1: 172.16.128.7:/var/lib/heketi/mounts/vg_67314f879686de975f9b8936ae43c5c5/brick_f264a47aa32be5d595f83477572becf8/brick
Brick2: 172.16.128.8:/var/lib/heketi/mounts/vg_147b43f6f6903be8b23209903b7172ae/brick_f5731fe7175cbe6e6567e013c2591343/brick
Brick3: 172.16.128.9:/var/lib/heketi/mounts/vg_72c0f520b0c57d807be21e9c90312f85/brick_ac6add804a6a467cd81cd1404841bbf1/brick
Options Reconfigured:
transport.address-family: inet
nfs.disable: on
You can see how the data is replicated across 3 GlusterFS bricks. Let's pick one of them (ideally the host you are logged on to and look at the directory contents):
# ll /var/lib/heketi/mounts/vg_67314f879686de975f9b8936ae43c5c5/brick_f264a47aa32be5d595f83477572becf8/brick
total 180300
-rw-r-----. 2 1000070000 2001       56 Mar 24 12:11 auto.cnf
-rw-------. 2 1000070000 2001     1676 Mar 24 12:11 ca-key.pem
-rw-r--r--. 2 1000070000 2001     1075 Mar 24 12:11 ca.pem
-rw-r--r--. 2 1000070000 2001     1079 Mar 24 12:12 client-cert.pem
-rw-------. 2 1000070000 2001     1680 Mar 24 12:12 client-key.pem
-rw-r-----. 2 1000070000 2001      352 Mar 24 12:12 ib_buffer_pool
-rw-r-----. 2 1000070000 2001 12582912 Mar 24 12:20 ibdata1
-rw-r-----. 2 1000070000 2001 79691776 Mar 24 12:20 ib_logfile0
-rw-r-----. 2 1000070000 2001 79691776 Mar 24 12:11 ib_logfile1
-rw-r-----. 2 1000070000 2001 12582912 Mar 24 12:12 ibtmp1
drwxr-s---. 2 1000070000 2001     8192 Mar 24 12:12 mysql
-rw-r-----. 2 1000070000 2001        2 Mar 24 12:12 mysql-1-h4afb.pid
drwxr-s---. 2 1000070000 2001     8192 Mar 24 12:12 performance_schema
-rw-------. 2 1000070000 2001     1676 Mar 24 12:12 private_key.pem
-rw-r--r--. 2 1000070000 2001      452 Mar 24 12:12 public_key.pem
drwxr-s---. 2 1000070000 2001       62 Mar 24 12:20 sampledb
-rw-r--r--. 2 1000070000 2001     1079 Mar 24 12:11 server-cert.pem
-rw-------. 2 1000070000 2001     1676 Mar 24 12:11 server-key.pem
drwxr-s---. 2 1000070000 2001     8192 Mar 24 12:12 sys
You can see the MySQL database directory here. This is how it's stored in GlusterFS backend and presented to the MySQL container as a bind-mount. If you check your mount table on the OpenShift VM you will see the GlusterFS mount.
Summary
What we have done here is create a simple but functional GlusterFS storage pool outside of OpenShift. This pool can grow and shrink independently of the applications. The entire lifecycle of this pool is managed by a simple front-end known as heketi which only needs manual intervention when the deployment grows. For daily provisioning operations it's API is used via OpenShifts dynamic provisioner, eliminating the need for Developers to interact with Infrastructure teams directly.
This is how we bring storage into the DevOps world - painless, and available directly via developer tooling of the OpenShift PaaS system.
GlusterFS and OpenShift run across all foot-prints: bare-metal, virtual, private and public cloud (Azure, Google Cloud, AWS...) ensuring application portability and avoiding cloud provider lock-in.
Happy Glustering your Containers!
(c) 2017 Keith Tenzer