
It’s a PaaS: Vanilla Kubernetes vs OpenShift on OpenStack Lab Setup Guide

Overview
Often a lot of people seem to confuse Kubernetes with OpenShift or a platform-as-a-service (PaaS). Kubernetes is of course on it's own, not. It is an orchestration layer or technology for containers but a lot is missing to really call it a platform. OpenShift is Red Hat enterprise Kubernetes platform. It contains Kubernetes but also a whole lot more which make it a true platform. So which is right for you? It depends a lot on your requirements and what you are trying to achieve. The purpose of this article is to setup an environment for running a workshop that compares the Kubernetes experience with OpenShift in order to gain more insight and understanding in what you may actually need. Many people sit down with slides or at a whiteboard, but I really find that is not adequate and you really need to experience it, first hand.
This article will guide you through building an OpenStack IaaS environment and then create a vanilla Kubernetes environment using Magnum (a OpenStack service for providing container technologies) and one using OpenShift. Both environments will run on OpenStack. You will need a physical system. My recommendation is 64GB RAM, 1-2 Socket CPU and SSDs. You can get such a server on a monthly basis at the Hetzner cloud for cheap, including 15 additional IPV4 floating ips. The guide explains how to set everything up on Hetzner as well. Hetzner provides an auction market for used hardware which is why it is so cheap. Below is a link to get going on ordering a Hetzner server.
Deploy OpenStack Environment
You can choose whatever OpenStack distribution you want as long as it has Magnum and LBaaS or Octavia. Currently none of the major distributions ship Magnum. This is because Magnum is not yet very stable and is considered experimental. Nevertheless it is a good way to get a vanilla Kubernetes cluster going.
We will be using the RDO community distribution of OpenStack which running on CentOS, this allows for automatically configuring Magnum. The following blog is a step-by-step guide of deploying OpenStack on Hetzner.
If you are interested in an automated approach a colleague of mine has written an Ansible playbook to deploy OpenStack on hetzner for this use case.
https://github.com/ktenzer/openshift-on-openstack-123
Configure Magnum Kubernetes Cluster
Magnum provides templates to deploy kubernetes, mesos or docker swarn. The idea is to create a template and then deploy a cluster from the template. Heat is used to deploy the cluster. The concept of Magnum is similar to that of Kubernetes in the cloud (Amazon, Microsoft and Google). There is no multi-tenancy or isolation between namespaces. You typically end up running lots and lots of clusters, one per application maybe even. Below is a diagram to help visualize the deployment.

Download Fedora Atomic Image
$ wget https://download.fedoraproject.org/pub/alt/atomic/stable/Fedora-Atomic-27-20180419.0/CloudImages/x86_64/images/Fedora-Atomic-27-20180419.0.x86_64.qcow2
Add Image to OpenStack Glance
$ openstack image create --disk-format=qcow2 --container-format=bare \
--file=Fedora-Atomic-27-20180419.0.x86_64.qcow2 \
--property os_distro='fedora-atomic' --public fedora-atomic-latest
Create Template
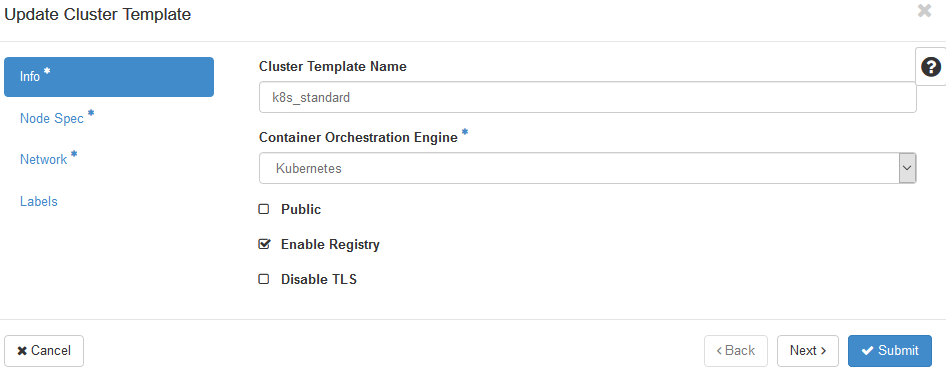
Under "Container Infra" -> "Cluster Templates" create a new template. Select Kubernetes for the orchestration engine.
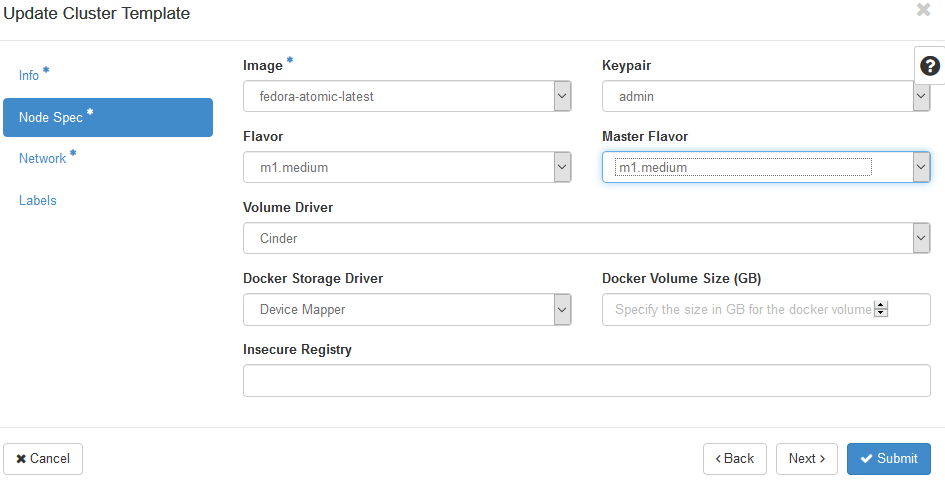
Choose flavor and configure storage settings.
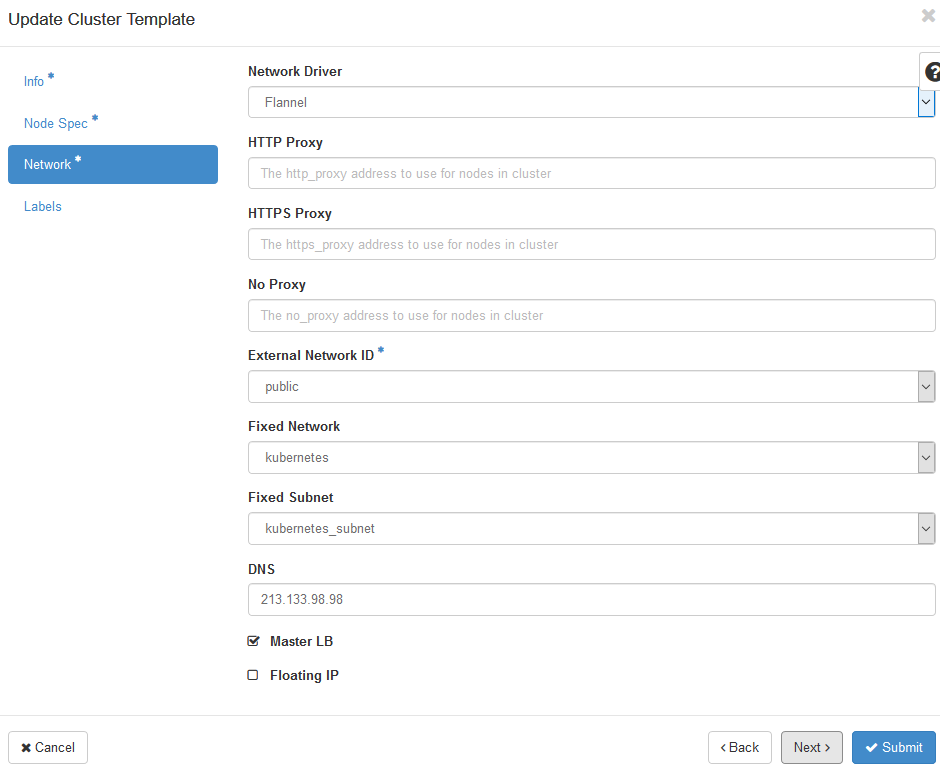
Configure container network settings.
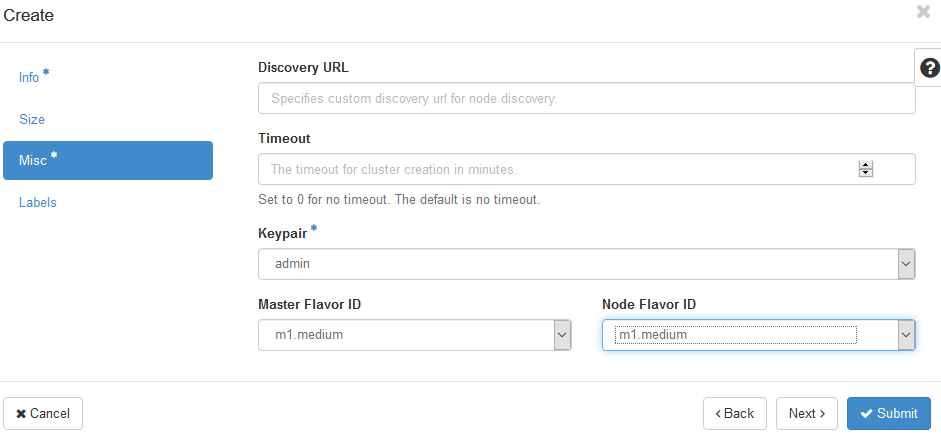
Deploy Template
Once the template is created you simply click deploy cluster from the template. Choose name for cluster and select proper template.
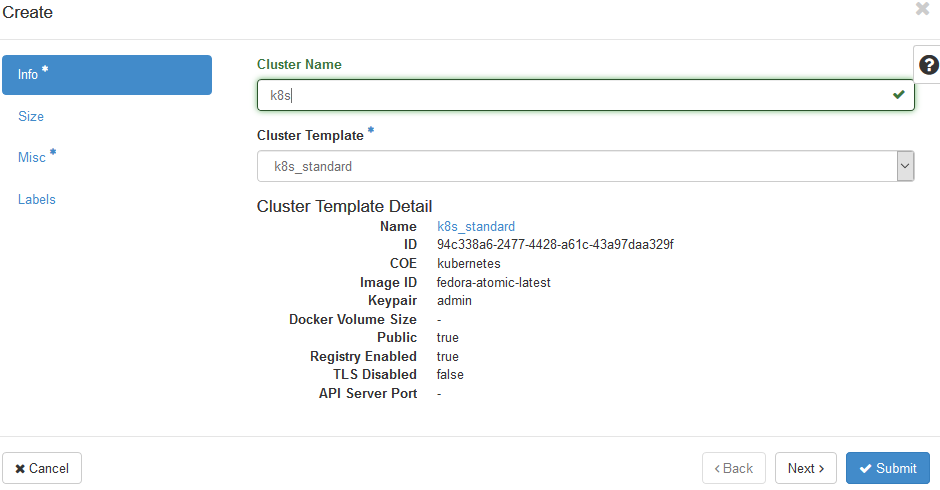
Choose number of masters and nodes and size of docker volume.

Choose flavors and admin key for accessing cluster.
Follow deployment from Heat.
# openstack stack event list k8s-demo-4ogiuqtpozdr
2018-12-15 10:16:42Z [k8s-demo-4ogiuqtpozdr]: CREATE_IN_PROGRESS Stack CREATE started
2018-12-15 10:16:43Z [k8s-demo-4ogiuqtpozdr.nodes_server_group]: CREATE_IN_PROGRESS state changed
2018-12-15 10:16:43Z [k8s-demo-4ogiuqtpozdr.nodes_server_group]: CREATE_COMPLETE state changed
2018-12-15 10:16:44Z [k8s-demo-4ogiuqtpozdr.network]: CREATE_IN_PROGRESS state changed
2018-12-15 10:16:45Z [k8s-demo-4ogiuqtpozdr.secgroup_kube_minion]: CREATE_IN_PROGRESS state changed
2018-12-15 10:16:46Z [k8s-demo-4ogiuqtpozdr.secgroup_kube_master]: CREATE_IN_PROGRESS state changed
2018-12-15 10:16:46Z [k8s-demo-4ogiuqtpozdr.secgroup_kube_minion]: CREATE_COMPLETE state changed
2018-12-15 10:16:47Z [k8s-demo-4ogiuqtpozdr.network]: CREATE_COMPLETE state changed
2018-12-15 10:16:47Z [k8s-demo-4ogiuqtpozdr.api_lb]: CREATE_IN_PROGRESS state changed
2018-12-15 10:16:47Z [k8s-demo-4ogiuqtpozdr.etcd_lb]: CREATE_IN_PROGRESS state changed
2018-12-15 10:16:48Z [k8s-demo-4ogiuqtpozdr.secgroup_kube_master]: CREATE_COMPLETE state changed
2018-12-15 10:17:01Z [k8s-demo-4ogiuqtpozdr.etcd_lb]: CREATE_COMPLETE state changed
2018-12-15 10:17:03Z [k8s-demo-4ogiuqtpozdr.api_lb]: CREATE_COMPLETE state changed
2018-12-15 10:17:03Z [k8s-demo-4ogiuqtpozdr.kube_masters]: CREATE_IN_PROGRESS state changed
2018-12-15 10:24:23Z [k8s-demo-4ogiuqtpozdr.kube_masters]: CREATE_COMPLETE state changed
2018-12-15 10:24:23Z [k8s-demo-4ogiuqtpozdr.api_address_lb_switch]: CREATE_IN_PROGRESS state changed
2018-12-15 10:24:24Z [k8s-demo-4ogiuqtpozdr.etcd_address_lb_switch]: CREATE_IN_PROGRESS state changed
2018-12-15 10:24:25Z [k8s-demo-4ogiuqtpozdr.api_address_lb_switch]: CREATE_COMPLETE state changed
2018-12-15 10:24:25Z [k8s-demo-4ogiuqtpozdr.etcd_address_lb_switch]: CREATE_COMPLETE state changed
2018-12-15 10:24:25Z [k8s-demo-4ogiuqtpozdr.api_address_floating_switch]: CREATE_IN_PROGRESS state changed
2018-12-15 10:24:25Z [k8s-demo-4ogiuqtpozdr.kube_minions]: CREATE_IN_PROGRESS state changed
2018-12-15 10:24:26Z [k8s-demo-4ogiuqtpozdr.api_address_floating_switch]: CREATE_COMPLETE state changed
2018-12-15 10:30:32Z [k8s-demo-4ogiuqtpozdr.kube_minions]: CREATE_COMPLETE state changed
2018-12-15 10:30:32Z [k8s-demo-4ogiuqtpozdr]: CREATE_COMPLETE Stack CREATE completed successfully
[Kubernetes Master]
Log into the Kubernetes master and get the admin service account token.
# kubectl get secrets -n kube-system
NAME TYPE DATA AGE
admin-token-gkfx2 kubernetes.io/service-account-token 3 1h
coredns-token-wg568 kubernetes.io/service-account-token 3 1h
default-token-9h58d kubernetes.io/service-account-token 3 1h
heapster-token-2kr9d kubernetes.io/service-account-token 3 1h
kube-dns-autoscaler-token-8h4lg kubernetes.io/service-account-token 3 1h
kubernetes-dashboard-certs Opaque 0 1h
kubernetes-dashboard-key-holder Opaque 2 55m
kubernetes-dashboard-token-tfxjj kubernetes.io/service-account-token 3 1h
# kubectl describe secret admin-token-gkfx2 -n kube-system
Name: admin-token-gkfx2
Namespace: kube-system
Labels: <none>
Annotations: kubernetes.io/service-account.name=admin
kubernetes.io/service-account.uid=8796d78d-0053-11e9-9468-fa163ed886d7

Type: kubernetes.io/service-account-token

Data
====
token: eyJhbGciOiJSUzI1NiIsInR5cCI6IkpXVCJ9.eyJpc3MiOiJrdWJlcm5ldGVzL3NlcnZpY2VhY2NvdW50Iiwia3ViZXJuZXRlcy5pby9zZXJ2aWNlYWNjb3VudC9uYW1lc3BhY2UiOiJrdWJlLXN5c3RlbSIsImt1YmVybmV0ZXMuaW8vc2VydmljZWFjY291bnQvc2VjcmV0Lm5hbWUiOiJhZG1pbi10b2tlbi1na2Z4MiIsImt1YmVybmV0ZXMuaW8vc2VydmljZWFjY291bnQvc2VydmljZS1hY2NvdW50Lm5hbWUiOiJhZG1pbiIsImt1YmVybmV0ZXMuaW8vc2VydmljZWFjY291bnQvc2VydmljZS1hY2NvdW50LnVpZCI6Ijg3OTZkNzhkLTAwNTMtMTFlOS05NDY4LWZhMTYzZWQ4ODZkNyIsInN1YiI6InN5c3RlbTpzZXJ2aWNlYWNjb3VudDprdWJlLXN5c3RlbTphZG1pbiJ9.KFGUddyzu6Z_fGJAC0EszF2UNe6zIBZ-kxI0tDbBlCsR8Slh2QNKuQ5PuFeSo7V1cb3SLcqoFHB_MjWsQmNfX_gIgqd1uuMe82dSW0xaK17zNvZG2qVNZdzWgGgqRErJ2j2hLL2BnH8K5i--O6nmpJn8eom-OJXq7UhdGu8gAq_FFYt86R5PI7u3e7tOjaY5BHKTi_tkBYEQdpJizu0fTHbJ-s-vJac2yx4puHkAcE_OHCpXL2nDdp92vvj3iqI8v11iR1IJ5OrVU5drITbIiNRk_RHe7Fcwfyu47oRXzs1XpRZCoZBPSRG_KCZYX1g8k0KDP9nNHkiDGTWoDEk-ICUZP5V1rHtNdB1kKNUAQ_vw_fSK3erfP0Aim2g3roLSl_P6K3uvoZV825U9biaVtxGFBwCFE49uzH_PM9HA4xtghIajqTZpW4vXn_vbBOSlt26RHex08AVWaPp0UYHyyEj8b6leryiPnd-tOoVSV7iZa5nlECoffGXoVq7ISWXPldu2Qt7GH2olE-nmOyOoKmU2ETUGHds_x2EpN9Fp6kJkFhJ0FfPblJAi0JEEJ5cSjUGKuq5dKRwZgoiS00bW2_UznDXAql6yHAcDzf6-PqYY4oSEfk4UxpBz6RafE-Y_ba6VWT5cu8_S8HDsBAdmuefjL7qXLN2xgsCFwy26FxI
ca.crt: 1046 bytes
namespace: 11 bytes
Deploy Bastion
In order to access the environment it strongly recommended to setup a bastion. You will want to use same OS image as is used for Kubernetes. In this case that is fedora atomic. The reason is you will want kubectl client. You could however do this on any system and then setup the kubectl client.
From OpenStack UI in the project deploy a new instance using the fedora atomic image.
[Bastion]
Log into the bastion and install the following rpms. Since this is fedora atomic we need to use rpm-ostree.
# ssh -i <openstack keypair> fedora@<bastion floating ip>
# rpm-ostree install kubernetes
# rpm-ostree install git
# rpm-ostree install ansible
# rpm-ostree install python-passlib
Reboot bastion
# systemctl reboot
Log back into bastion and setup kubectl credentials with admin service account.
# kubectl config set-credentials cluster-admin \
--server=https://176.9.171.115:6443 --insecure-skip-tls-verify \
--token=eyJhbGciOiJSUzI1NiIsInR5cCI6IkpXVCJ9.eyJpc3MiOiJrdWJlcm5ldGVzL3NlcnZpY2VhY2NvdW50Iiwia3ViZXJuZXRlcy5pby9zZXJ2aWNlYWNjb3VudC9uYW1lc3BhY2UiOiJrdWJlLXN5c3RlbSIsImt1YmVybmV0ZXMuaW8vc2VydmljZWFjY291bnQvc2VjcmV0Lm5hbWUiOiJhZG1pbi10b2tlbi1na2Z4MiIsImt1YmVybmV0ZXMuaW8vc2VydmljZWFjY291bnQvc2VydmljZS1hY2NvdW50Lm5hbWUiOiJhZG1pbiIsImt1YmVybmV0ZXMuaW8vc2VydmljZWFjY291bnQvc2VydmljZS1hY2NvdW50LnVpZCI6Ijg3OTZkNzhkLTAwNTMtMTFlOS05NDY4LWZhMTYzZWQ4ODZkNyIsInN1YiI6InN5c3RlbTpzZXJ2aWNlYWNjb3VudDprdWJlLXN5c3RlbTphZG1pbiJ9.KFGUddyzu6Z_fGJAC0EszF2UNe6zIBZ-kxI0tDbBlCsR8Slh2QNKuQ5PuFeSo7V1cb3SLcqoFHB_MjWsQmNfX_gIgqd1uuMe82dSW0xaK17zNvZG2qVNZdzWgGgqRErJ2j2hLL2BnH8K5i--O6nmpJn8eom-OJXq7UhdGu8gAq_FFYt86R5PI7u3e7tOjaY5BHKTi_tkBYEQdpJizu0fTHbJ-s-vJac2yx4puHkAcE_OHCpXL2nDdp92vvj3iqI8v11iR1IJ5OrVU5drITbIiNRk_RHe7Fcwfyu47oRXzs1XpRZCoZBPSRG_KCZYX1g8k0KDP9nNHkiDGTWoDEk-ICUZP5V1rHtNdB1kKNUAQ_vw_fSK3erfP0Aim2g3roLSl_P6K3uvoZV825U9biaVtxGFBwCFE49uzH_PM9HA4xtghIajqTZpW4vXn_vbBOSlt26RHex08AVWaPp0UYHyyEj8b6leryiPnd-tOoVSV7iZa5nlECoffGXoVq7ISWXPldu2Qt7GH2olE-nmOyOoKmU2ETUGHds_x2EpN9Fp6kJkFhJ0FfPblJAi0JEEJ5cSjUGKuq5dKRwZgoiS00bW2_UznDXAql6yHAcDzf6-PqYY4oSEfk4UxpBz6RafE-Y_ba6VWT5cu8_S8HDsBAdmuefjL7qXLN2xgsCFwy26FxI
Setup a context and save cluster settings.
# kubectl config set-context cluster-admin
# kubectl config use-context cluster-admin
# kubectl config set-cluster k8s-student \
--server=https://<ip of master api load balancer>:6443 \
--insecure-skip-tls-verify
# kubectl config set-context cluster-admin --user=cluster-admin \
--cluster=k8s-student
Check to ensure it working. You should see the pods running under kube-system.
# kubectl get pods -n kube-system
Create student accounts on Kubernetes
Clone GitHub repository.
$ git clone https://github.com/ktenzer/its-a-paas.git
$ cd its-a-paas/k8s/playbooks
Run playbook to create system users.
$ ansible-playbook create_users.yml
Run playbook to create student service accounts.
$ ansible-playbook create_sa.yml
Run playbook to create role binding.
$ ansible-playbook create_rolebinding.yml
Save generated tokens under student home directories.
$ ./save_token.sh
Copy token to credentials directory where user account passwords are stored.
$ sudo ./copy_token.sh
Configure OpenShift Cluster
OpenShift is Red Hat's enterprise Kubernetes platform. There is also a community version of OpenShift called OKD. OpenShift offers quite a lot more than vanilla Kubernetes, as mentioned, which is what Magnum of course deploys. Below is a list of additional capabilities OpenShift brings with it, in addition to Kubernetes.
- Service Catalog with many ready-to-go application runtimes, databases, frameworks and middleware.
- Source-to-Image (S2I) allows source code to act as layer in container and re-use other layers so build runs many times faster.
- Day 2 Operations: Aggregated Logging (EFK), Monitoring (Prometheus/Grafana), Metrics (Hawkular), Alerting (Pro,metheus) and Events.
- UI/API that encompasses entire platform (Orchestration, Container Images, Builds, Deployments, Service Catalog and more).
- Network and Security Isolation between projects, containers and namespaces.
- SDN out-of-box based on openvswitch but supporting many SDN plugins (Nuage, Contrail, NSX-T, Cisco ACI and more).
- Out-of-box solution for routing Ingress and Egress Traffic.
- Container Native Storage (based on GlusterFS, runs in containers using local disks and integrates with platform).
- Concept for Infrastructure and Storage Nodes, Kubernetes just has masters and nodes.
- CRI-O OCI based implementation of Kubernetes Container Runtime Interface (supports any OCI compliant container image format).
- And much much more...
Deploy OpenShift on OpenStack
We have automated the deployment of OpenShift on OpenStack in Ansible. The playbooks can deploy OpenShift Enterprise, OKD or even a disconnected install. Instructions and the playbooks themselves can be found in the following GitHub repository.
https://github.com/ktenzer/openshift-on-openstack-123
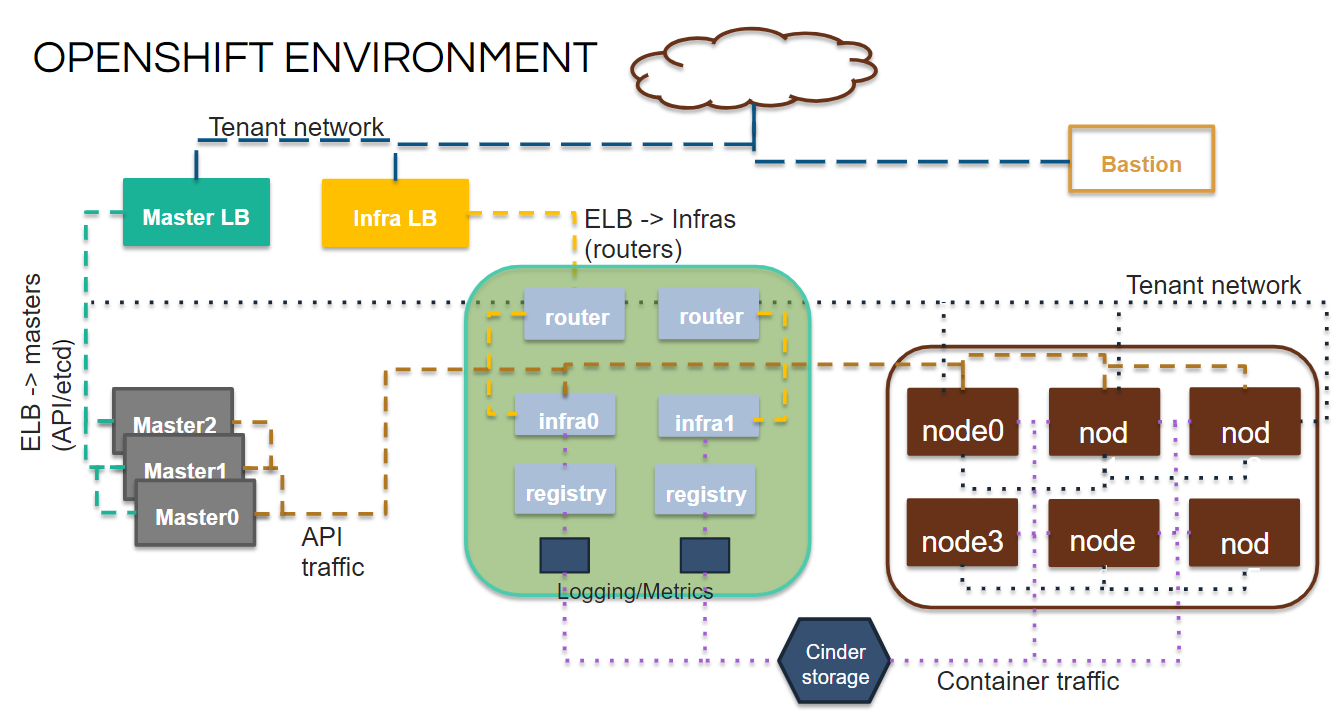
You will of course need to prepare a few things like a OpenStack project, image and tenant network in OpenStack but those things are documented in the GitHub readme. A typical OpenShift environment will be 3 x Masters, 2-3 x Infras and 2 or more Nodes. Below is a diagram to help visualize the deployment.
[Bastion]
Log into the openshift bastion.
$ ssh -i <openstack keypair> cloud-user@<bastion floating ip>
Create student accounts on OpenShift
Clone GitHub repository.
$ git clone https://github.com/ktenzer/its-a-paas.git
$ cd its-a-paas/openshift/playbooks
Run playbook to create system users.
$ ansible-playbook create_users.yml
Run playbook to create openstack users.
$ source /home/cloud-user/keystonerc_admin
Note: You may need to copy the keystonerc file to the bastion host.
$ ansible-playbook create_openstack_users.yml
Note: If you are running both Magnum and OpenShift labs and want the same usernames and passwords, simply copy the its-a-paas/k8s/playbooks/credentials directory before running the playbooks. If the credentials are already existing they will be used instead of new ones generated.
Running the Magnum and OpenShift Labs
By default there are 40 student accounts created student0-student40. The passwords are located in the credentials/<#>/password.txt file. Provide students with their username and password as well as the IPs of the Magnum and OpenShift Bastions.
For Magnum students also need the floating ips of all of the Kubernetes nodes. This is because Magnum provides no way to route traffic into platform as such we are exposing services out the node physical floating IPs.
For OpenShift students need the URL to the master API/UI. By default we use xip.io for DNS so it is just floating ip of the master in OpenStack (https://openshift.<master lb floating ip>.xip.io:8443). In the future we plan on using Designate from OpenStack which provides DNSaaS.
The lab can be found at the below GitHub repository.
https://github.com/ktenzer/its-a-paas
The exercises for Kubernetes are located under the k8s directory. The OpenShift exercises are located under the openshift directory. The first three exercises are the same for both but OpenShift has additional exercises that focus on day 2 operations.
Summary
In this article we went through the steps in order to build a software-defined cloud with distinct, decoupled infrastructure (IaaS) and platform (PaaS) layers. The deployment of the IaaS and the two different PaaS layers Magnum as well as OpenShift are opinionated deployments. We went through the steps to prepare for a lab or workshop environment with the goal to give students the ability to try out some of the differences between vanilla Kubernetes and OpenShift.
Happy Learning!
(c) 2018 Keith Tenzer