
OpenShift 3.6 Fast Track: Everything You Need, Nothing You Don’t

Overview
OpenShift Container Platform 3.6 went GA on August 9, 2017. You can read more about the release and new features here. In this article we will setup a standard non-HA environment that is perfect for PoCs or labs. Before we begin, let's explain OpenShift for those that may be starting their OpenShift journey today. OpenShift is a complete container application build + run-time platform built on Kubernetes (Container Orchestration) and Docker (Container Packaging Format). Organizations looking to adopt containerization for their applications need of course a lot more than just technology, (Kubernetes and Docker), they need a real platform. OpenShift provides a service catalog for containerized applications, huge selection of already certified application runtimes + xPaaS services, a method for building containerized applications (source to image), centralized application logging, metrics, autoscaling, application deployments (Blue-Green, A/B, Canary, Rolling), integrated Jenkins CI/CD pipelines, integrated docker registry, load balancing / routes to containerized apps, multi-tenant SDN, security features (SELinux, secrets, security context), management tooling supporting multiple OpenShift environments (CloudForms), persistent storage (built-in Container Native Storage), automated deployment tooling based on Ansible and much, much more. OpenShift is a platform that runs on any infrastructure, from bare-metal to virtualization to public cloud (Amazon, Google, Microsoft), providing portability across cloud infrastructure for containerized applications. All of these things together is what truly enables organizations to move to DevOps, increase application release cycles, speed up innovation cycles, scale efficiently, gain independence from infrastructure providers and deliver new capabilities faster with more reliability to their customers.
OpenShift Environment
OpenShift has a few different architectures (Single Master, Multiple Master Integrated ETCD or Multiple Master Separate ETCD).
Single Master - This is a non-HA configuration. First there is only a single master which also runs ETCD and a single infrastructure node. The infrastructure node also runs OpenShift services such as docker registry, router, metrics and logging. This is only intended for lab or PoC environments.
Multiple Master Integrated ETCD - This is an HA configuration with three masters and two or more infrastructure nodes. OpenShift control plane as well as critical services are all in active/active HA configuration. ETCD service is running on the three masters.
Multiple Master Separate ETCD - This is an HA configuration with three masters and two or more infrastructure nodes. OpenShift control plane as well as critical services are all in active/active HA configuration. ETCD service is running on three separate servers. Since ETCD maintains state for OpenShift cluster it is critical the service is not only available but provides fast responses and updates. In some environments due to number of objects or size, it is preferred to separate ETCD. This is of course an architectural decision that requires discussion and planning.
Here we have chosen to go with Single Master. Note: when referring to regions and zones, these are just labels that allow us to isolate nodes to different applications / projects. They are not dependent on public cloud regions.

API and management traffic go to the master server. In a multiple master configuration a load balancer would balance traffic across the masters. Application traffic instead goes directly to the infrastructure node. In case of HA configuration, multiple infrastructure nodes and of course a load balancer in front would be configured. Application domains are in this case directed toward the single infrastructure node in DNS. In case of multiple infrastructure nodes, DNS should point application domains to load balancer. DNS round-robin is not a good option as it will continue to send traffic to infrastructure nodes, even if unavailable.
In this configuration we will create two regions and two zones. OpenShift through labeling lets you tailor the architecture to meet your infrastructure and Affinity / Anti-Affinity requirements. Infrastructure and applications are isolated to specific nodes using the region. Within the application region (Primary) we separate applications between zones test and production. Using the multi-tenant SDN included in OpenShift, traffic between applications in test and production will be restricted or not allowed.
Application persistence is provided by container native storage. Normally we would define special nodes for providing storage, in this case however the application nodes will fill that need. Container Native Storage works by running glusterfs (software-defined scale-out storage system) inside a container on each node. Container Native Storage requires a minimum of three nodes. The glusterfs container consumes local disks, available on node and builds a cluster-wide highly redundant storage system spanning all the nodes. OpenShift provides a storage class for consuming the storage dynamically. Developers can simply ask for storage by size (GB) and is is provided on the fly, dynamically assuming of course quotas aren't overwritten. In this environment storage is also automatically reclaimed based on policies defined by the Developer.
Configure OpenShift Nodes
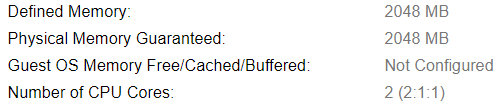
In OpenShift there are several types of nodes (master, infra, app, storage and etcd). Each type of node has different CPU, memory and storage requirements. The minimum requirements are 8GB of memory for a node but you can get away with far less (if you disable checking in configuration). Since this is a lab setup we will do just that.
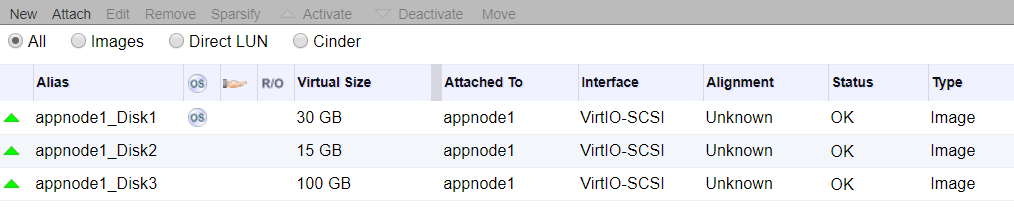
For storage we will either use 40GB or 30GB root disk, 15GB for Docker and 100GB for Container Native Storage. Everything is being provided by the virtualization layer, in this case Red Hat Virtualization powered by KVM. Again this could be bare-metal, any virtualization platform or any public cloud provider.
Master Nodes


Infra Nodes


App Nodes
Prepare OpenShift Nodes
Once the infrastructure is complete, a Container Operating System needs to be installed. The Operating System is as important as ever since containers are simply processes that run on Linux. Containers do not provide good isolation like VMs so security features in Operating System like SELinux, Kernel Capabilities, Container Signing, Secured Registries, TLS communications, Secrets and Security Context's are incredibly important. Thankfully you get it all out-of-the-box with OpenShift.
The choice of Operating Systems comes down to RHEL or Atomic. Atomic is a RHEL kernel but is image based (no RPMs), everything that is installed or runs in Atomic must run as container. RHEL allows more flexibility to install other required software but the recommendation is definitely Atomic for OpenShift, especially if additional software is not required (monitoring, etc).
[All Nodes]
Register Repositories
# subscription-manager register
# subscription-manager attach --pool=<pool_id>
# subscription-manager repos --disable="*"
# subscription-manager repos \
 --enable="rhel-7-server-rpms" \
 --enable="rhel-7-server-extras-rpms" \
 --enable="rhel-7-server-ose-3.6-rpms" \
 --enable="rhel-7-fast-datapath-rpms"
Install Required Packages
# yum install -y wget git net-tools bind-utils iptables-services \
bridge-utils bash-completion kexec-tools sos psacct
Update Operating System
# yum update -y
Configure Docker
# yum install -y docker-1.12.6
# vi /etc/sysconfig/docker
OPTIONS='--insecure-registry=172.30.0.0/16 --selinux-enabled --log-driver=journald'
Since we are not using Docker Hub (god save you if you are doing that) and the OpenShift Docker registry is internal, we can safely allow insecure registry. Make sure SELinux is enabled, this is a big deal for securing your containers. The log driver should be journald.
cat <<EOF > /etc/sysconfig/docker-storage-setup
DEVS=/dev/sdb
VG=docker-vg
EOF
Here we will use the 15GB disk for docker storage. You can use the 'lsblk' command to easily see the device numbers of your disks. Make sure the disk has no partitions.
# docker-storage-setup
# systemctl enable docker
# systemctl start docker
Name Resolution
Here we have two options, either use DNS or hosts file. Obviously for a real environment you are going with DNS but some people are lazy.
If you are using DNS, create a wildcard pointing from application domain (apps.lab) to the infrastructure node. You can simply create an 'A' record in your named zone (*.apps.lab).
vi /etc/resolv.conf
#search lab cluster.local
Ensure any search domain is commented out in /etc/resolv.conf, this will break SkyDNS used in OpenShift for internal service registry and resolution. To keep resolv.conf from being updated you can 'chattr +i' the file or update dnsmasq settings.
# systemctl reboot
[On Laptop]
In case you are using hosts file, make sure your laptop can resolve the OpenShift master and Hawkular (metrics) as well as Kibana (logging) need to be pointed at infra node. Additionally if you create any applications in OpenShift and expose them via routes, those host names need to go into hosts file and resolve to infra node. Hopefully you see now why a wildcard DNS is recommended.
Example of my Laptop /etc/hosts.
# vi /etc/hosts
192.168.0.30 master1.lab master1
192.168.0.34 hawkular-metrics.apps.lab
192.168.0.34 kibana.apps.lab
Configure OpenShift
As mentioned, OpenShift uses Ansible as it's life-cyle management and deployment tool. There are playbooks for installing, upgrading and adding or removing various components (Metrics, Logging, Storage, etc). Normally a Bastion host would be deployed for Ansible. In this case we install Ansible on the master.
[On Master]
Install Ansible and OpenShift Playbooks
# yum install -y atomic-openshift-utils
Configure SSH Authorization
# ssh-keygen
# for host in master1.lab \
appnode1.lab \
appnode2.lab \
appnode3.lab \
infranode1.lab; \
do ssh-copy-id $host; \
done
Configure Deployment Options
The Ansible playbooks require an inventory file that defines the hosts and also configuration options for OpenShift via group vars.
# vi /etc/ansible/hosts
# Create an OSEv3 group that contains the masters and nodes groups
[OSEv3:children]
masters
etcd
glusterfs
nodes

# Set variables common for all OSEv3 hosts
[OSEv3:vars]
# SSH user, this user should allow ssh based auth without requiring a password
ansible_ssh_user=root

# OpenShift Deployment, enterprise of course!
openshift_deployment_type=openshift-enterprise

#Set Domain for Apps
openshift_master_default_subdomain=apps.lab

# Enable htpasswd authentication; defaults to DenyAllPasswordIdentityProvider
openshift_master_identity_providers=[{'name': 'htpasswd_auth', 'login': 'true', 'challenge': 'true', 'kind': 'HTPasswdPasswordIdentityProvider', 'filename': '/etc/origin/master/htpasswd'}]

# Set networking to multi-tenant
os_sdn_network_plugin_name='redhat/openshift-ovs-multitenant'

# Enable CNS (glusterfs) as default storage provider
openshift_storage_glusterfs_namespace=glusterfs
openshift_storage_glusterfs_name=storage

# Deploy logging
openshift_hosted_logging_deploy=true
openshift_hosted_logging_storage_kind=dynamic

#Deploy Metrics
openshift_hosted_metrics_deploy=true

#Disable disk and memory checks
openshift_disable_check=disk_availability,memory_availability

# host group for masters
[masters]
master1.lab

# host group for etcd
[etcd]
master1.lab

# host group for glusterfs
[glusterfs]
appnode1.lab glusterfs_ip=192.168.0.31 glusterfs_devices='[ "/dev/sdb" ]'
appnode2.lab glusterfs_ip=192.168.0.32 glusterfs_devices='[ "/dev/sdb" ]'
appnode3.lab glusterfs_ip=192.168.0.33 glusterfs_devices='[ "/dev/sdb" ]'

# host group for nodes, includes region info
[nodes]
master1.lab openshift_schedulable=False
infranode1.lab openshift_schedulable=True openshift_node_labels="{'region': 'infra', 'zone': 'default'}"
appnode1.lab openshift_schedulable=True openshift_node_labels="{'region': 'primary', 'zone': 'prod'}"
appnode2.lab openshift_schedulable=True openshift_node_labels="{'region': 'primary', 'zone': 'prod'}"
appnode3.lab openshift_schedulable=True openshift_node_labels="{'region': 'primary', 'zone': 'test'}"
Install OpenShift
Once the hosts and configurations options are set in the inventory file, simply run the playbook. There are many playbooks, even ones that integrate directly with infrastructure platforms like (Amazon, Google, Microsoft). These can also setup VMs and infrastructure components, like load balancers that are required. In our case we will go with BYO (bring your own), basically means we have taken care of infrastructure and it is all ready to go. This is typically what you want for on-premise deployments.
# ansible-playbook -vv /usr/share/ansible/openshift-ansible/playbooks/byo/config.yml
PLAY RECAP *****************************************************************************************************************************************************************************************
 appnode1.lab : ok=244 changed=12 unreachable=0 failed=0
 appnode2.lab : ok=244 changed=12 unreachable=0 failed=0
 appnode3.lab : ok=244 changed=12 unreachable=0 failed=0
 infranode1.lab : ok=229 changed=12 unreachable=0 failed=0
 localhost : ok=13 changed=0 unreachable=0 failed=0
 master1.lab : ok=999 changed=199 unreachable=0 failed=0
Success!!! Okay if you are paying attention and know Ansible, the recap shows few tasks actually changed anything. This is because I had an error in my storage configuration due to using wrong disk device, hence my playbook run failed previously. Not a big deal though, I simply fixed the issue in inventory file and re-ran Ansible. This is the beauty, simplicity and power of Ansible. Fail, Fail until you succeed and then you can reproduce it every time successfully.
Verifying OpenShift Environment
Once installation is complete, check to make sure additional services (Storage, Logging and Metrics) are functioning properly.
Create Admin User
[On Master]
Login to the master and create an admin user for external access through UI or CLI.
[root@master1 ~]# oc login -u system:admin -n default
[root@master1 ~]# htpasswd -c /etc/origin/master/htpasswd admin
[root@master1 ~]# oadm policy add-cluster-role-to-user \
cluster-admin admin
[root@master1 ~]# oc login -u admin -n default
GUI
To access GUI simply point browser from laptop at the master on port 8443 (https://master.lab:8443).
Storage
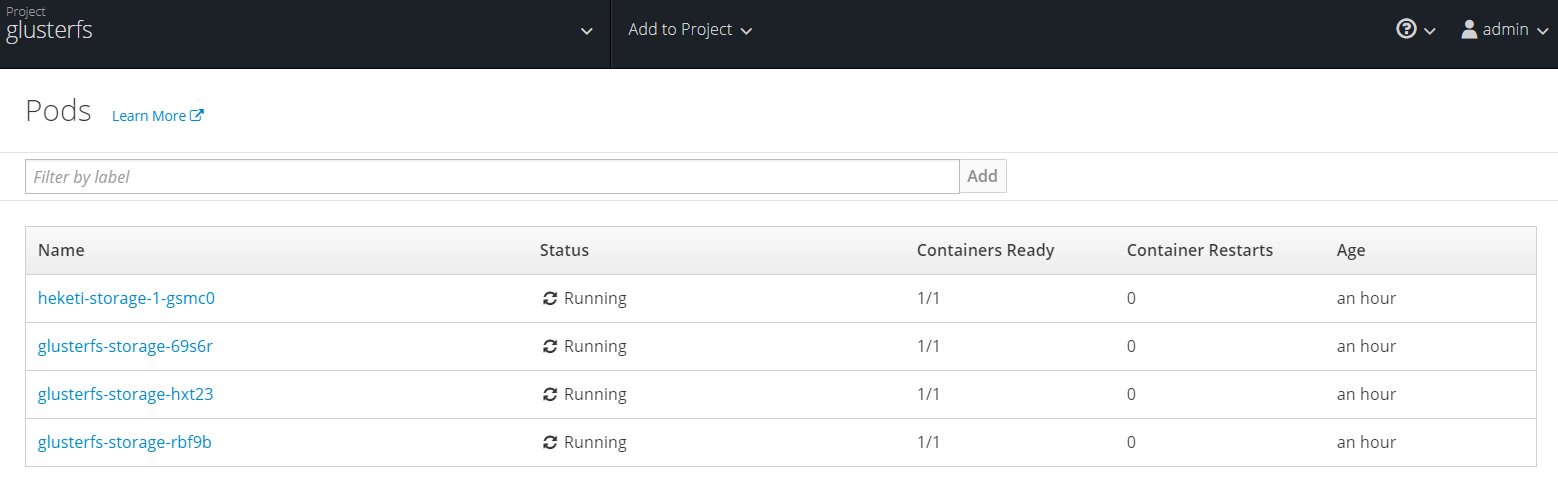
Since we are using Container Native Storage everything is integrated and deployed with installation of OpenShift. Go into the project glusterfs. Under resources select pods. You should see three glusterfs pods (one per app node).
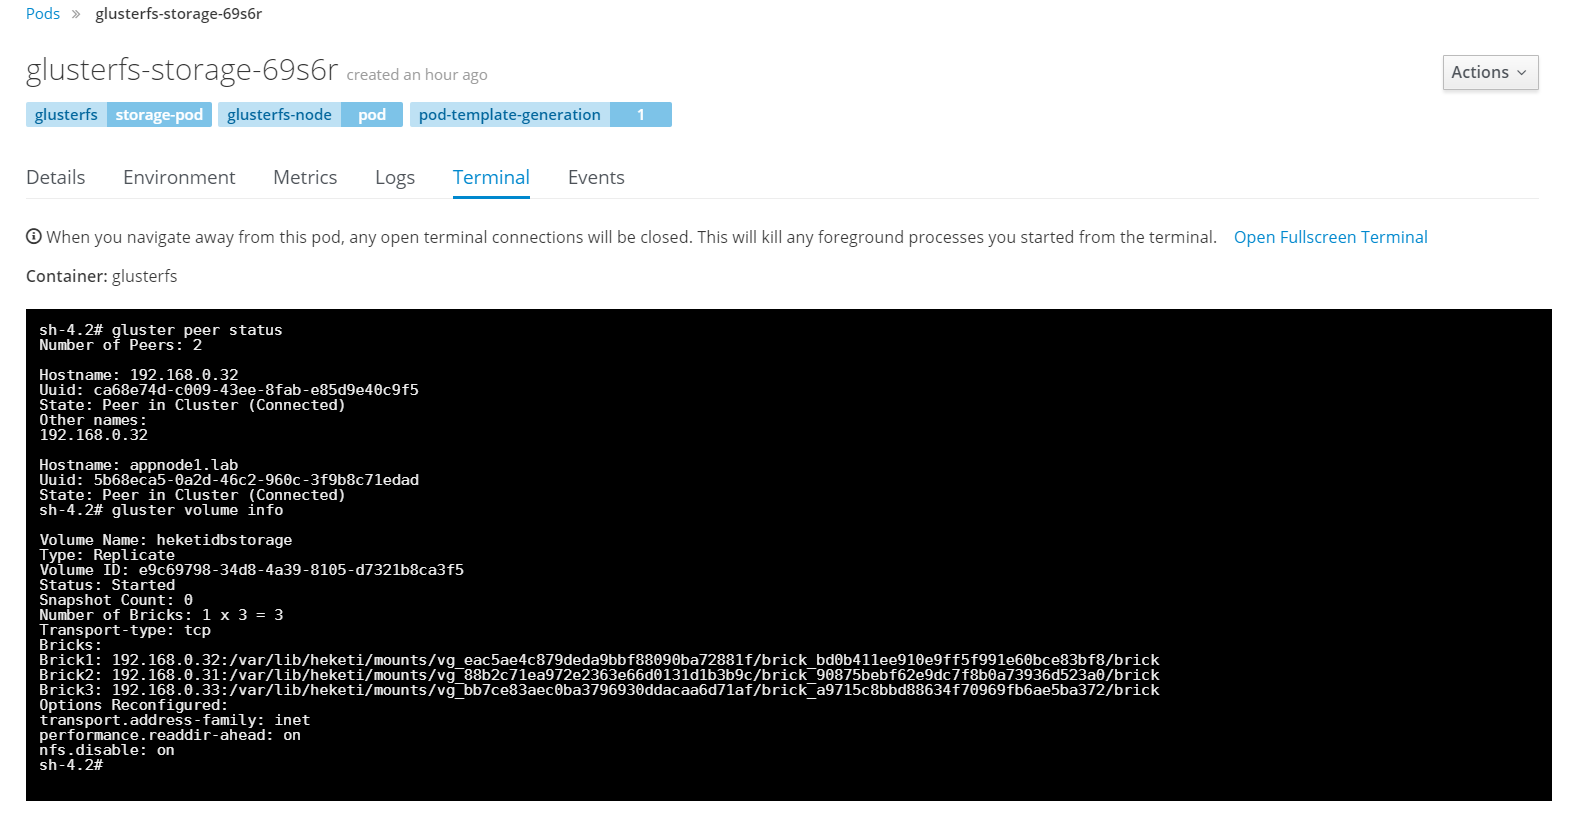
Select one of the glusterfs pods and select terminal. This opens a session directly, in container. Next you can check it's peer status as well as status of glusterfs volumes. Since we have three disks we will end up with three bricks. Data is then replicated and distributed across all three. No need to worry, adding and removing storage is all done through OpenShift dynamically, you should never need to touch anything in glusterfs level unless troubleshooting.
Make Storage Class Default
# oc patch storageclass glusterfs-storage -p '{"metadata": {"annotations": {"storageclass.kubernetes.io/is-default-class": "true"}}}'
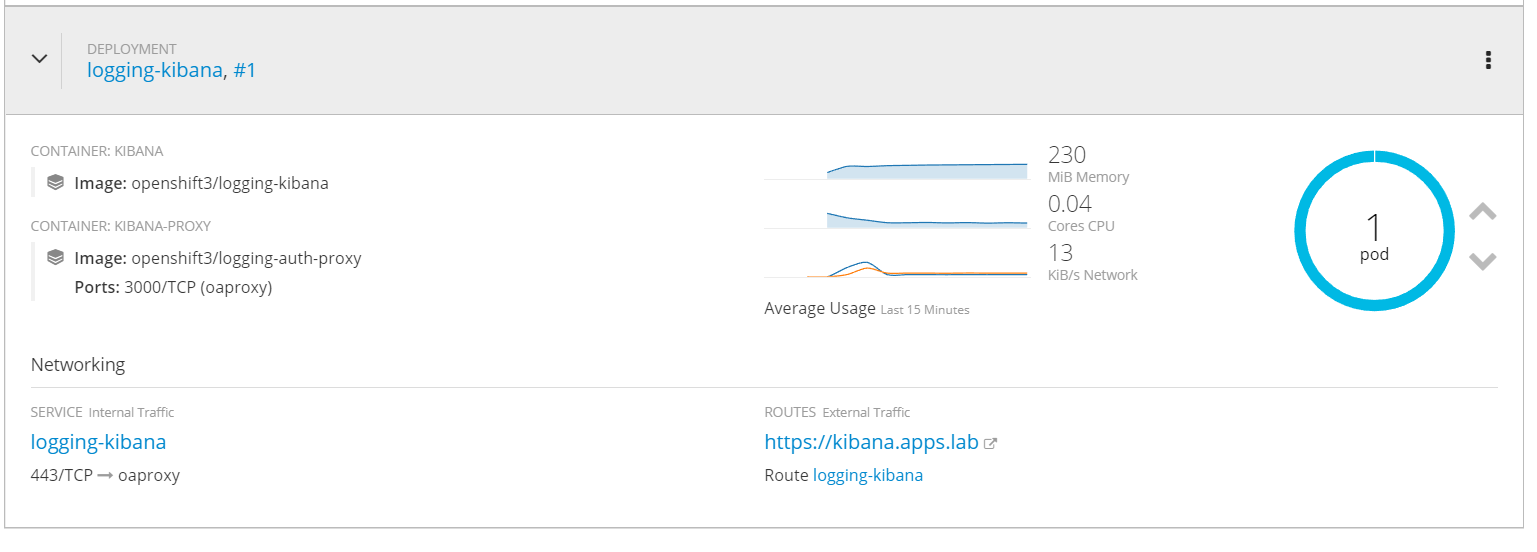
Logging
Open the logging project. Under Kibana you will see a route or URL (https://kibana.apps.lab). This will change depending on what domain was configured in OpenShift. Connect and you will be prompted to login. OpenShift uses elastic search and automatically populates it with projects and users from OpenShift. Users only see logs for projects and applications where they have access.

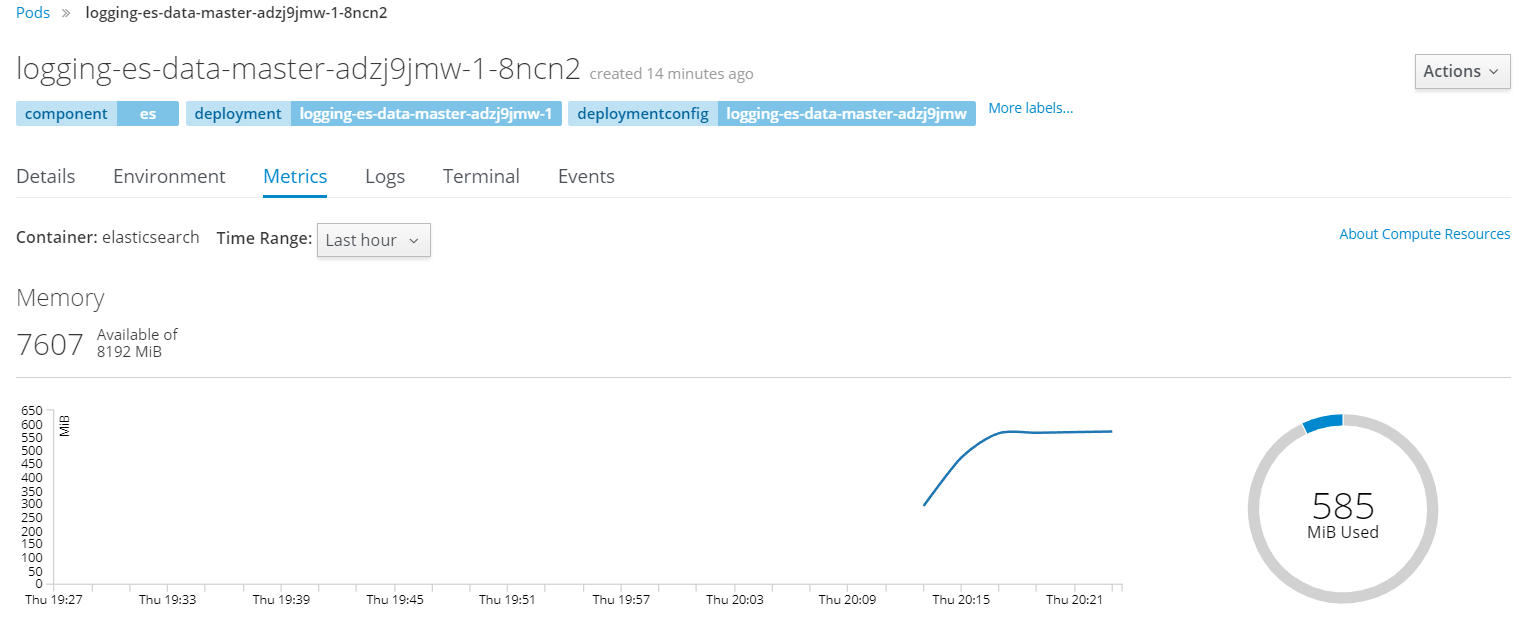
Metrics
In the logging project you will notice CPU, Memory and Network utilization are shown. This is coming from data collected in Hawkular and a 15 minute sample is shown.
Under the pods you can view more details and see the performance data historically over much longer period of time.
Miscellaneous
In OpenShift 3.6 not only OpenShift itself but also additional services are installed with Ansible. Here is an example of how to install and remove logging.
[On Master]
Install Logging
ansible-playbook -vv /usr/share/ansible/openshift-ansible/playbooks/byo/openshift-cluster/openshift-logging.yml
Remove Logging
ansible-playbook -vv /usr/share/ansible/openshift-ansible/playbooks/byo/openshift-cluster/openshift-logging.yml -e openshift_logging_install_logging=False
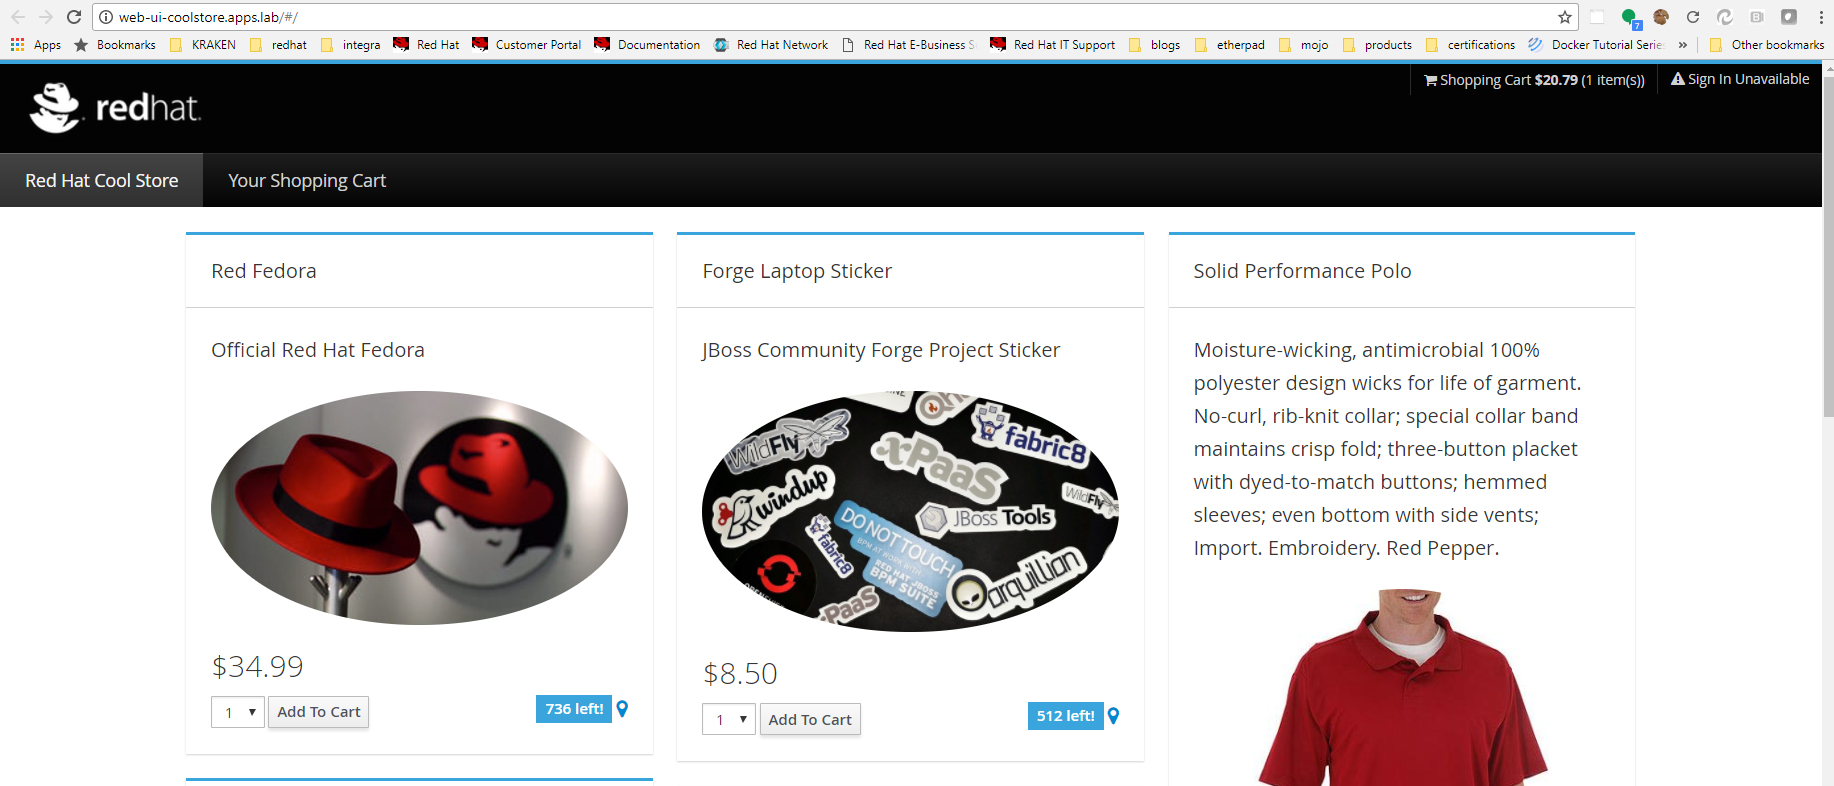
Coolstore
Coolstore is a polygot demo application comprised of many different services that form a shopping car application. It is a great example of the value OpenShift as a platform brings to a microservice orientated architecture. It illustrates how various containerized services can communicate with one another and how services can be independently released.
Clone Git Repo
# git clone https://github.com/jbossdemocentral/coolstore-microservice.git
Change Dir
# cd coolstore-microservice/openshift
Create Project
# oc new-project coolstore
Deploy Coolstore App
# oc process -f coolstore-template.yaml | oc create -f -
Summary
In this article we introduced OpenShift being a platform for containerized applications and spoke of the value it provides above the underlying technology (Kubernetes / Docker). We discussed various architectures and detailed the design for a lab or PoC configuration. Finally we went through all the steps to configure infrastructure, prepare nodes, configure, install and verify a running OpenShift environment.
Happy OpenShifting!
(c) 2017 Keith Tenzer