
Keep Your Servers and Run Your Applications Forever with Red Hat Virtualization powered by KVM

Overview
This article was written by myself and fellow colleague Götz Rieger. Often one of the most challenging problems we are facing today is both absorbing and leading change. Software defined-everything has taken over and is leveling the playing field, de-marginalizing staunch competitive advantages and nothing is safe anymore. Develop great applications and thrive or become irrelevant is the mantra facing many organizations. In such environments it is important to innovate constantly, delivering new capabilities at an ever increasing speed. In order to do so, new practices (DevOps), values (Agile) and of course technology (Containers) are being implemented.
Today it seems almost everyone is focused on "the new" software-defined whatever, when in reality change happens at different levels and different speeds. Gartner tried to summarize this with "mode 1 vs mode 2" but that trivializes things too far. It comes down to application lifecycles which dictates dependency on change. What if certain software doesn't need to change? What if it has a purpose and is already doing it's job function? What if the software cannot be ported to a new operating platform? What do you do then? The answer surprisingly, is maybe nothing? Maybe we let those applications live well beyond their intended support lifecycles. Consider the old programs in the Matrix, some found a way to survive and were not killed. These were also some of the most important, powerful programs.
Virtualization has enabled us to let x86 platforms essentially run forever or at least well beyond their support lifecycles (hardware and software). If we consider outdated Cobol applications on UNIX or Windows platforms like NT, XP and 2003; they haven't been supported for years. Applications running on these platforms might are not able to migrate for whatever reason, else they would have already done so. If we think about it, this is in fact a very valid use case for virtualization. There are of course other considerations that are important, like isolation (since these applications are not receiving patches) but assuming that is handled, why not? If it ain't broken and doesn't need to change, why fix it?
In this article we will look at how to run Windows NT Server (an operating system that hasn't been supported since 2004) on KVM and Red Hat Virtualization powered by KVM.
Prerequisites
We found two options to work well, a VMware VM with NT already installed and patched or install NT into a qemu/KVM VM. In order to continue you will need the following:
- Red Hat Virtualization (RHV) environment (Here we used RHV 4.1)
- KVM
- Windows NT installation medium (ISO) or a VMware virtual disk with pre-installed NT
WARNING: Just to be clear Windows NT is not a supported guest OS for Red Hat Virtualization (RHV). That should be obvious since it isn't supported by Microsoft either.
Option 1: Installing Windows NT ISO
On RHV we didn’t get the Windows NT 4.0 installer from the original boot CD to run without Blue Screening on us, so we had to take a detour. Windows NT 4.0 installs on qemu/KVM using virt-manager (RHEL 7.3 in this case). After installation, NT can be patched up to SP6 (which runs fine on RHV) and then the VM can be migrated to RHV. Remember in those days you couldn’t easily build a slip-stream CD with the updates integrated anyway.
In order to install Windows NT you will need the original installation CD as ISO image, Service Pack 6 and the Realtek RTL8139 network driver for NT. Of course it goes without saying, you should use a purchased copy of Windows NT.
Convert Windows NT SP 6 to ISO
# mkisofs -o iso winntsp6.iso
Convert Realtek Driver to ISO
# mkisofs -o iso rtl8139.iso
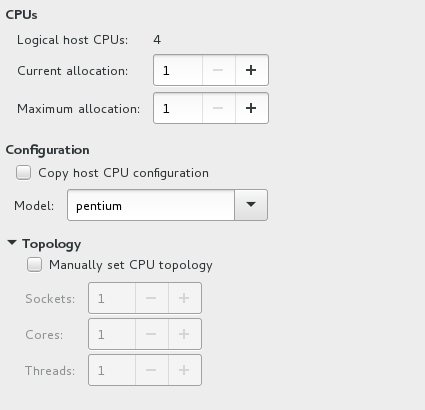
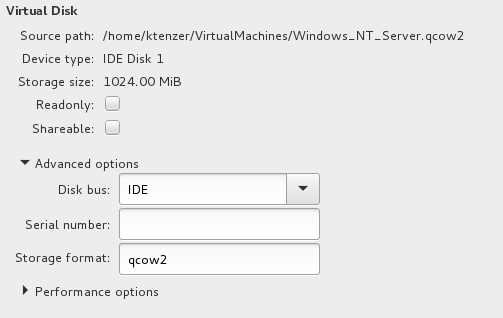
Create Windows NT Virtual Machine in KVM
Provide the Windows NT Server ISO and configure the Virtual Machine using virt-manager.
Set CPU Model to Pentium
Windows NT (without SP6) can only boot on older CPU generations like Pentium.
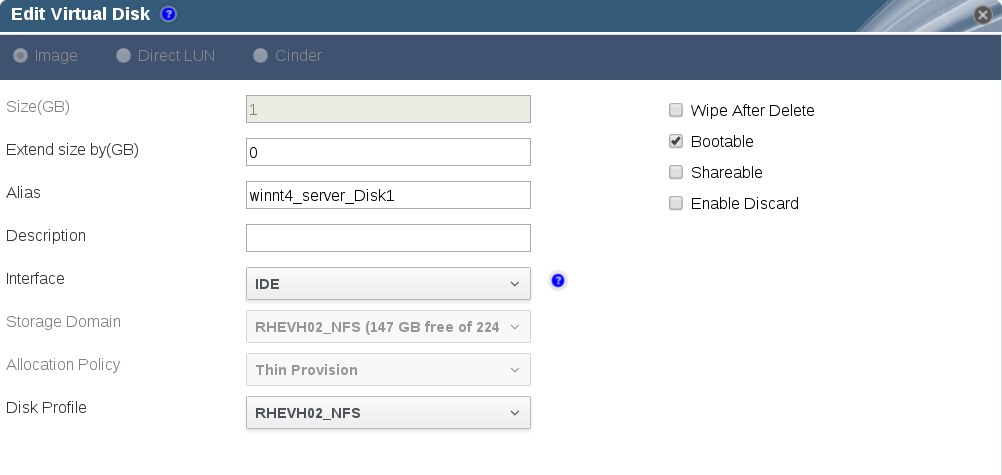
Set Virtual Disk to IDE
Windows NT does not have a virtio driver so we need to use IDE interface.
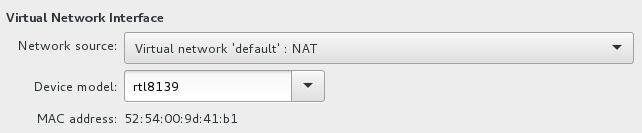
Set Network to RTL8139
Windows NT has drivers for Realtek 8139.
Configure Windows NT Server
Format Partition as NTFS
Select defaults other than NTFS for the partition.
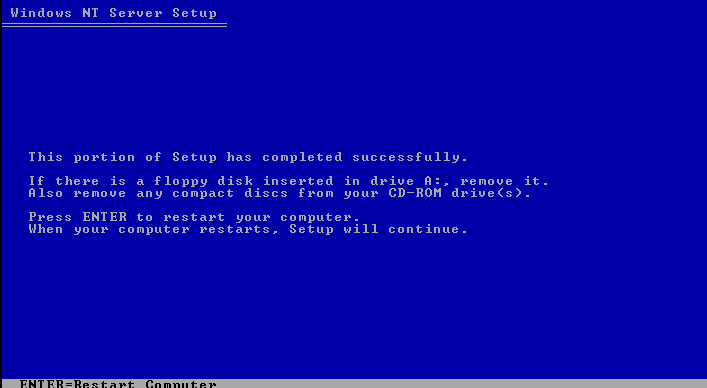
Reboot
Before rebooting change the boot order in virtual machine so that it boots from disk and not cdrom.
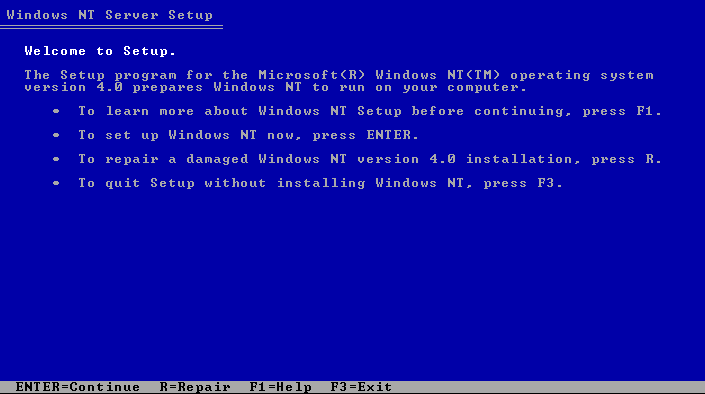
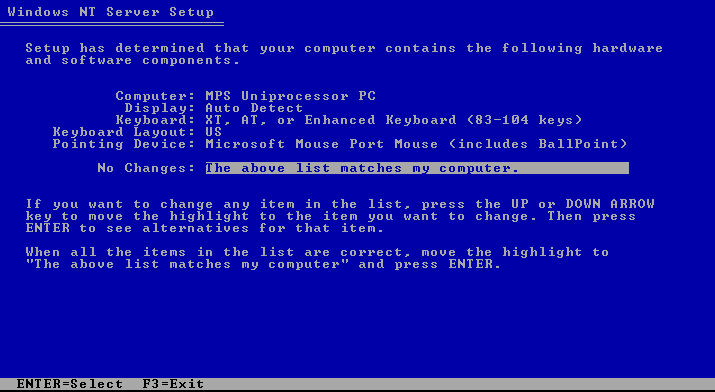
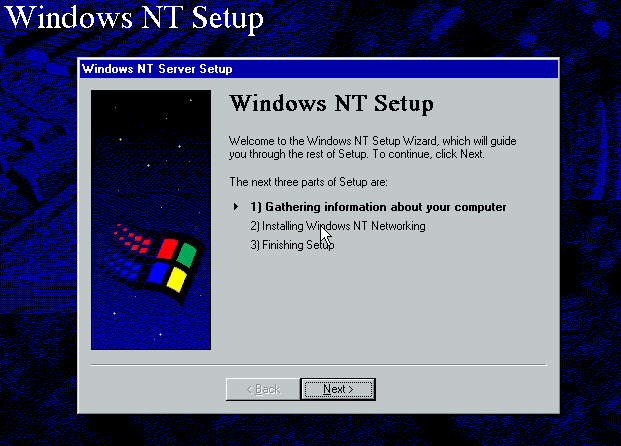
Windows NT Setup
Enter license and otherwise select defaults and server role (DC or standalone).
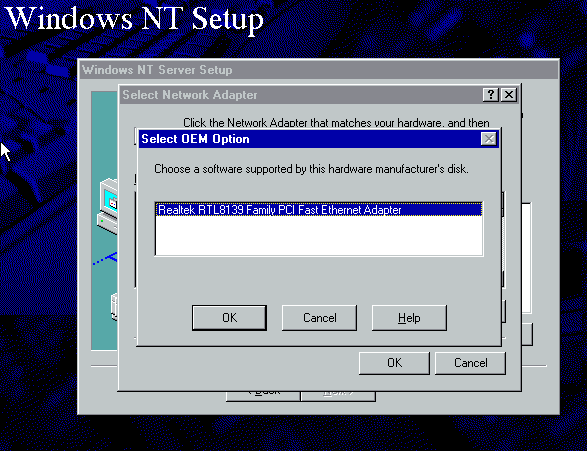
Install Realtek 8139 Driver
Mount the rtl8139.iso in the cdrom that was created above and install driver. Configure IP, Subnet, Gateway and DNS.
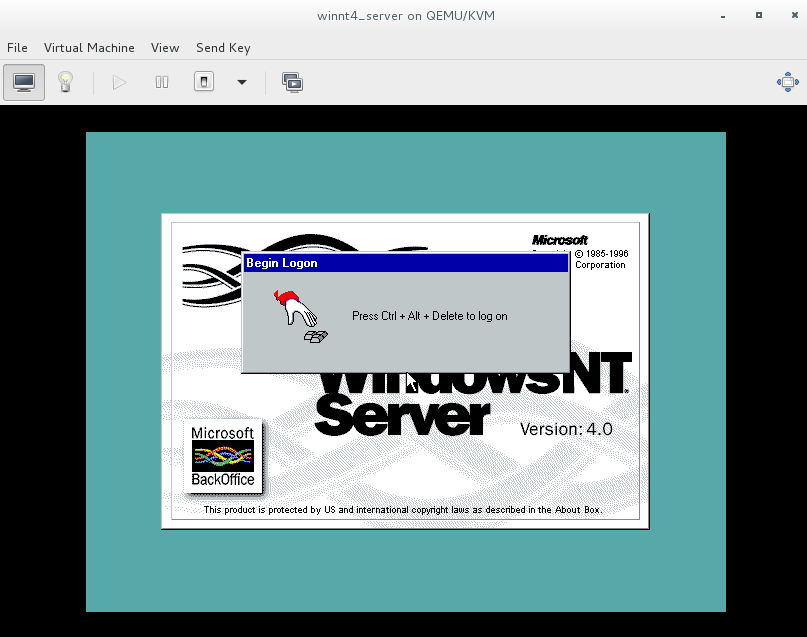
Login to Windows NT Server
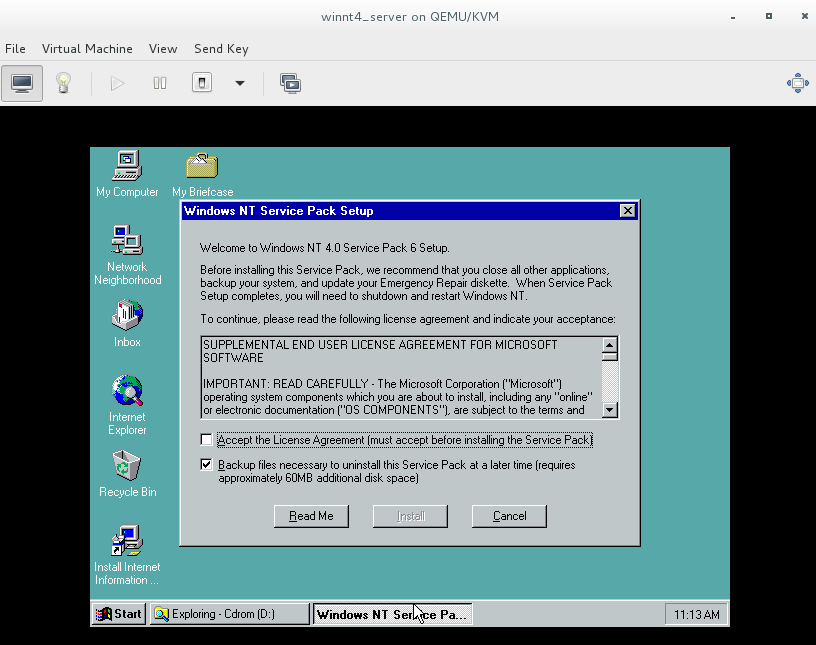
Install Windows NT Server SP 6
Using ISO created above, mount the Windows NT SP6 ISO and run the installer.
Note: A lesson learned back in the day: If you install the network card driver (or anything else for that matter) after Service Pack installation, just re-install the SP afterwards. This takes care of the dreaded “a service couldn’t be started” error.
Test Networking
Ensure network stack is functional.
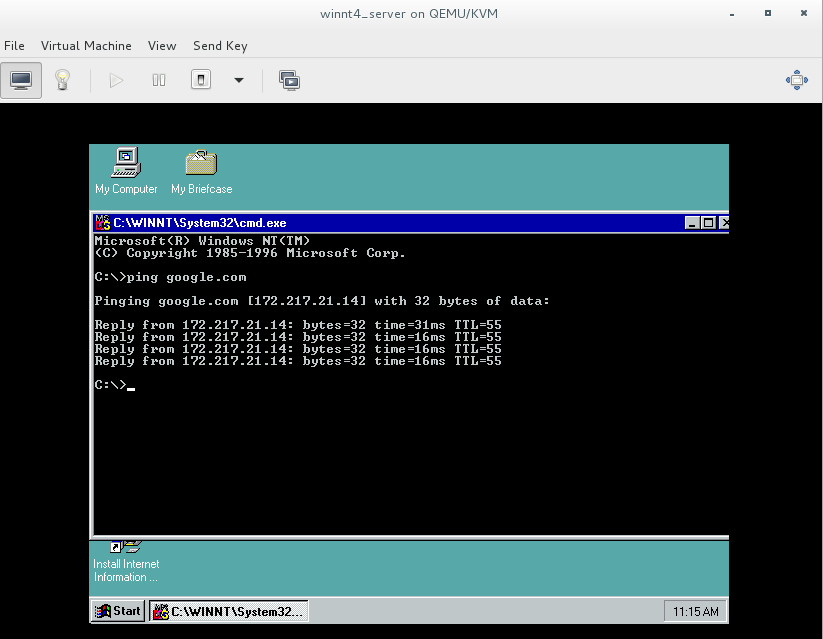
Congratulations!!! You just installed plus booted, an Operating System that has been off support since 2004 (over 10 years) and would most definitely not run on any modern hardware that exists today.
Option 2: Importing from VMware
Red Hat provides a tool called virt-v2v for converting from VMware or other virtualization platforms to RHV and KVM. Unfortunately in this case, Windows NT is simply too old and virt-v2v cannot recognize the operating system. Thankfully however the qemu-img command can easily convert a vmdk to qcow2.
Convert VMDK to QCOW2
# qemu-img convert -f vmdk -O qcow2 winnt_server.vmdk winnt_server.qcow2
Once the image is converted you can import into KVM or RHV.
Note: you need to remember to set CPU: Pentium, Virtual Disk Interface: IDE and NIC: RTL8139 after importing and before starting virtual machine.
Importing Windows NT Server in RHV
Now that we have a working Windows NT Server 4 SP6 qcow2 image it is time to import into Red Hat Virtualization (RHV). There are several options but we will explore two.
- Importing into RHV directly from KVM (Libvirt)
- Importing using a script from Richard Jones (Colleague in Virtualization Group @Red Hat)
Option 1: Import using KVM (Libvirt)
RHV has a direct integration and can import virtual machines directly from many virtualization platforms like Libvirt, VMware, Amazon EC2, etc.
Configure KVM (Libvirt) to allow external connections
[On KVM Host]
Enable TCP connections to Libvirt Daemon
#vi /etc/libvirt/libvirtd.conf
listen_tls = 0
listen_tcp = 1
tcp_port = "16509"
auth_tcp = "none"
#vi /etc/sysconfig/libvirtd
LIBVIRTD_ARGS="--listen"
Open Libvirt Port on Firewall
firewall-cmd --permanent --add-port="16509/tcp"
firewall-cmd --reload
Import Virtual Machine
In RHV management console under VM->Import select KVM as source. The URI should be "qemu+tcp://IP/system". Once setting username and password select load to display the virtual machines running on KVM host. Select the Window NT Server virtual machine.
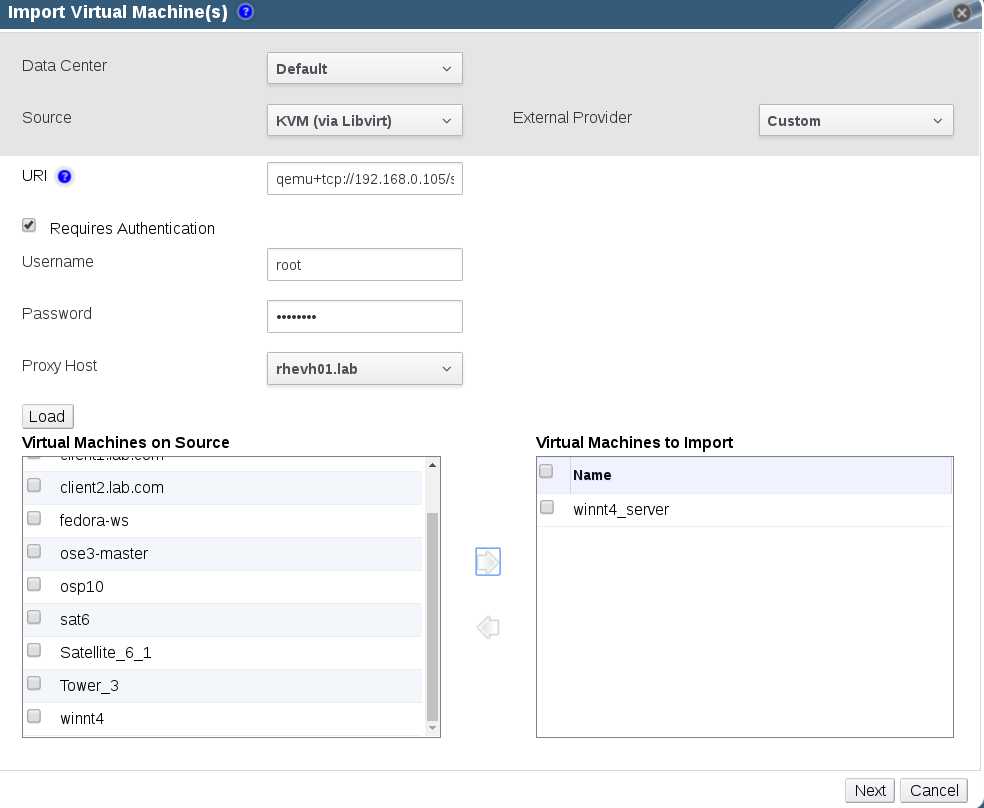
Choose Storage Domain
Storage domains in RHV are similar to VMware datastores, this is where the virtual machines live. Here we will select a desired storage domain.
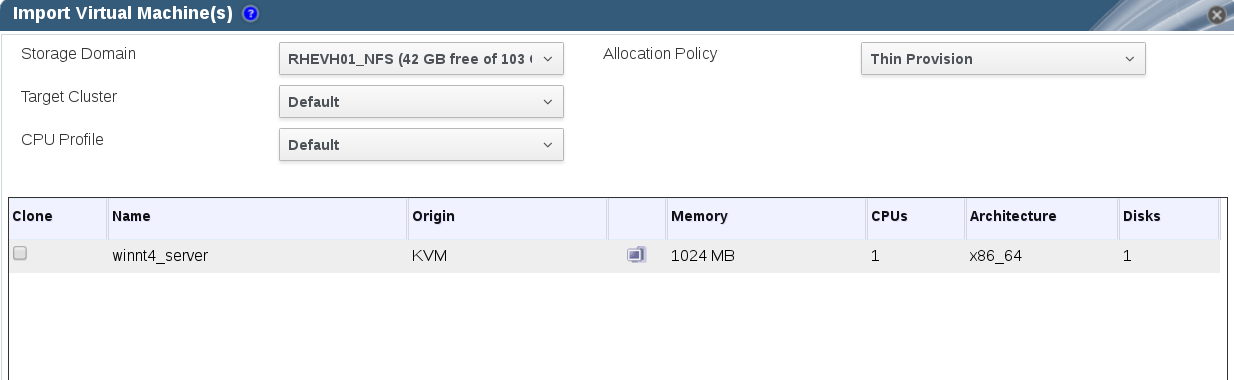
Once the import process is started you will be notified and can follow the process via the event monitor in RHV.
Option 2: Import Using Script
Richard Jones has created a very useful script that imports qcow2 images directly into RHV via the export domain (a special storage domain for importing templates). We really like this method for qcow2 because it doesn't try to convert the image like virt-v2v (which isn't needed) and you don’t need RHV to have direct access to another virtualization platform. The script and it's commits are stored here. In addition Richard Jones has also provided a blog on using his import script.
Install the Script
Select a host where you would like to install the script. The host shouldn’t be one of your RHV systems (neither RHV-H nor RHV-M). Then simply copy/paste or use curl to get the script from here.
Install Dependencies
# yum install perl-XML-Writer perl-Sys-Guestfs
Configure Direct Image Conversion
We don't want to convert image using libvirt but direct.
# export LIBGUESTFS_BACKEND=direct
Run Import Script
The script needs to be able to access the export storage domain via NFS. Ensure the host running the export script can mount the NFS share locally and write there. Here the host providing the export domain mount is "rhevh01.lab" and the path is "/usr/share/export".
# ./import-to-ovirt.pl winnt_server.qcow2 rhevh01.lab:/usr/share/export
The script will create the necessary structure and metadata and place things into the export storage domain in RHV.
Import Image from Export Domain
In RHV management under storage select the export storage domain. At the bottom select the tab "VM Import". Here you should see the image we just imported.
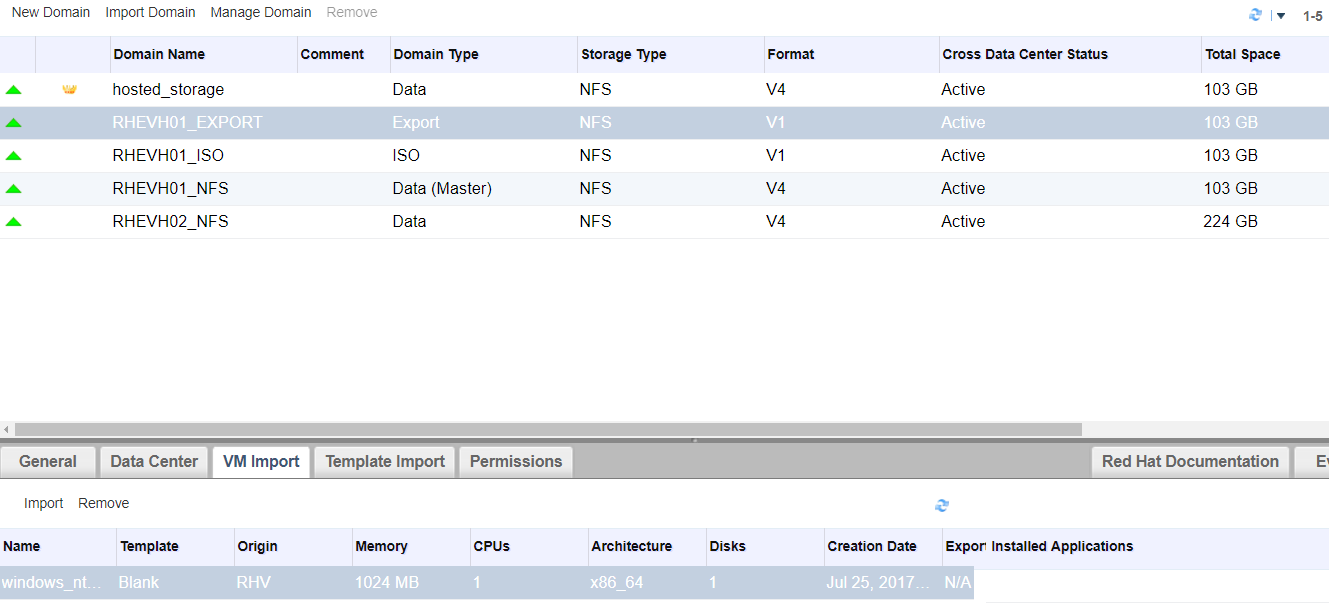
Congratulations!!! You just successfully imported Windows NT Server into RHV.
Confirm Settings
Before starting the Windows NT virtual machine we will ensure the settings are correct and the VM is configured to present the supported hardware.
Virtual Disk Set to IDE
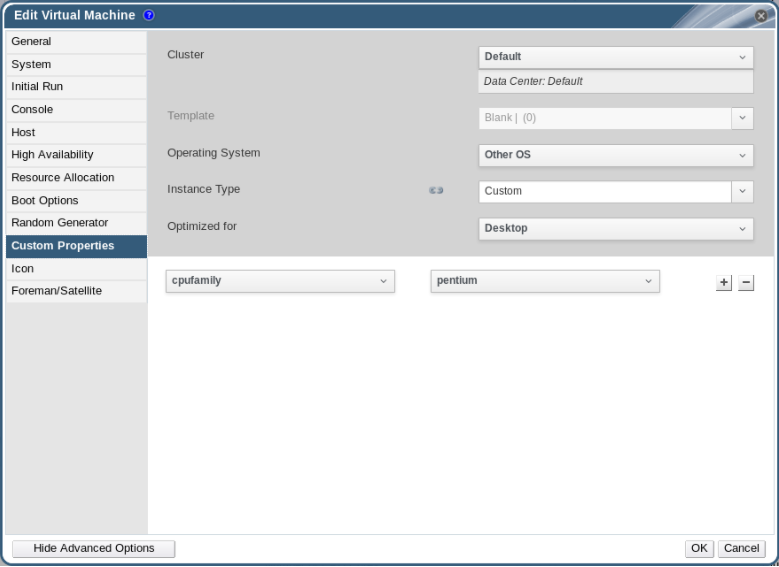
Set CPU Model
Okay, we are done and ready to start NT! No, wait a second… you might remember we said NT is only able to boot on older CPU families, we choose “Pentium” in virt-manager. Have a look at the CPU settings available for the VM in RHV, no Pentium or other archaeological interesting CPU families to be seen.
This doesn’t mean they aren’t there, underneath it’s KVM after all, but they are not exposed in the web UI. Fortunately RHV comes with a feature called “VDSM Hooks” that allows to run arbitrary scripts on VM actions and enables us to change almost every feature of a VM.
Configure VDSM Plugin
[On each Hypervisor (RHV-H) Host]
Credit here goes to colleagues Martin Polednik and Michal Skrivanek for providing VDSM hook script.
# vi /usr/libexec/vdsm/hooks/before_vm_start/50_cpufamily
#!/usr/bin/python

import os
import sys
import hooking
import traceback

if os.environ.has_key('cpufamily'):
 try:
    domxml = hooking.read_domxml()   #here we read the VM XML into the domxml variable
    vcpu = domxml.getElementsByTagName('cpu')[0] #find and read the CPU definition in the VM XML
    vcpu.setAttribute('mode', 'custom')
    vcpu.setAttribute('match', 'exact')
    vcpu.setAttribute('check', 'partial')
    sys.stderr.write('cpufamily: Changing cpu family to: %s\n' % os.environ['cpufamily'])  #sys.stderr.write is caught by vdsm and logged into vdsm.log for debugging
    e = domxml.createElement('model')
    e.setAttribute('fallback', 'forbid')
    txt = domxml.createTextNode(os.environ['cpufamily'])
    e.appendChild(txt)
    modelnode = vcpu.getElementsByTagName('model')[0]
    vcpu.replaceChild(e,modelnode)

    # Set topology sockets to N (example uses N = 1).
    topo = vcpu.getElementsByTagName('topology')[0]
    topo.setAttribute('sockets', '1') # <- N

    # Edit  element's text node.
    vcpu = domxml.getElementsByTagName('vcpu')[0]
    vcpu.firstChild.nodeValue = 1

    hooking.write_domxml(domxml) #and write to the altered domxml
 except:
    sys.stderr.write('cpufamily: [unexpected error]: %s\n' % traceback.format_exc())
    sys.exit(2)
Make VDSM plugin executable
# chmod +x /usr/libexec/vdsm/hooks/before_vm_start/50_cpufamily
How the VDSM Hook Works
- Looks if there is a configuration key named “cpufamily” in this VMs configuration.
- Sets the CPU model to the value of the key.
- Does some CPU topology corrections.
So what’s missing is the key/value pair for the hook script. This can be set as a custom attribute, inside the VM.
Set Custom Attribute in VM
[On RHV-Manager Host]
# engine-config -s UserDefinedVMProperties='cpufamily=^(Conroe|Penryn|Nehalem|Westmere|SandyBridge|pentium)$' --cver=4.1
This sets the user defined property “cpufamily” and supplies a number of values you can choose from in the web UI.
Note: A list of the supported CPU models can be found on your RHV Hypervisors under /usr/share/libvirt/cpu_map.xml.
Restart RHV-M Engine
# systemctl restart ovirt-engine
Set CPU Type to Pentium
In the settings of your NT VM in RHV-M go to “Custom Properties”, you should have a key named “cpufamily”, set it to “pentium”.
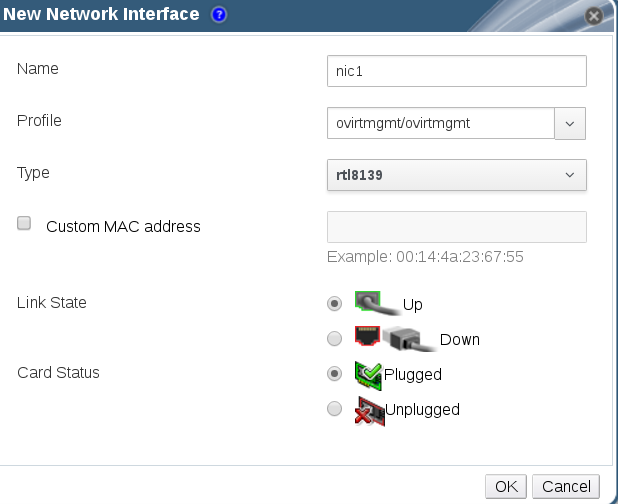
NIC Set to RTL8139
The last step is to configure the network card as Realtek 8139 so the network configuration inside the VM works. Select the VM and at bottom there is a tab for network and there you can add or edit the network interface.
Start Windows NT Virtual Machine on RHV
The moment has arrived where you can finally start the Windows NT virtual machine. I know, you can cut through the excitement with a knife. Again check to ensure network connectivity is working (likely you will need to reconfigure TCP/IP inside virtual machine).
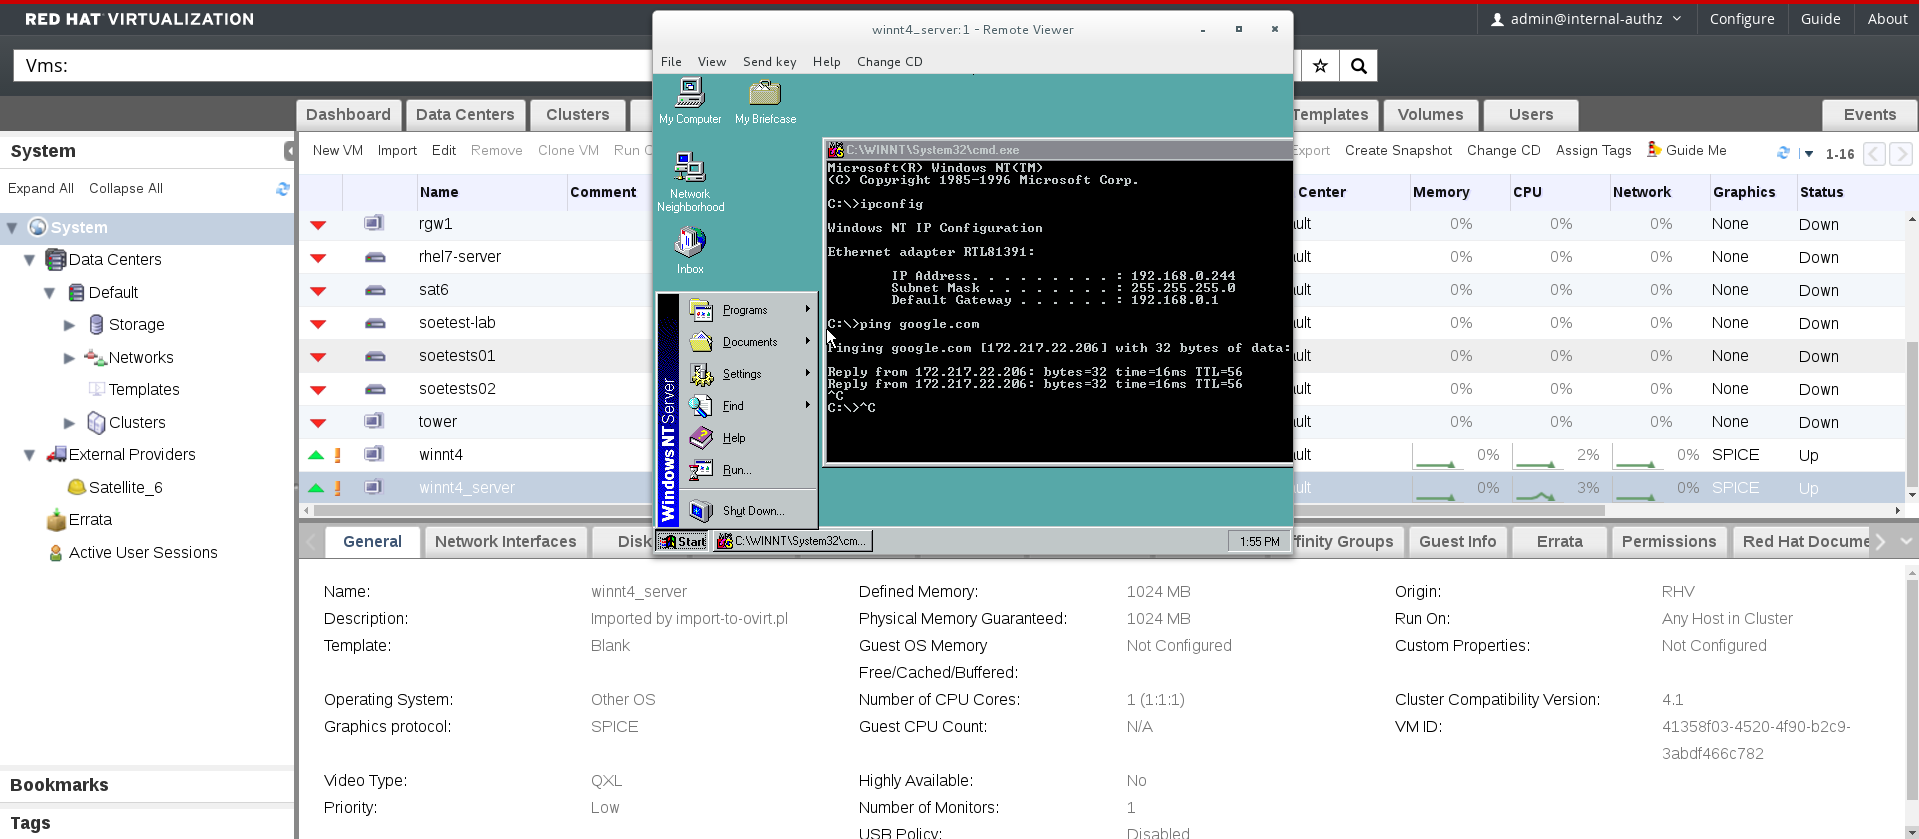
This is exactly what success feels like!!!
Windows NT Server HA
Things have changed a lot since Windows NT era, one thing that has significantly improved is HA. Once Windows NT Server is running we can use migrate option and automatically migrate the virtual machine to another Hypervisor.
Select Hypervisor
Here we see the Windows NT virtual machine running on "rhevh02.lab" and will migrate to "rhevh01.lab".
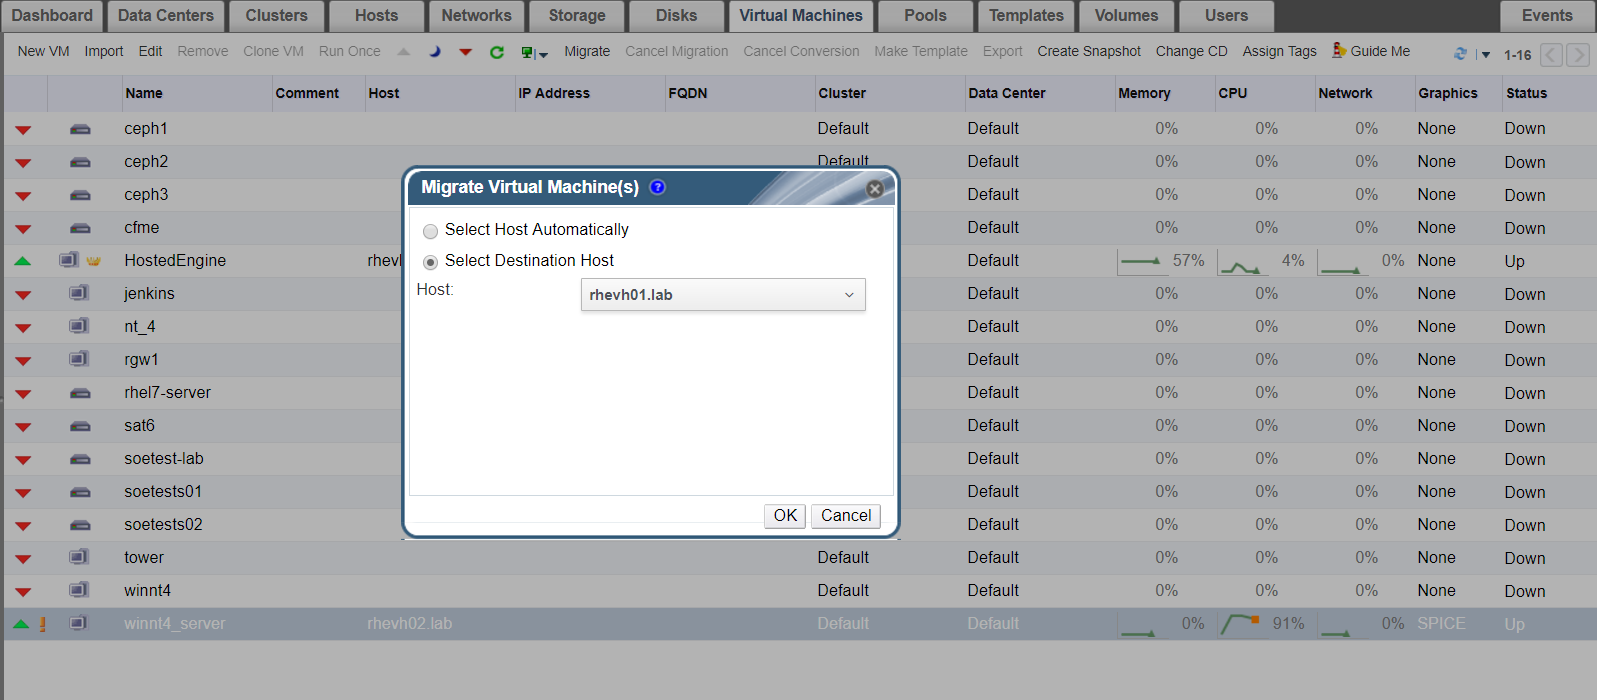
Migrate Virtual Machine
During the migration the virtual machine is locked, meaning actions like start and stop are not allowed.

Migration Complete
Viewing the event log in RHV we can see when the migration operation started and completed.

Summary
In this article we discussed one of the least talked about virtualization use cases, extending application and operating system lifecycles well beyond intended support of hardware or software. Using Windows NT Server, an operating system introduced in 1996 that went end-of-life in 2004, we walked through steps of bringing things online in both KVM and Red Hat Virtualization (RHV) powered by KVM. Hopefully this article brings to light the point that if it ain't broken, maybe just maybe you don't need to fix it!
Happy Virtualizing!
(c) 2017 Keith Tenzer