OpenShift on OpenStack 1-2-3: Bringing IaaS and PaaS Together
Overview
In this article we will explore why you should consider tackling IaaS and PaaS together. Many organizations gave up on OpenStack during it's hype phase, but in my view it is time to reconsider the IaaS strategy. Two main factors are really pushing a re-emergence of interest in OpenStack and that is containers and cloud.
Containers require very flexible, software-defined infrastructure and are changing the application landscape fast. Remember when we had the discussions about pets vs cattle? The issue with OpenStack during it's hype phase was that the workloads simply didn't exist within most organizations, but now containers are changing that, from a platform perspective. Containers need to be orchestrated and the industry has settled in on Kubernetes for that purpose. In order to run Kubernetes you need quite a lot of flexibility at scale on the infrastructure level. You must be able to provide solid Software Defined Networking, Compute, Storage, Load Balancing, DNS, Authentication, Orchestration, basically everything and do so at a click of the button. Yeah we can all do that, right.
If we think about IT, there are two types of personas. Those that feel IT is generic, 80% is good enough and for them, it is a light switch: on or off. This persona has no reason whatsoever to deal with IaaS and should just go to the public cloud, if not already there. In other words, OpenStack makes no sense. The other persona feel IT adds compelling value to their business and going beyond 80% provides them with distinct business advantages. Anyone can go to public cloud but if you can turn IT into a competitive advantage then there may actually be a purpose for it. Unfortunately with the way many organizations go about IT today, it is not really viable, unless something dramatic happens. This brings me back to OpenStack. It is the only way an organization can provide the capabilities a public cloud offers while also matching price, performance and providing a competitive advantage. If we cannot achieve the flexibility of public cloud, the consumption model, the cost effectiveness and provide compelling business advantage then we ought to just give up right?
I also find it interesting that some organizations, even those that started in the public cloud are starting to see value in build-your-own. Dropbox for example, originally started using AWS and S3. Over last few years they built their own object storage solution, one that provided more value and saved 75 million over two years. They also did so with a fairly small team. I certainly am not advocating for doing everything yourself, I am just saying that we need to make a decision, does IT provide compelling business value? Can you do it for your business, better than the generic level playing field known as public cloud? If so, you really ought to be looking into OpenStack and using momentum behind containers to bring about real change.
OpenShift and the case for OpenStack
OpenShift of course is infrastructure independent. You can run it on public cloud, virtualization, baremetal or anything that can boot Red Hat Enterprise Linux. All organizations definitely want and will use the public cloud but likely will also want to maintain control, avoiding lock-in. OpenShift is the only way to truly get multi-cloud, enterprise Kubernetes. The idea here with OpenStack is to deliver the on-premise portion of multi-cloud, with the same capabilities as public cloud. Today organizations have an incredible investment in their on-premise IT. Even if you don't see IT as a value generator, it is clear you most likely won't want to divest all those resources at once. Growth will most likely be augmented by public cloud as opposed to a complete migration.
To the next point, what is the right infrastructure to actually run on? Certainly over the years a vast majority of applications have moved to virtualization platforms but not all. I expect this also remains. Why? Well beyond 16 vCPUs, VMs start getting into the law of diminishing returns. You end up getting less value out of hyperthreading and usually needing to limit vCPUs to number of cores. Baremetal may also have advantages in certain container use cases like large scale computing. With emergence of AI and also need for large data crunching, baremetal could actually be gaining steam as a future platform. Regardless the point here is you may want your containers to run in VMs (smaller OpenShift Nodes) or baremetal (larger OpenShift nodes) and this is highly dependent on application or workload. Finally, there are other factors that could make baremetal play important role that won't be covered, cost/performance or isolation/security.
If we stick to virtualization technology we have one and only one choice. This again is where OpenStack shines, at least Red Hat OpenStack. One of the components shipped is ironic (metal-as-a-service). Ironic allows us to manage baremetal just like a virtual machine, in fact in OpenStack there is no difference and why OpenStack refers to compute units as instances, because it could be either. OpenStack can provide OpenShift with VM or baremetal based nodes and much, much more.
OpenShift integration with OpenStack
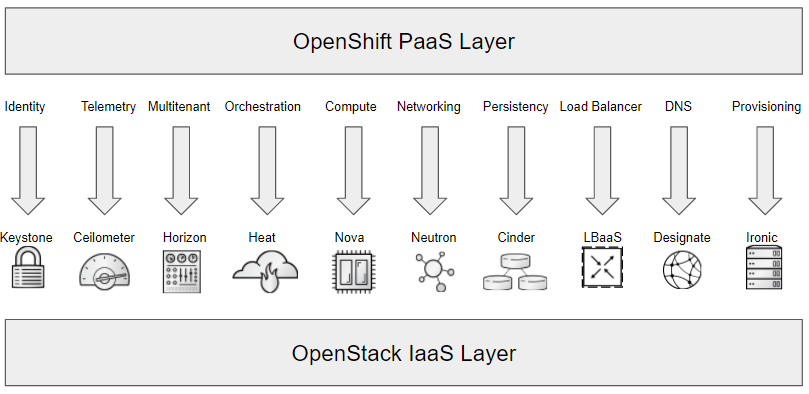
OpenShift and OpenStack fit perfectly together. Below is a list of the major integration points.
- Keystone provides identity and can be used to authenticate OpenShift or LDAP users.
- Ceilometer provides telemtry of IaaS allowing correlation using CloudForms between container, node and instance.
- Multi tenant could help if running many OpenShift clusters.
- Heat provides orchestration enabling dynamic scale-up or scale-down of OpenShift cluster.
- Nova provides OpenShift nodes as a VM or baremetal instance.
- Neutron provides SDN and through Kuryr (starting with Red Hat OpenStack 13) will allow neutron SDN to be consumed in OpenShift directly allowing single SDN to serve both container and non-container workloads.
- Cinder provides dynamic storage and provisioning for containers running in OpenShift.
- LBaaS provides load balancer for API across masters and for application traffic across infrastructure nodes running OpenShift router.
- Designate provides DNS and OpenShift needs either dynamic DNS or to use wildcard for application domains.
- Ironic plugs into Nova via ironic conductor and allows provisioning of baremetal systems.

OpenShift on OpenStack Architectures
Important to any underlying architecture discussion is how to group OpenShift masters, infrastructure and application nodes. OpenStack provides two different possibilities.
Resource vs AutoScaling Groups
Resource groups allow us to group instances together and apply affinity or anti-affinity policies via the OpenStack scheduler. AutoScaling groups allow us to group instances and based on alarms, scale-up or scale-down those instances automatically. At first glance, you would think for masters and infra nodes use resource groups and app nodes autoscaling groups. While autoscaling sounds great, especially for app nodes, there are a lot of possibilities that can lead to scaling either happening or not happening when desired. My experience is this can work well with simple wordpress type applications but not something more complex, like a container platform or OpenShift. Also another disadvantage with autoscaling groups is they don't support an index. Indexes within groups are used to increment the instance name: master0, master1 and so on. A final point is that you can easily scale resource groups, it just needs to be triggered by an update to the Heat stack. The nice thing is you can also control scaling and if it is to be automated, you have more flexibility than relying on alarms in Ceilometer. For all of these reasons I recommend creating three resource groups: masters, infras and nodes.
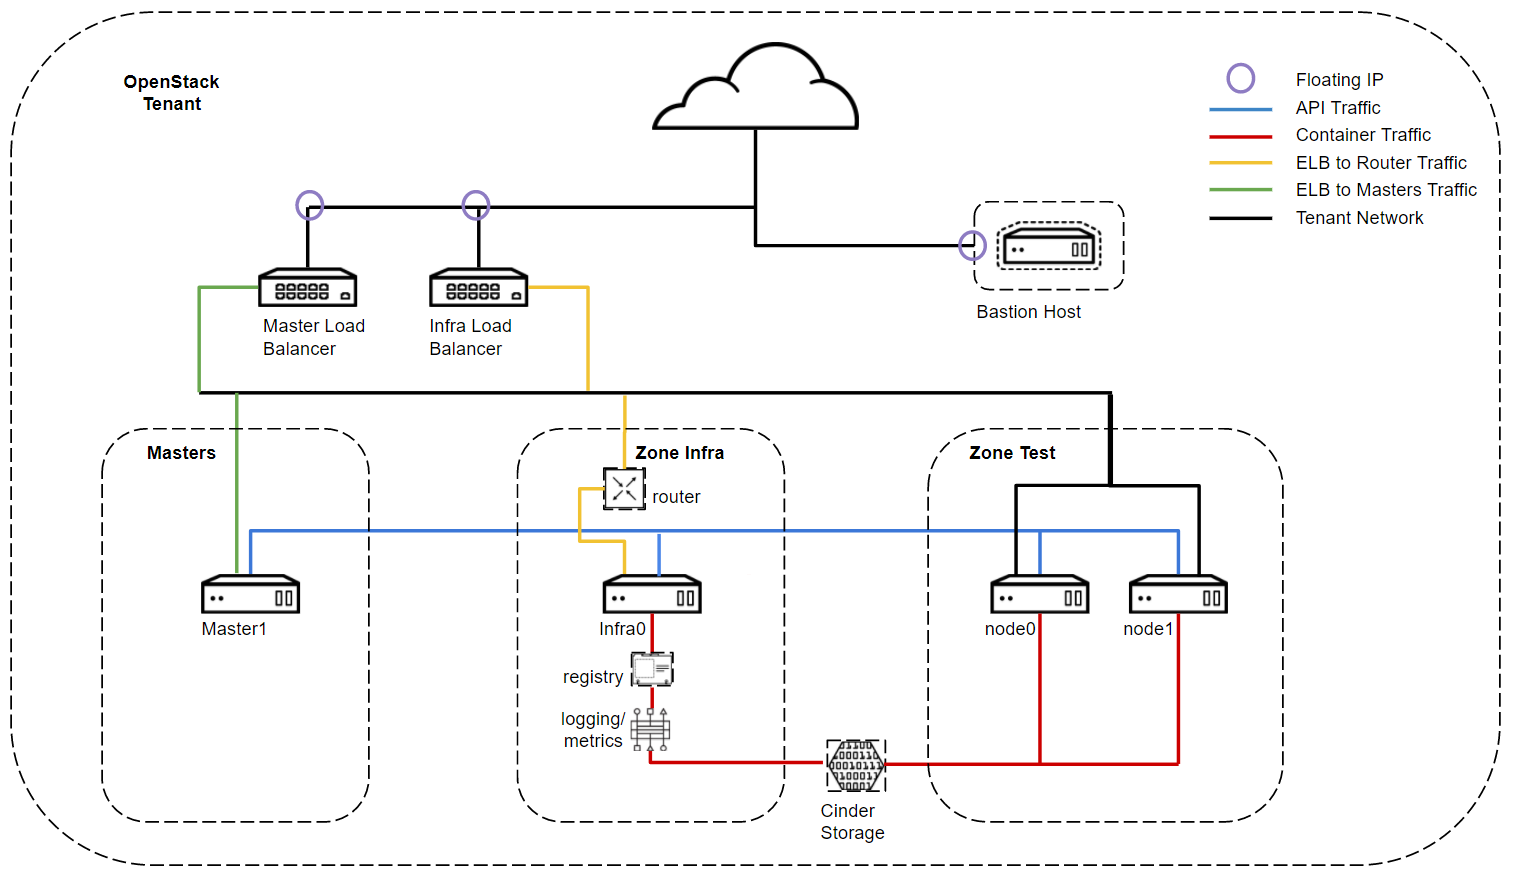
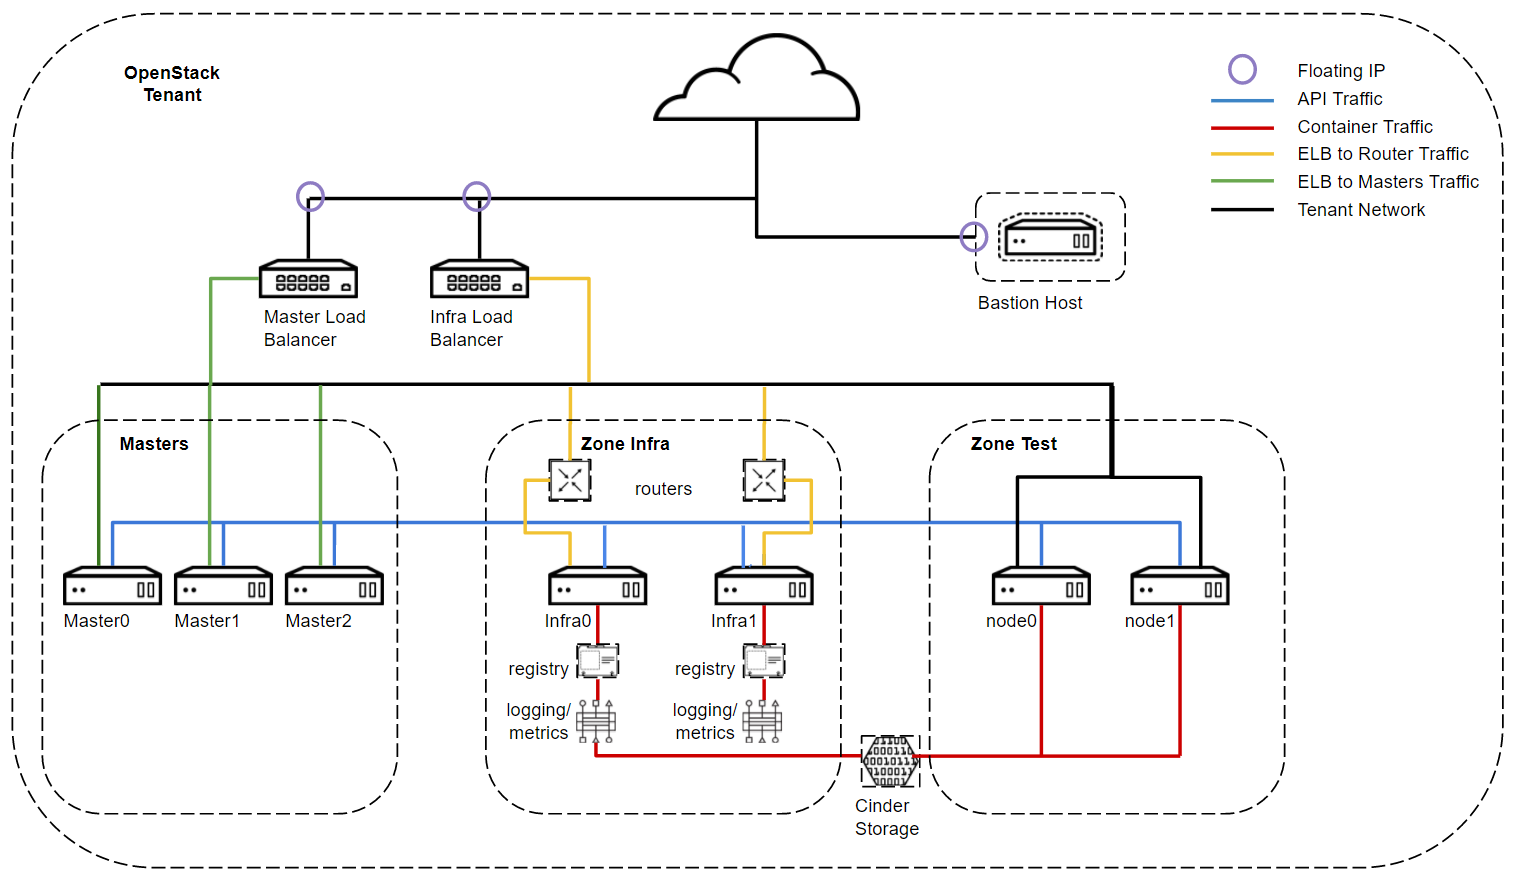
Two common OpenShift architectures for OpenStack are non-ha and ha within single tenant.
Non-HA
In this architecture we will have one master, one infra node and x application nodes. While certainly application availability can be achieved by deploying across multiple nodes, the master presents a single point of failure for the data plane. The infra node runs the OpenShift router and as such a failure here would mean incoming traffic to applications would be interrupted.

HA
The HA architecture typically has three masters, two infra nodes and x app nodes. There are variations where you could have 3 infra nodes if you are running metrics and logging services that require a third node. In addition you could also split etcd and run it independently, on three additional nodes. If east/west traffic is not allowed between network zones, then you would likely require two infra nodes in each zone, to handle incoming traffic for app nodes. There are many variations of course, but for now let us keep it simple.

Deploying OpenStack
In order to deploy OpenShift on OpenStack we obviously need OpenStack. Here are some guides to help.
- OpenStack 12 (Pike) RDO Lab Installation and Configuration Guide on Hetzner Root Servers
- OpenStack 11 (Ocata) RDO Lab Installation and Configuration Guide
- Red Hat OpenStack Platform 10 (Newton) Installation and Configuration Guide
Once OpenStack is deployed you need to ensure a few things are in place.
Create Flavors
# openstack flavor create --ram 2048 --disk 30 --ephemeral 0 --vcpus 1 --public ocp.bastion
# openstack flavor create --ram 8192 --disk 30 --ephemeral 0 --vcpus 2 --public ocp.master
# openstack flavor create --ram 8192 --disk 30 --ephemeral 0 --vcpus 1 --public ocp.infra
# openstack flavor create --ram 8192 --disk 30 --ephemeral 0 --vcpus 1 --public ocp.node
Create RHEL Image
Download RHEL 7.4 Cloud (qcow2) Image
# openstack image create --disk-format qcow2 \
--container-format bare --public \
--file /root/rhel-server-7.4-x86_64-kvm.qcow2 "rhel74"
Create Private Key
# openstack keypair create admin
Save Private Key
# vi /root/admin.pem
-----BEGIN RSA PRIVATE KEY-----
MIIEowIBAAKCAQEAwTrb+xdbpgY8hVOmftBIShqYUgXXDC/1gggakq8bkEdNnSku
IaNGeJykzksjdksjd9383iejkjsu92wiwsajFLuE2lkh5dvk9s6hpfE/3UvSGk6m
HWIMCf3nJUv8gGCM/XElgwNXS02c8pHWUywBiaQZpOsvjCqFLGW0cNZLAQ+yzrh1
dIWddx/E1Ppto394ejfksjdksjdksdhgu4t39393eodNlVQxWzmK4vrLWNrfioOK
uRxjxY6jnE3q/956ie69BXbbvrZYcs75YeSY7GjwyC5yjWw9qkiBcV1+P1Uqs1jG
1yV0Zvl5xlI1M4b97qw0bgpjTETL5+iuidFPVwIDAQABAoIBAF7rC95m1fVTQO15
buMCa1BDiilYhw+Mi3wJgQwnClIwRHb8IJYTf22F/QptrrBd0LZk/UHJhekINXot
z0jJ+WvtxVAA0038jskdjskdjksjksjkiH9Mh39tAtt2XR2uz/M7XmLiBEKQaJVb
gD2w8zxqqNIz3438783787387s8s787s8sIAkP3ZMAra1k7+rY1HfCYsRDWxhqTx
R5FFwYueMIldlfPdGxwd8hLrqJnDY7SO85iFWv5Kf1ykyi3PRA6r2Vr/0PMkVsKV
XfxhYPkAOb2hNKRDhkvZPmmxXu5wy8WkGeq+uTWRY3DoyciuC4xMS0NMd6Y20pfp
x50AhJkCgYEA8M2OfUan1ghV3V8WsQ94vguHqe8jzLcV+1PV2iTwWFBZDZEQPokY
JkMCAtHFvUlcJ49yAjrRH6O+EGT+niW8xIhZBiu6whOd4H0xDoQvaAAZyIFoSmbX
2WpS74Ms5YSzVip70hbcXb4goDhdW9YxvTVqJlFrsGNCEa3L4kr2qFMCgYEAzWy0
5cSHkCWaygeYhFc79xoTnPxKZH+QI32dAeud7oyZtZeZDRyjnm2fEtDCEn6RtFTH
NlI3W6xFkXcp1u0wbmYJJVZdn1u9aRsLzVmfGwEWGHYEfZ+ZtQH+H9XHXsi1nPpr
Uy7Msd,sl,.swdko393j495u4efdjkfjdkjfhflCgYEA7VO6Xo/XdKPMdJx2EdXM
y4kzkPFHGElN2eE7gskjdksjdksjkasnw33a23433434wk0P8VCksQlBlojjRVyu
GgjDrMhGjWamEA1y3vq6eka3Ip0f+0w26mnXCYYAJslNstu2I04yrBVptF846/1E
ElXlo5RVjYeWIzRmIEZ/qU8CgYB91kOSJKuuX3rMm46QMyfmnLC7D8k6evH+66nM
238493ijsfkjalsdjcws9fheoihg80eWDSAFDOASDF=OIA=FSLoiidsiisiisNDo
ACh40FeKsHDby3LK8OeM9NXmeCjYeoZYNGimHForiCCT+rIniiu2vy0Z/q+/t3cM
BgmAmQKBgCwCTX5kbLEUcX5IE6Nzh+1n/lkvIqlblOG7v0Y9sxKVxx4R9uXi3dNK
6pbclskdksdjdk22k2jkj2kalksx2koUeLzwHuRUpMavRhoTLP0YsdbQrjgHIA+p
kDNrgFz+JYKF2K08oe72x1083RtiEr8n71kjSA+5Ua1eNwGI6AVl
-----END RSA PRIVATE KEY-----
# chmod 400 /root/admin.pem
Create Public Floating IP Network
# openstack network create --provider-network-type flat \
--provider-physical-network extnet2 --external public
Create Public Floating IP Subnet
# openstack subnet create --network public --allocation-pool \
start=144.76.132.226,end=144.76.132.230 --no-dhcp \
--subnet-range 144.76.132.224/29 public_subnet
Create Router
# openstack router create --no-ha router1
Set Router Gateway
# openstack router set --external-gateway public router1
That is it! Everything else will be created automatically by the deployment of the OpenShift infrastructure. If you want to include more or less you can also easily update the Heat templates provided.
Deploying OpenShift on OpenStack 1-2-3
Once you have OpenStack environment configured, deploying OpenShift will be done using a simple three step phased approach.
- Step 1 Deploy OpenShift Infrastructure using Heat and Ansible.
- Step 2 Install OpenShift using Ansible.
- Step 3 Configure OpenShift and additional services using Ansible.
The Heat templates, all playbooks and a README is provided in the following Github repository: https://github.com/ktenzer/openshift-on-openstack-123
This step is responsible for deploying OpenShift infrastructure. Ansible will be used to call Heat to deploy the infrastructure in OpenStack. The heat templates will create a private network, load balancers, cinder storage, connect to existing public network, boot all instance and prepare the bastion host. The bastion host is used to deploy and manage the OpenShift deployment.
[OpenStack Controller]
Clone Git Repository
# git clone https://github.com/ktenzer/openshift-on-openstack-123.git
Checkout release branch 1.0
# git checkout release-1.0
Change dir to repository
# cd openshift-on-openstack-123
Configure Parameters
# cp sample-vars.yml vars.yml
# vi vars.yml
---
### OpenStack Setting ###
domain_name: ocp3.lab
dns_forwarders: [213.133.98.98, 213.133.98.99]
external_network: public
service_subnet_cidr: 192.168.1.0/24
router_id:
image: rhel74
ssh_user: cloud-user
ssh_key_name: admin
stack_name: openshift
openstack_version: 12
contact: admin@ocp3.lab
heat_template_path: /root/openshift-on-openstack-123/heat/openshift.yaml

### OpenShift Settings ###
openshift_version: 3.7
docker_version: 1.12.6
openshift_ha: true
registry_replicas: 2
openshift_user: admin
openshift_passwd:

### Red Hat Subscription ###
rhn_username:
rhn_password:
rhn_pool:

### OpenStack Instance Count ###
master_count: 3
infra_count: 2
node_count: 2

### OpenStack Instance Group Policies ###
### Set to 'affinity' if only one compute node ###
master_server_group_policies: "['anti-affinity']"
infra_server_group_policies: "['anti-affinity']"
node_server_group_policies: "['anti-affinity']"

### OpenStack Instance Flavors ###
bastion_flavor: ocp.bastion
master_flavor: ocp.master
infra_flavor: ocp.infra
node_flavor: ocp.node
Authenticate OpenStack Credentials
# source /root/keystonerc_admin
Disable host key checking
# export ANSIBLE_HOST_KEY_CHECKING=False
Deploy OpenStack Infrastructure for OpenShift
# ansible-playbook deploy-openstack-infra.yml \n
--private-key=/root/admin.pem -e @vars.yml

This step is responsible for preparing OpenShift environment. The hostnames will be set, OpenShift inventory file dynamically generated, systems will be registered to rhn, required packages installed and docker, among other things properly configured.
Get IP address of the bastion Host
# openstack stack output show -f value -c output_value openshift ip_address

{
  "masters": [
    {
      "name": "master0",
      "address": "192.168.1.19"
    },
    {
      "name": "master1",
      "address": "192.168.1.16"
    },
    {
      "name": "master2",
      "address": "192.168.1.15"
    }
  ],
  "lb_master": {
    "name": "lb_master",
    "address": "144.76.134.230"
  },
  "infras": [
    {
      "name": "infra0",
      "address": "192.168.1.10"
    },
    {
      "name": "infra1",
      "address": "192.168.1.11"
    }
  ],
  "lb_infra": {
    "name": "lb_infra",
    "address": "144.76.134.229"
  },
  "bastion": {
    "name": "bastion",
    "address": "144.76.134.228"
  },
  "nodes": [
    {
      "name": "node0",
      "address": "192.168.1.6"
    },
    {
      "name": "node1",
      "address": "192.168.1.13"
    }
  ]
}
SSH to the Bastion Host using cloud-user and Private Key
# ssh -i /root/admin.pem cloud-user@144.76.134.229
[Bastion Host]
Change Directory to Cloned Git Repository
# cd openshift-on-openstack-123
Authenticate OpenStack Credentials
[cloud-user@bastion ~]$ source /home/cloud-user/keystonerc_admin
Disable Host Key Checking
[cloud-user@bastion ~]$ export ANSIBLE_HOST_KEY_CHECKING=False
Prepare the Nodes for Deployment of OpenShift
[cloud-user@bastion ~]$ ansible-playbook prepare-openshift.yml \n
--private-key=/home/cloud-user/admin.pem -e @vars.yml

PLAY RECAP *****************************************************************************************
bastion                    : ok=15   changed=7    unreachable=0    failed=0
infra0                     : ok=18   changed=13   unreachable=0    failed=0
infra1                     : ok=18   changed=13   unreachable=0    failed=0
localhost                  : ok=7    changed=6    unreachable=0    failed=0
master0                    : ok=18   changed=13   unreachable=0    failed=0
master1                    : ok=18   changed=13   unreachable=0    failed=0
master2                    : ok=18   changed=13   unreachable=0    failed=0
node0                      : ok=18   changed=13   unreachable=0    failed=0
node1                      : ok=18   changed=13   unreachable=0    failed=0

This step is responsible for configuring a vanilla OpenShift environment. By default only the OpenShift router and registry will be configured. OpenShift will be deployed based on the dynamically generated inventory file in step 2. You can certainly edit the inventory file and make any changes. After deployment of OpenShift, there is a small post deployment playbook which will configure dynamic storage to use OpenStack Cinder. Optional steps are defined as well to configure metrics and logging if that is desired.
[Bastion Host]
Deploy OpenShift
[cloud-user@bastion ~]$ ansible-playbook -i /home/cloud-user/openshift-inventory --private-key=/home/cloud-user/admin.pem -vv /usr/share/ansible/openshift-ansible/playbooks/byo/config.yml
PLAY RECAP *****************************************************************************************
infra0.ocp3.lab            : ok=183  changed=59   unreachable=0    failed=0
infra1.ocp3.lab            : ok=183  changed=59   unreachable=0    failed=0
localhost                  : ok=12   changed=0    unreachable=0    failed=0
master0.ocp3.lab           : ok=635  changed=265  unreachable=0    failed=0
master1.ocp3.lab           : ok=635  changed=265  unreachable=0    failed=0
master2.ocp3.lab           : ok=635  changed=265  unreachable=0    failed=0
node0.ocp3.lab             : ok=183  changed=59   unreachable=0    failed=0
node1.ocp3.lab             : ok=183  changed=59   unreachable=0    failed=0


INSTALLER STATUS ***********************************************************************************
Initialization             : Complete
Health Check               : Complete
etcd Install               : Complete
Master Install             : Complete
Master Additional Install  : Complete
Node Install               : Complete
Hosted Install             : Complete
Service Catalog Install    : Complete
Run Post Install Playbook
[cloud-user@bastion ~]$ ansible-playbook post-openshift.yml --private-key=/home/cloud-user/admin.pem -e @vars.yml

PLAY RECAP **************************************************************************************************************************
infra0                     : ok=4    changed=2    unreachable=0    failed=0
infra1                     : ok=4    changed=2    unreachable=0    failed=0
localhost                  : ok=7    changed=6    unreachable=0    failed=0
master0                    : ok=6    changed=4    unreachable=0    failed=0
master1                    : ok=6    changed=4    unreachable=0    failed=0
master2                    : ok=6    changed=4    unreachable=0    failed=0
node0                      : ok=4    changed=2    unreachable=0    failed=0
node1                      : ok=4    changed=2    unreachable=0    failed=0
Login in to UI
https://openshift.144.76.134.226.xip.io:8443
Optional
Configure Admin User
[cloud-user@bastion ~]$ ssh -i /home/cloud-user/admin.pem cloud-user@master0
Authenticate as system:admin User
[cloud-user@master0 ~]$ oc login -u system:admin -n default
Make User OpenShift Cluster Administrator
[cloud-user@master0 ~]$ oadm policy add-cluster-role-to-user cluster-admin admin
Install Metrics
Set Metrics to true in Inventory
[cloud-user@bastion ~]$ vi openshift_inventory
...
openshift_hosted_metrics_deploy=true
...
Run Playbook for Metrics
[cloud-user@bastion ~]$ ansible-playbook -i /home/cloud-user/openshift-inventory --private-key=/home/cloud-user/admin.pem -vv /usr/share/ansible/openshift-ansible/playbooks/byo/openshift-cluster/openshift-metrics.yml
PLAY RECAP **************************************************************************************************************************
infra0.ocp3.lab            : ok=45   changed=4    unreachable=0    failed=0
infra1.ocp3.lab            : ok=45   changed=4    unreachable=0    failed=0
localhost                  : ok=11   changed=0    unreachable=0    failed=0
master0.ocp3.lab           : ok=48   changed=4    unreachable=0    failed=0
master1.ocp3.lab           : ok=48   changed=4    unreachable=0    failed=0
master2.ocp3.lab           : ok=205  changed=48   unreachable=0    failed=0
node0.ocp3.lab             : ok=45   changed=4    unreachable=0    failed=0
node1.ocp3.lab             : ok=45   changed=4    unreachable=0    failed=0


INSTALLER STATUS ********************************************************************************************************************
Initialization             : Complete
Metrics Install            : Complete
Install Logging
Set logging to true in Inventory
[cloud-user@bastion ~]$ vi openshift_inventory
...
openshift_hosted_logging_deploy=true
...
Run Playbook for Logging
[cloud-user@bastion ~]$ ansible-playbook -i /home/cloud-user/openshift-inventory --private-key=/home/cloud-user/admin.pem
Summary
In this article we discussed the important role infrastructure plays when deploying a container platform such as OpenShift. We also discussed the basis for various infrastructure decisions, containers, public cloud vs on-premise. There are very compelling reasons why IaaS and PaaS fit so well together and why it is important to tackle both, not just one of them. OpenStack is a perfect fit for OpenShift from an infrastructure perspective and many of the integration points were discussed in detail. Finally a hands-on guide was provided to deploy OpenStack and OpenShift on OpenStack in an automated, easy three step process. Many try to avoid tackling infrastructure and just focus on OpenShift with their applications. I certainly cannot fault anyone for taking that approach, but I think you will get the most value, out of tackling both and if you use containers as an excuse to do so, then so be it.
Happy OpenShifting on OpenStack!
(c) 2018 Keith Tenzer


