
OpenShift v3: Basic Release Deployment Scenarios

source: http://snsoftwarelabs.com/
Overview
One of the hardest things companies struggle with today is release management. Of course many methodologies and even more tools or technologies exist, but how do we bring everything together and work across functional boundaries of an organization? A product release involves everyone in the company not just a single team. Many companies struggle with this and the result is a much slower innovation cycle. In the past this used to be something that at least wasn't a deal breaker. Unfortunately that is no longer the case. Today companies live and die by their ability to not only innovate but release innovation. I would say innovating is the easy part, the ability to provide those innovations in a controlled fashion through products and services is the real challenge.
Moving to micro-services architectures and container based technologies such as Docker have simplified or streamlined many technological aspects. Certainly at least providing light at the end of the tunnel, but until OpenShift there wasn't a platform to bring it all together, allowing development and operations teams to work together while still maintaining their areas of focus or control. In this article we will look at three scenarios for handling application deployments within OpenShift that involve both operations and development. Each scenario builds on the other and should give you a good idea of the new possibilities with OpenShift. Also keep in mind, these are basic scenarios and we are just scratching the surface so this should be viewed as a starting point for doing application deployments or release management in the new containerized world.
Scenario 1: Development leveraging customized image from Operations
Typically operations teams will want to control application runtime environment. Ensure that the application runtime environment meets all security policies, provides needed capabilities and is updated on regular basis.
Development teams want to focus on innovation through application functionality, stability and capabilities.
OpenShift allows both teams to focus on their core responsibility while also providing a means to integrate inputs/outputs of various teams into a end-to-end release.
There are many ways to integrate DevOps teams in OpenShift. One simple way is by separating development and operations into different projects and allowing development to their application runtime environment from operations. In this scenario we will see how to do that using a basic ruby hello-world application as example.
Create Projects
Create operations and development projects for our ruby application.
# oc login -u admin
# oc new-project ruby-ops
# oc new-project ruby-dev
Setup Users
Create a user for development and operations.
# htpasswd /etc/origin/master/htpasswd dev
# htpasswd /etc/origin/master/htpasswd ops
Create ops and dev users
# htpasswd /etc/origin/master/htpasswd dev
# htpasswd /etc/origin/master/htpasswd ops
Enable permissions.
Create three groups that allow operations to edit the ruby-ops project, allow development to view the ruby-ops project and also edit the ruby-dev project. In addition the ruby-dev project needs permission to pull images from the ruby-ops project.
Create groups and add users to correct groups.
# oadm groups new ops-edit && oadm groups new dev-view && oadm groups new dev-edit
# oadm groups add-users ops-edit ops && oadm groups add-users dev-view dev && \
oadm groups add-users dev-edit dev
Associate groups to projects and setup pull permissions to allow ruby-dev to pull images from ruby-ops.
# oadm policy add-role-to-group edit ops-edit -n ruby-ops && \
# oadm policy add-role-to-group view dev-view -n ruby-ops && \
# oadm policy add-role-to-group edit dev-edit -n ruby-dev && \
# oadm policy add-role-to-group system:image-puller system:serviceaccounts:ruby-dev -n ruby-ops
Operations Ruby Environment
As ops user create a ruby runtime image using application test code.
# oc login -u ops
# oc project ruby-ops
# oc new-app centos/ruby-22-centos7~https://github.com/openshift/ruby-hello-world.git
Application requires database and service name called database.
# oc new-app mysql-ephemeral -p DATABASE_SERVICE_NAME=database
# oc env dc database --list | oc env dc ruby-hello-world -e -
Development Ruby Environment
As dev user pull the operations ruby runtime image and build using latest code from different Github branch or project.
# oc login -u dev
# oc project ruby-dev
# oc new-app ruby-ops/ruby-22-centos7:latest~https://github.com/ktenzer/ruby-hello-world.git
Application requires database and service name called database.
# oc new-app mysql-ephemeral -p DATABASE_SERVICE_NAME=database
# oc env dc database --list | oc env dc ruby-hello-world -e -
Scenario 2: Development to Production Promotion
Once development has an application version with required functionality and having passed all tests it can be promoted to other environments. Typically that would be qa, test, integration and eventually production. In this simple example using the ticket-monster application we will promote directly from development to production.
Using similar concepts as describe in scenario 1 this technique relies on production pulling appropriate images from development. In this scenario however we will create deployment configs and within setup a trigger that when an image with particular name/tag is updated in development, promotion to production will occur automatically. Scenario 1 shows how to do this manually, here we do it automatically and in scenario 3 we will see how to do promotion using jenkins that enables building complex pipelines with approval processes.
Create projects and setup pull permissions
# oc new-project ticket-monster-dev
# oc new-project ticket-monster-prod
# oc policy add-role-to-group system:image-puller system:serviceaccounts:ticket-monster-prod -n ticket-monster-dev
Create ticket monster template for development
# vi monster.yaml
kind: Template
apiVersion: v1
metadata:
 name: monster
 annotations:
 tags: instant-app,javaee
 iconClass: icon-jboss
 description: |
 Ticket Monster is a moderately complex application that demonstrates how
 to build modern applications using JBoss web technologies

parameters:
- name: GIT_URI
 value: git://github.com/kenthua/ticket-monster-ose
- name: MYSQL_DATABASE
 value: monster
- name: MYSQL_USER
 value: monster
- name: MYSQL_PASSWORD
 from: '[a-zA-Z0-9]{8}'
 generate: expression


objects:
- kind: ImageStream
 apiVersion: v1
 metadata:
 name: monster

- kind: BuildConfig
 apiVersion: v1
 metadata:
 name: monster
 spec:
 triggers:
 - type: Generic
 generic:
 secret: secret
 - type: ImageChange
 - type: ConfigChange
 strategy:
 type: Source
 sourceStrategy:
 from:
 kind: ImageStreamTag
 name: jboss-eap64-openshift:latest
 namespace: openshift
 source:
 type: Git
 git:
 uri: ${GIT_URI}
 ref: master
 output:
 to:
 kind: ImageStreamTag
 name: monster:latest

- kind: DeploymentConfig
 apiVersion: v1
 metadata:
 name: monster
 spec:
 replicas: 1
 selector:
 deploymentConfig: monster
 template:
 metadata:
 labels:
 deploymentConfig: monster
 name: monster
 spec:
 containers:
 - name: monster
 image: monster
 ports:
 - name: http
 containerPort: 8080
 - name: jolokia
 containerPort: 8778
 - name: debug
 containerPort: 8787
 readinessProbe:
 exec:
 command:
 - /bin/bash
 - -c
 - /opt/eap/bin/readinessProbe.sh
 env:
 - name: DB_SERVICE_PREFIX_MAPPING
 value: monster-mysql=DB
 - name: TX_DATABASE_PREFIX_MAPPING
 value: monster-mysql=DB
 - name: DB_JNDI
 value: java:jboss/datasources/MySQLDS
 - name: DB_DATABASE
 value: ${MYSQL_DATABASE}
 - name: DB_USERNAME
 value: ${MYSQL_USER}
 - name: DB_PASSWORD
 value: ${MYSQL_PASSWORD}
 - name: JAVA_OPTS
 value: "-Xmx512m -XX:MaxPermSize=256m -Djava.net.preferIPv4Stack=true -Djboss.modules.system.pkgs=org.jboss.logmanager -Djava.awt.headless=true -Djboss.modules.policy-permissions=true"
 - name: DEBUG
 value: "true"
 triggers:
 - type: ImageChange
 imageChangeParams:
 automatic: true
 containerNames:
 - monster
 from:
 kind: ImageStream
 name: monster

- kind: DeploymentConfig
 apiVersion: v1
 metadata:
 name: monster-mysql
 spec:
 triggers:
 - type: ImageChange
 imageChangeParams:
 automatic: true
 containerNames:
 - monster-mysql
 from:
 kind: ImageStreamTag
 name: mysql:latest
 namespace: openshift
 replicas: 1
 selector:
 deploymentConfig: monster-mysql
 template:
 metadata:
 labels:
 deploymentConfig: monster-mysql
 name: monster-mysql
 spec:
 containers:
 - name: monster-mysql
 image: mysql
 ports:
 - containerPort: 3306
 env:
 - name: MYSQL_USER
 value: ${MYSQL_USER}
 - name: MYSQL_PASSWORD
 value: ${MYSQL_PASSWORD}
 - name: MYSQL_DATABASE
 value: ${MYSQL_DATABASE}

- kind: Service
 apiVersion: v1
 metadata:
 name: monster
 spec:
 ports:
 - name: http
 port: 8080
 selector:
 deploymentConfig: monster

- kind: Service
 apiVersion: v1
 metadata:
 name: monster-mysql
 spec:
 ports:
 - port: 3306
 selector:
 deploymentConfig: monster-mysql

- kind: Route
 apiVersion: v1
 metadata:
 name: monster
 spec:
 to:
 name: monster
# oc create -n openshift -f monster.yaml
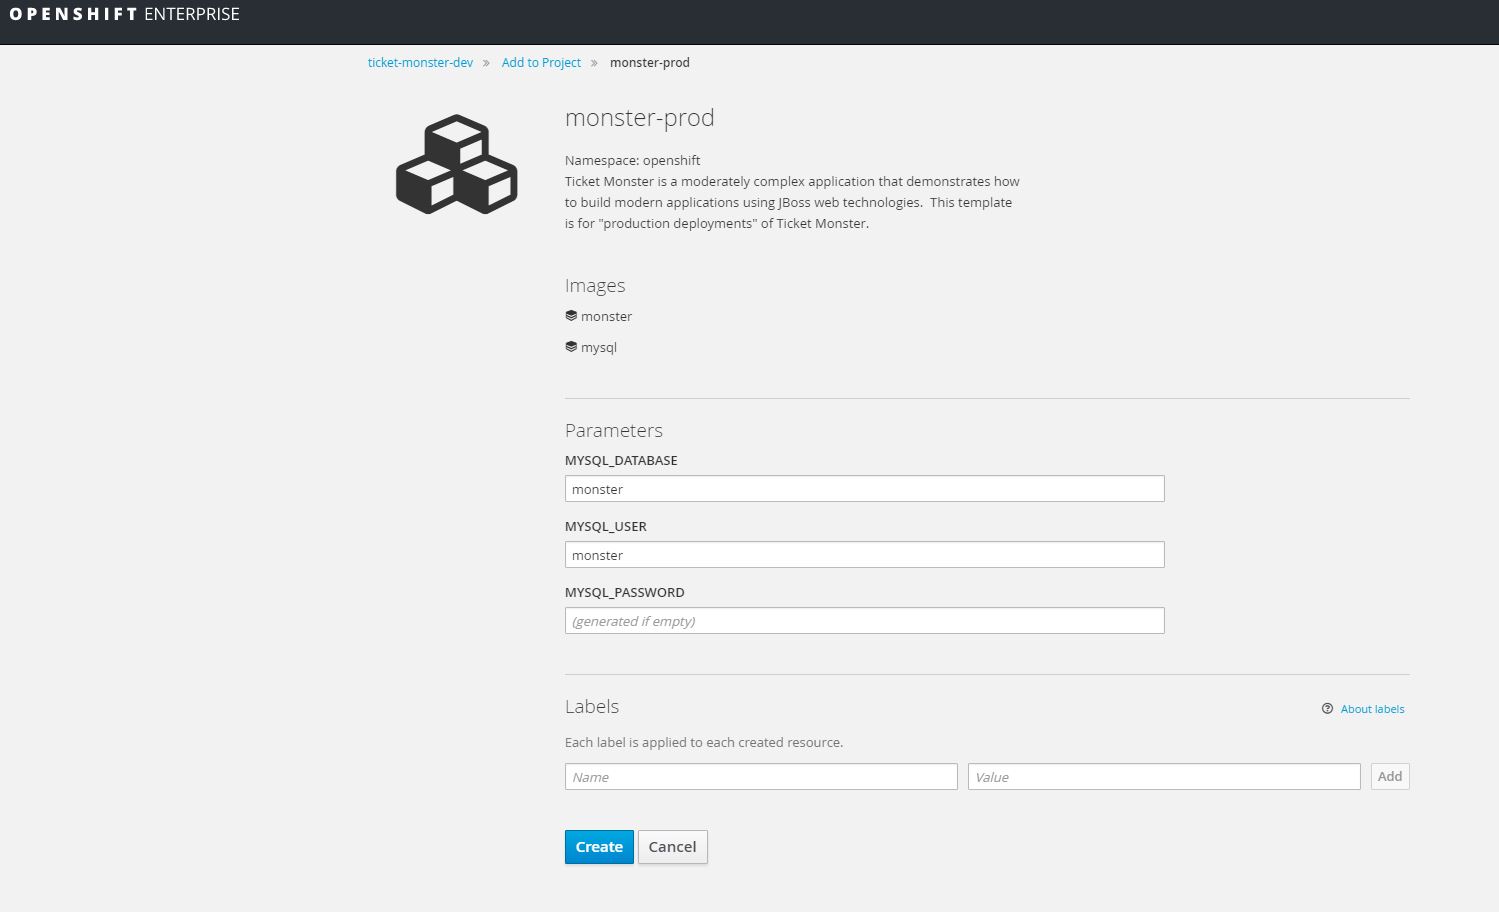
Create template for ticket monster production environment
Below trigger will only deploy production environment when the image stream in development is tagged with monster:prod.
# vi monster-prod.yaml
kind: Template
apiVersion: v1
metadata:
 name: monster-prod
 annotations:
 tags: instant-app,javaee
 iconClass: icon-jboss
 description: |
 Ticket Monster is a moderately complex application that demonstrates how
 to build modern applications using JBoss web technologies. This template
 is for "production deployments" of Ticket Monster.

parameters:
- name: MYSQL_DATABASE
 value: monster
- name: MYSQL_USER
 value: monster
- name: MYSQL_PASSWORD
 from: '[a-zA-Z0-9]{8}'
 generate: expression

objects:
- kind: DeploymentConfig
 apiVersion: v1
 metadata:
 name: monster
 spec:
 replicas: 3
 selector:
 deploymentConfig: monster
 template:
 metadata:
 labels:
 deploymentConfig: monster
 name: monster
 spec:
 containers:
 - name: monster
 image: monster
 ports:
 - name: http
 containerPort: 8080
 - name: jolokia
 containerPort: 8778
 readinessProbe:
 exec:
 command:
 - /bin/bash
 - -c
 - /opt/eap/bin/readinessProbe.sh
 env:
 - name: DB_SERVICE_PREFIX_MAPPING
 value: monster-mysql=DB
 - name: TX_DATABASE_PREFIX_MAPPING
 value: monster-mysql=DB
 - name: DB_JNDI
 value: java:jboss/datasources/MySQLDS
 - name: DB_DATABASE
 value: ${MYSQL_DATABASE}
 - name: DB_USERNAME
 value: ${MYSQL_USER}
 - name: DB_PASSWORD
 value: ${MYSQL_PASSWORD}
 - name: JAVA_OPTS
 value: "-Xmx512m -XX:MaxPermSize=256m -Djava.net.preferIPv4Stack=true -Djboss.modules.system.pkgs=org.jboss.logmanager -Djava.awt.headless=true -Djboss.modules.policy-permissions=true"
 triggers:
 - type: ImageChange
 imageChangeParams:
 automatic: true
 containerNames:
 - monster
 from:
 kind: ImageStreamTag
 name: monster:prod
 namespace: ticket-monster-dev

- kind: DeploymentConfig
 apiVersion: v1
 metadata:
 name: monster-mysql
 spec:
 triggers:
 - type: ImageChange
 imageChangeParams:
 automatic: true
 containerNames:
 - monster-mysql
 from:
 kind: ImageStreamTag
 name: mysql:latest
 namespace: openshift
 replicas: 1
 selector:
 deploymentConfig: monster-mysql
 template:
 metadata:
 labels:
 deploymentConfig: monster-mysql
 name: monster-mysql
 spec:
 containers:
 - name: monster-mysql
 image: mysql
 ports:
 - containerPort: 3306
 env:
 - name: MYSQL_USER
 value: ${MYSQL_USER}
 - name: MYSQL_PASSWORD
 value: ${MYSQL_PASSWORD}
 - name: MYSQL_DATABASE
 value: ${MYSQL_DATABASE}

- kind: Service
 apiVersion: v1
 metadata:
 name: monster
 spec:
 ports:
 - name: http
 port: 8080
 selector:
 deploymentConfig: monster

- kind: Service
 apiVersion: v1
 metadata:
 name: monster-mysql
 spec:
 ports:
 - port: 3306
 selector:
 deploymentConfig: monster-mysql

- kind: Route
 apiVersion: v1
 metadata:
 name: monster
 spec:
 to:
 name: monster
# oc create -n openshift -f monster-prod.yaml
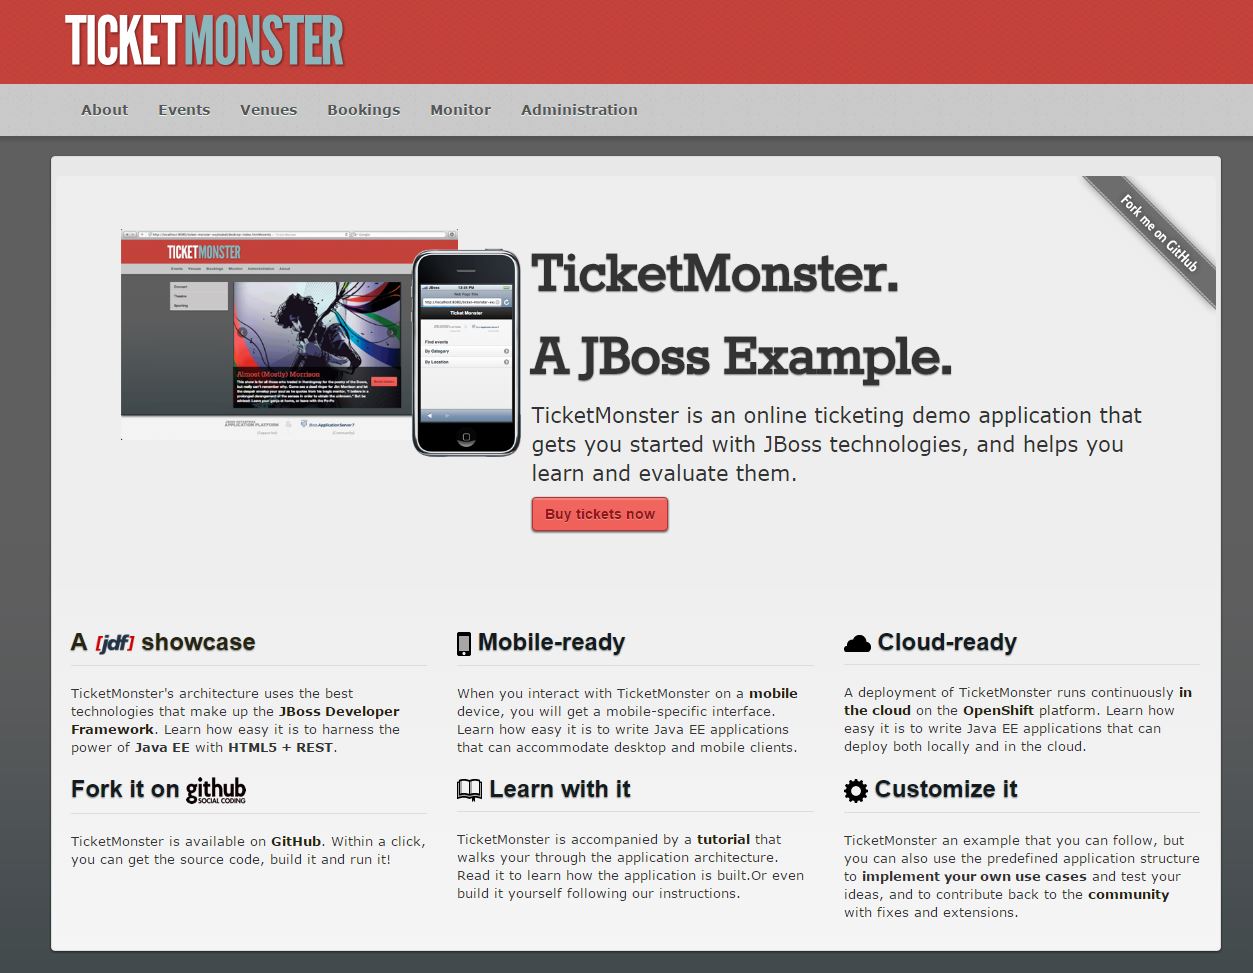
Deploy ticket-monster development environment
Using the UI you can now choose template monster (monster).

Deploy ticket-monster production environment
Deploy ticket-monster production template (monster-prod).
You will notice in development the environment is built and you can access the application using the service URL: http://monster-ticket-monster-dev.apps.lab
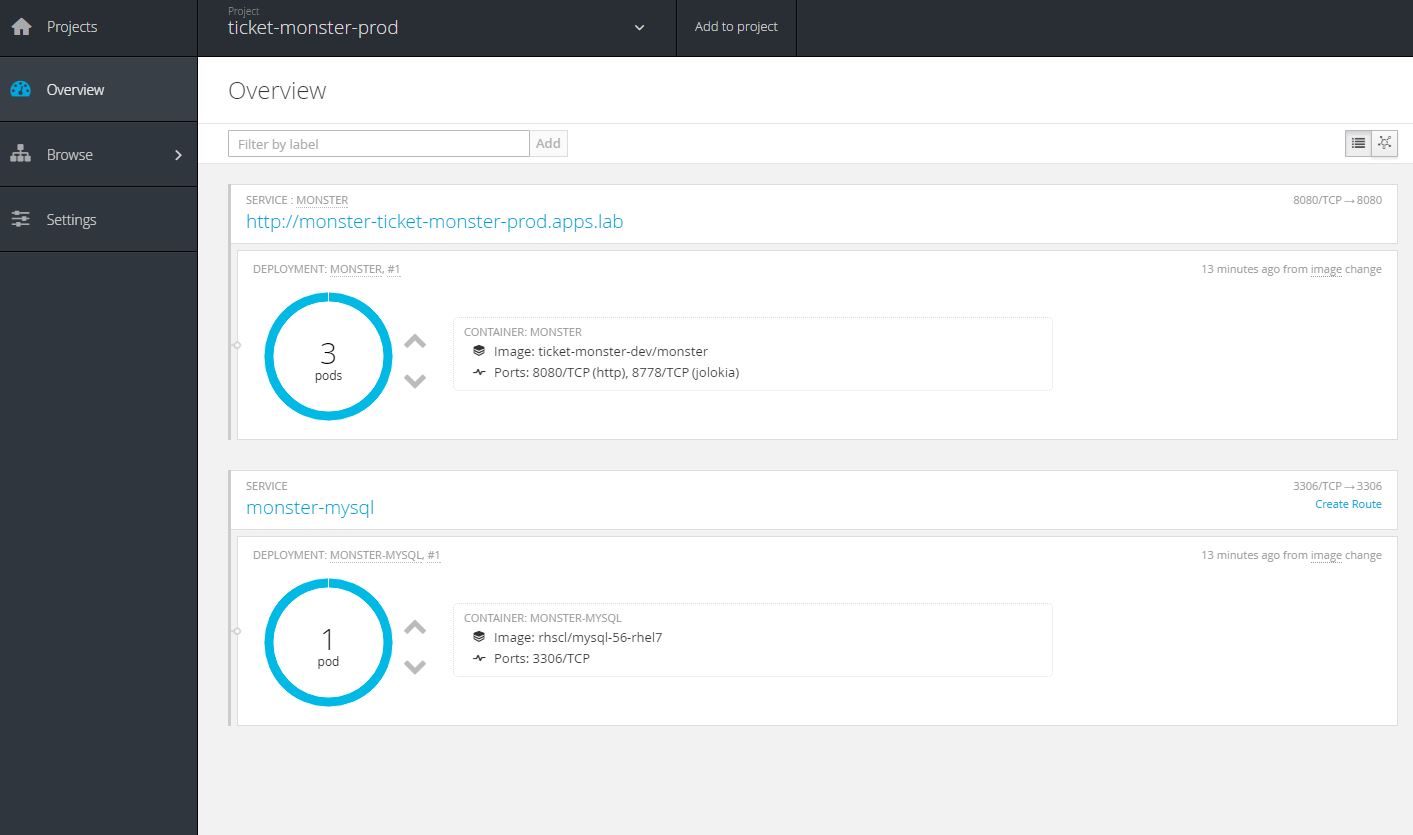
If you look at production environment, the database is running and a service endpoint exists however ticket monster application is not running. The production template is as mentioned setup to pull images from development automatically that have a certain name/tag. The production environment also runs scale of 4 for application where development only has scale of 1.
Promote development application version to production
Get the image stream pull spec.
# oc get is monster -o yaml
apiVersion: v1
kind: ImageStream
metadata:
 annotations:
 openshift.io/image.dockerRepositoryCheck: 2016-08-09T13:37:47Z
 creationTimestamp: 2016-08-09T13:14:53Z
 generation: 7
 name: monster
 namespace: ticket-monster-dev
 resourceVersion: "107170"
 selfLink: /oapi/v1/namespaces/ticket-monster-dev/imagestreams/monster
 uid: 42740a3d-5e33-11e6-aa8d-001a4ae42e01
spec:
 tags:
 - annotations: null
 from:
 kind: ImageStreamImage
 name: monster@sha256:3a48a056a58f50764953ba856d90eba73dd0dfdee10b8cb6837b0fd9461da7f9
 generation: 7
 importPolicy: {}
 name: prod
status:
 dockerImageRepository: 172.30.139.50:5000/ticket-monster-dev/monster
 tags:
 - items:
 - created: 2016-08-09T13:26:04Z
 dockerImageReference: 172.30.139.50:5000/ticket-monster-dev/monster@sha256:3a48a056a58f50764953ba856d90eba73dd0dfdee10b8cb6837b0fd9461da7f9
 generation: 1
 image: sha256:3a48a056a58f50764953ba856d90eba73dd0dfdee10b8cb6837b0fd9461da7f9
 tag: latest
Once you have the image stream pull specification (above in bold), tag the image stream monster:prod.
# oc tag monster@sha256:3a48a056a58f50764953ba856d90eba73dd0dfdee10b8cb6837b0fd9461da7f9 monster:prod
You can verify that the image stream in fact has a tag prod.
# oc get is
NAME DOCKER REPO TAGS UPDATED
monster 172.30.139.50:5000/ticket-monster-dev/monster prod,latest 2 minutes ago
As soon as the image stream in ticket-monster-dev is tagged with monster:prod it will be deployed to production. As mentioned above the scale in production is 4 instead of 1.
Scenario 3: AB Deployment using Jenkins
In this scenario we will look at how to do a simple AB deployment using Jenkins. This scenario builds off what we learned in scenario 1 and 2. In this scenario we will create a slightly more complex environment with three environments: development, integration and production. We will also build two version of our application, v1 and v2 in dev environment. Using Jenkins we will show how to promote v2 of application from development to integration to production. Finally we will show how to rollback production from v2 to v1 of application. I want to thank a colleague, Torben Jaeger who created a lot of the below content.
Create projects
# oc new-project dev && \
oc new-project int && \
oc new-project prod
Setup pull permissions
Allow int environment to pull images from dev environment and prod to pull images from both dev and int environments.
# oc policy add-role-to-group system:image-puller system:serviceaccounts:int -n dev
# oc policy add-role-to-group system:image-puller system:serviceaccounts:prod -n int
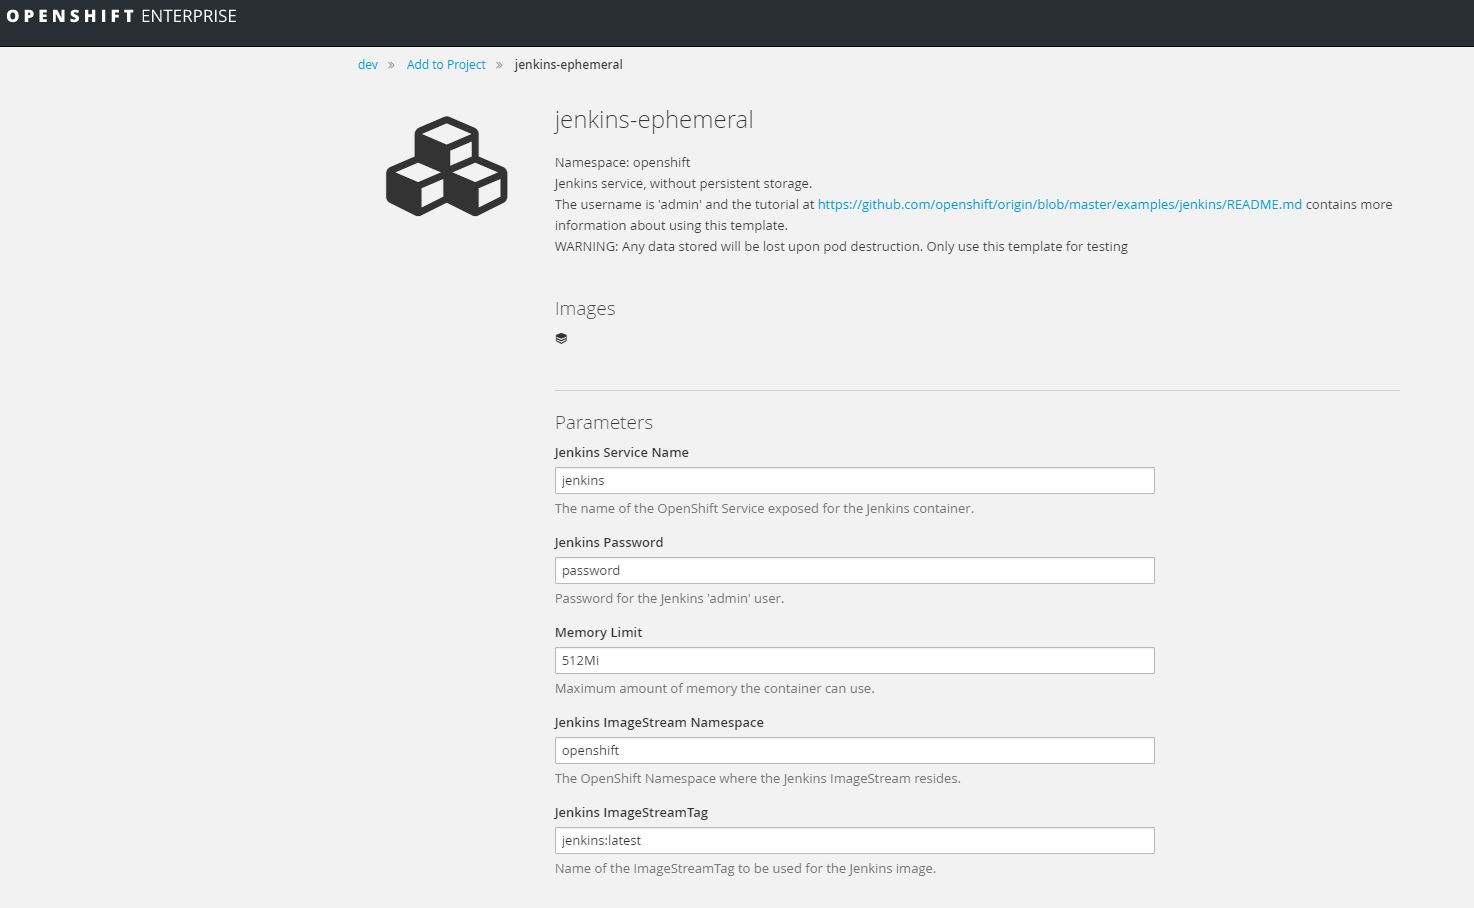
# oc policy add-role-to-group system:image-puller system:serviceaccounts:prod -n devSetup jenkins in development environment
Using the UI go to the dev project, select add to project and choose jenkins-ephemeral.
Clone Github repository
# git clone https://github.com/ktenzer/openshift-demo.git
Update auth tokens for Jenkins
Get Auth token for OpenShift API. This is needed to allow Jenkins to access OpenShift environment. You need to update the auth tokens.
# oc login -u admin
# oc whoami -t
DMzhKyEN87DZiDYV6i1d8L8NL2e6gFVFPpT5FnozKtU
Update the below jenkins jobs and replace authToken and destinationAuthToken using your token from above.
# ls jenkins-jobs/
promote-int.xml promote-prod.xml rel-v2.xml rollback-prod.xml
Setup all three environements
Using templates you updated above with your auth token create all environments.
# cd openshift-demo
# oc create -f template.json -n dev
# oc create -f acceptance.template.json -n int
# oc create -f production.template.json -n prodDeploy nodejs hello-world application in dev environment
Integration is setup to pull from development and production is setup to pull from integration.
# oc new-app -f template.json -n devThis template creates two versions of the application: v1-ab and v2-ab.
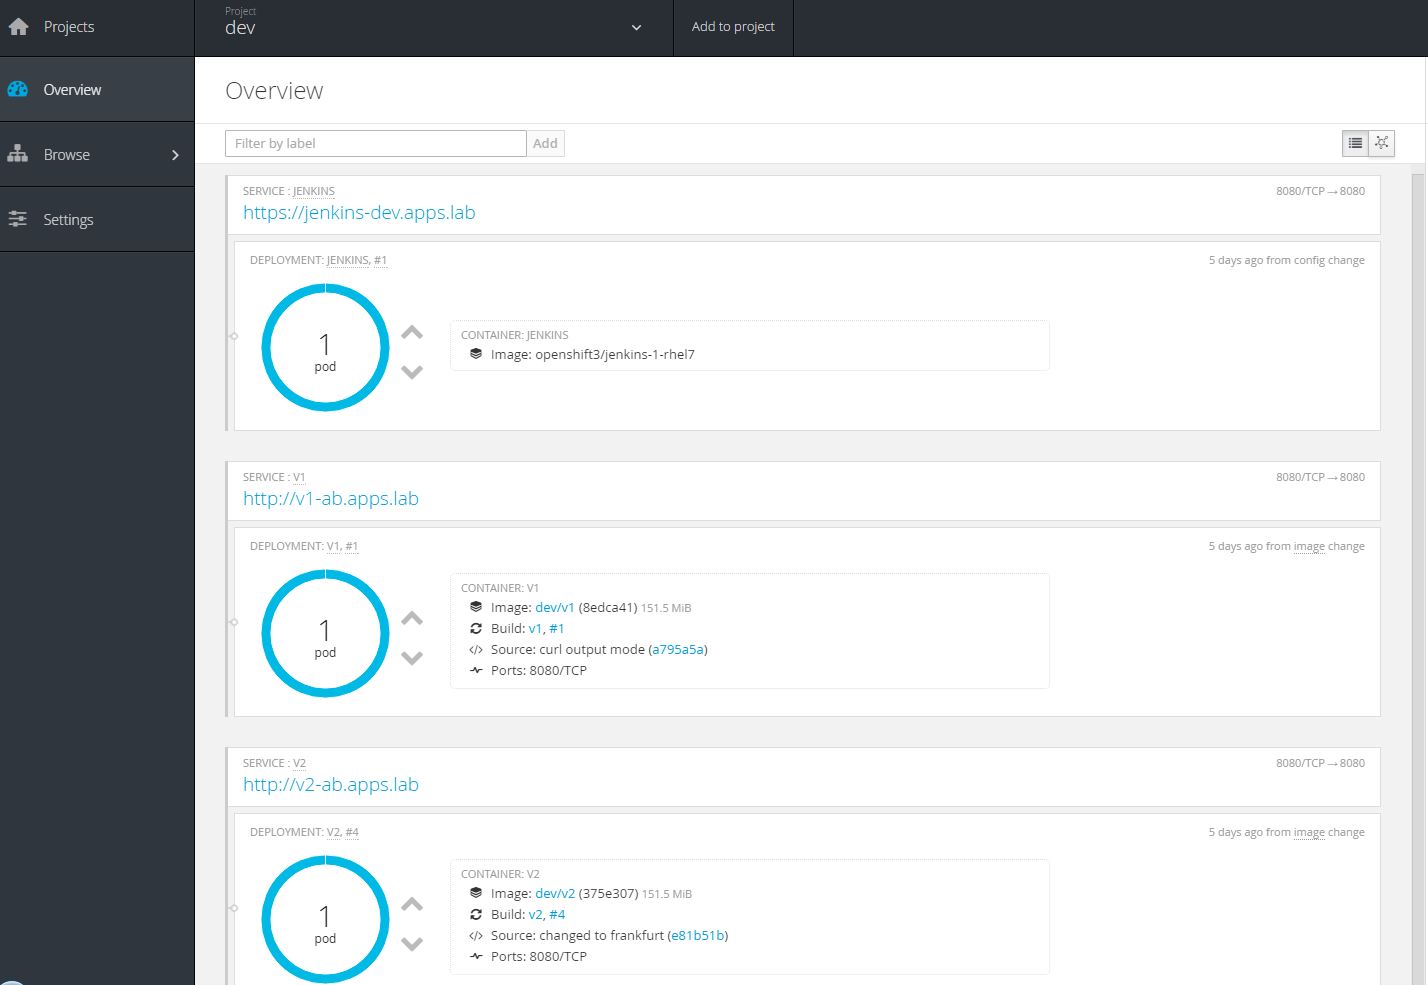
Test applications in development
Connecting to v1-ab via http or curl should print "Hello World!". Connecting to v2-ab via http or curl should print "Hello World, welcome to Frankfurt!".
Deploy v1 from development to integration
Deploy v1 to int using tags. A trigger is set on int (acceptance) template to deploy when the image acceptance:latest is updated. You should see that a pod is started and running version v1 of application.
oc tag v1:latest v1:1.0 -n dev
oc tag dev/v1:1.0 acceptance:v1 -n int
oc tag acceptance:v1 acceptance:latest -n int
Deploy v1 from integration to production
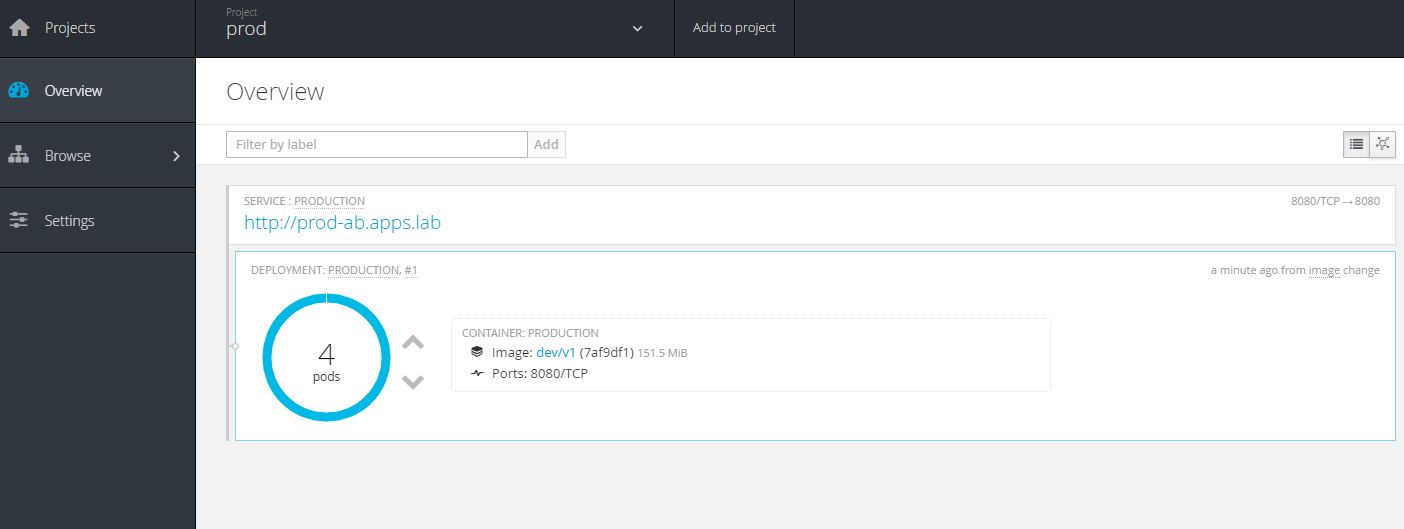
Deploy v1 to prod using tags. A trigger is set on prod template to deploy when the image production:latest is updated.
oc tag int/acceptance:v1 production:v1 -n prod
oc tag production:v1 production:latest -n prod
Notice the application scale is 4 and the version of code running in prod is v1. Again this is all defined in the template we provided.
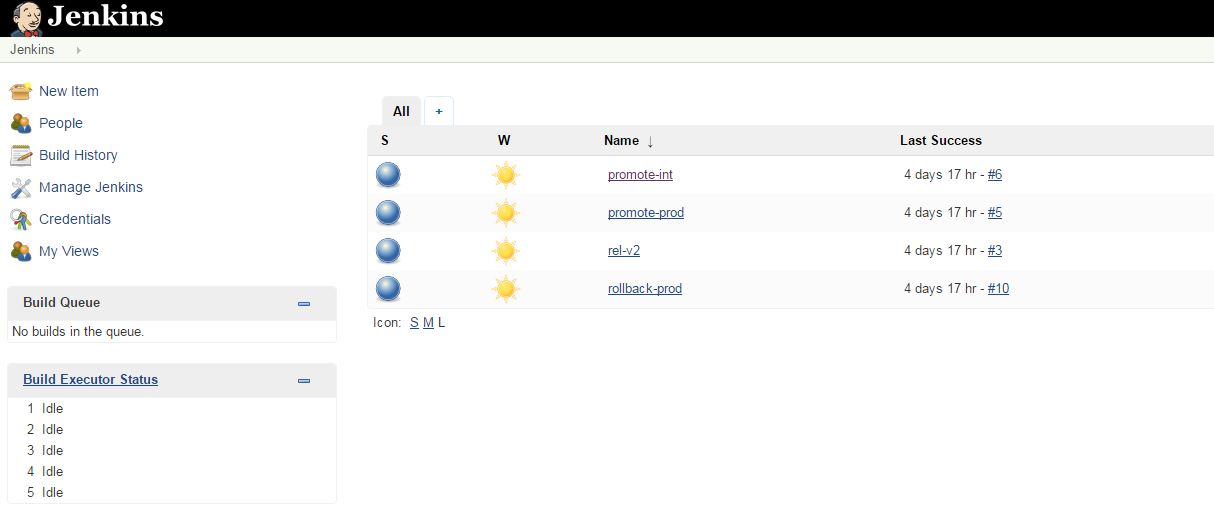
Configure Jenkins
You have seen how to promote application versions manually using image tags and triggers in the templates. Next lets get a bit more sophisticated and orchestrate the same things through jenkins using the OpenShift plugin. This time we will promote the version v2 through int and prod environments.
There are jenkins jobs to promote a release from development to integration and also from integration to production. There is a job to build a new version of the v2 application and finally perform a rollback in production.
# curl -k -u admin:password -XPOST -d @jenkins-jobs/rel-v2.xml 'https://jenkins-dev.apps.lab/createItem?name=rel-v2' -H "Content-Type: application/xml"
# curl -k -u admin:password -XPOST -d @jenkins-jobs/promote-int.xml 'https://jenkins-dev.apps.lab/createItem?name=promote-int' -H "Content-Type: application/xml"
# curl -k -u admin:password -XPOST -d @jenkins-jobs/promote-prod.xml 'https://jenkins-dev.apps.lab/createItem?name=promote-prod' -H "Content-Type: application/xml"
# curl -k -u admin:password -XPOST -d @jenkins-jobs/rollback-prod.xml 'https://jenkins-dev.apps.lab/createItem?name=rollback-prod' -H "Content-Type: application/xml"
Once you create the jobs you can login to jenkins using the url with user: admin password: password.
Optional Step: make change in v2 code and start build
In order for this to work you need to fork below nodejs-ex Github repository and update the template.json with your github URL. You would then need to redeploy the dev environment using new template.
 "source": {
 "type": "Git",
 "git": {
 "uri": "https://github.com/ktenzer/nodejs-ex.git",
 "ref": "master"
 },
# git clone https://github.com/ktenzer/nodejs-ex
# cd nodejs-ex
Checkout v2 branch and make commit.
# git checkout v2
# vi index.html
Hello World, welcome to Munich!
Commit changes.
# git commit -a -m "updated to munich"
# git push origin v2
Run rhel-v2 build from Jenkins
![]()
If you cloned the nodejs-ex repository then you should see your changes in v2 by clicking the URL or using curl.
Promote v2 from development to integration
Run promote-int build from Jenkins. You will see a new pod is started with v2 code next to v1 pod.
![]()
Promote v2 from integration to production
Here we will take a deeper look into what is actually happening under the hood.
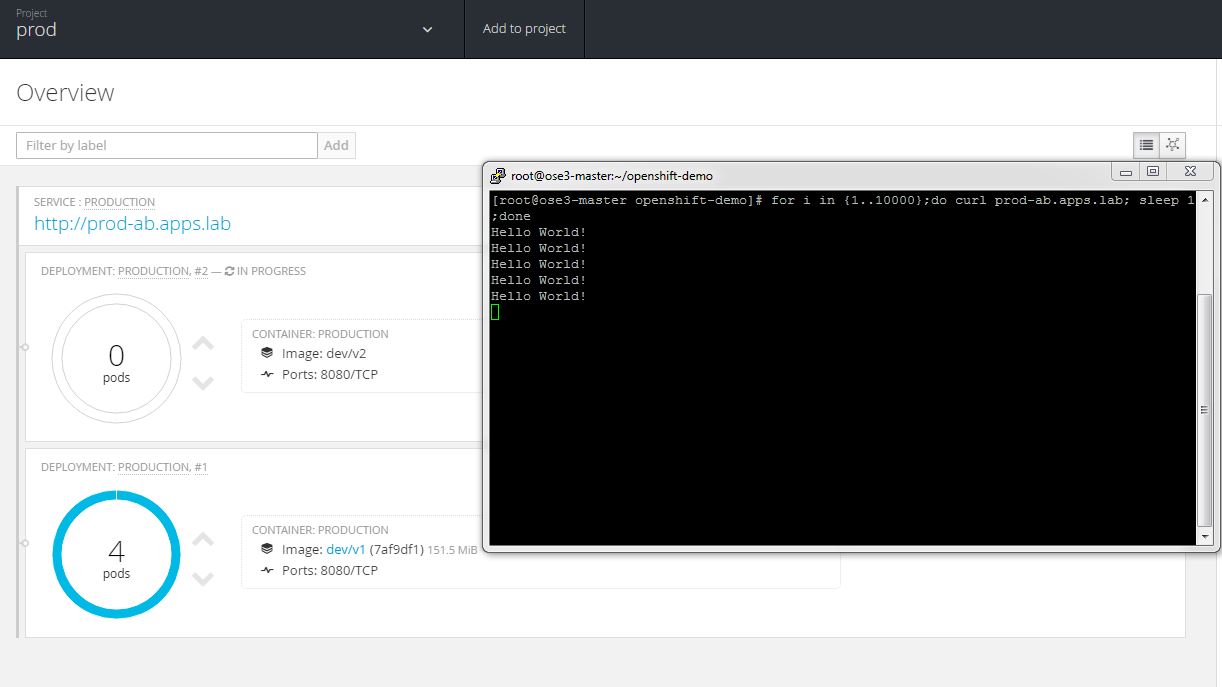
Using curl you can see how the application is switched from v1 to v2.
# for i in {1..10000};do curl prod-ab.apps.lab; sleep 1;done
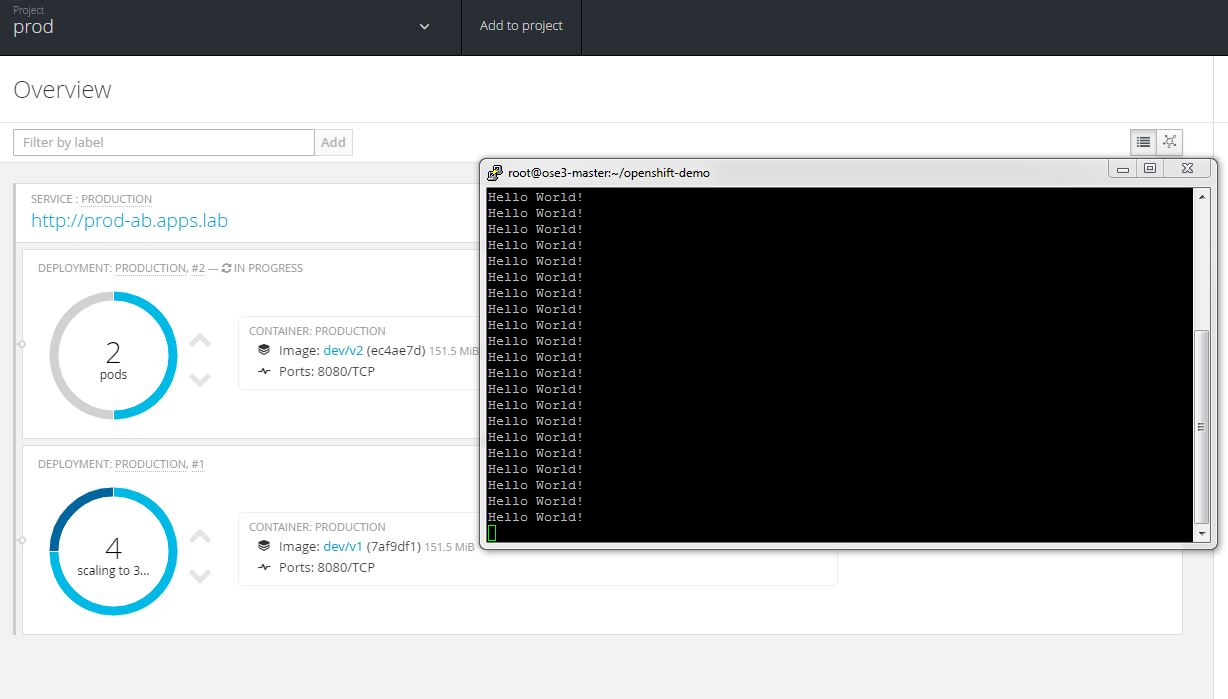
Run promote-prod build from Jenkins.
![]()
The deployment is started and a v2 pods are started next to v1 pods. At this point application service still is set to v1.
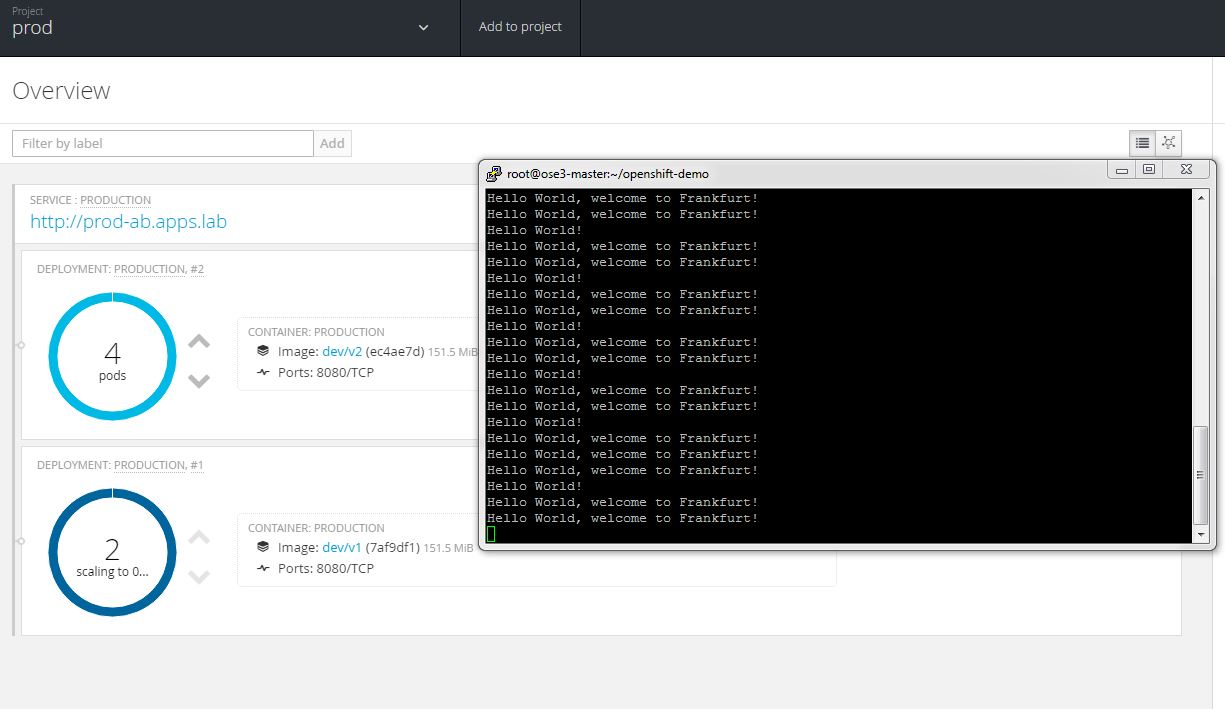
Two v2 pods are running and readiness checks are done to ensure v2 application is responding. The v1 application pods are set to scale down.
All four v2 pods are running and the v1 pods are scaling to 0. We can see that both v1 and v2 are responding to requests while we are in transition.
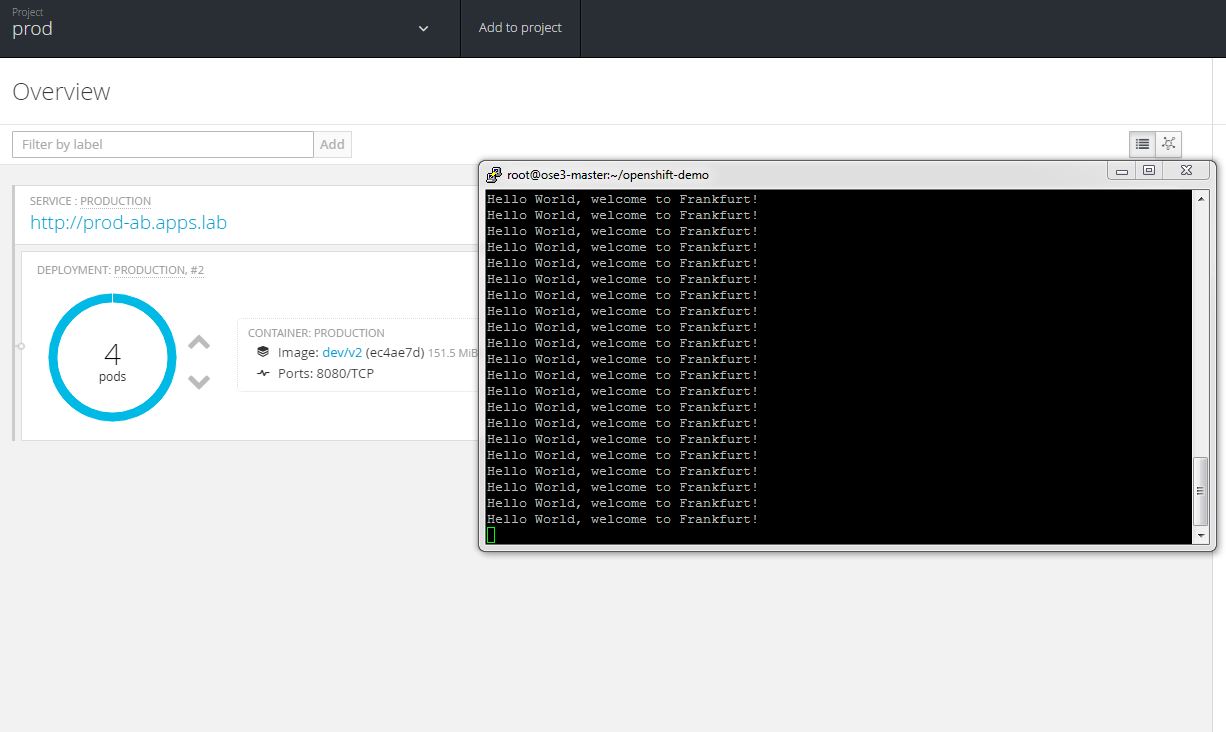
Only v2 pods are running and the AB deployment of v2 is complete.
Rollback
Now lets assume we aren't satisfied with v2 and want to do a rollback of v1.
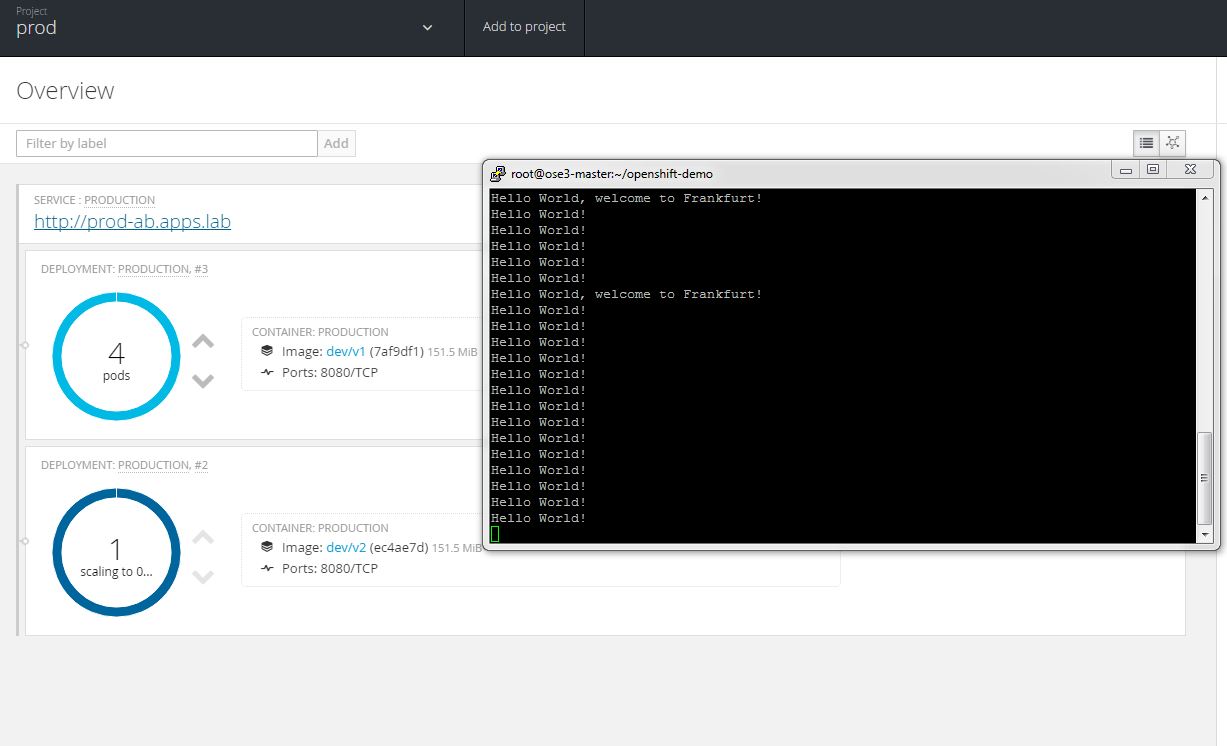
Run rollback-prod build from Jenkins.
![]()
Here we observe the same thing as in our previous step, only we are switching from v2 to v1.
To rollback the integration environment to v1 run below command.
# oc tag dev/v1:latest acceptance:latest -n int
Summary
In this article we have seen how OpenShift simplifies application deployments and integrates with tools such as Jenkins that enable release management. You have many options using OpenShift and we have only really begun to scratched the surface. With Jenkins you can create very complex build pipelines that allow you to not only control but also visualize your application deployment processes. We have looked at one type of common deployment, the AB deployment but there are also other deployment types such as blue-green or canary. In a future article I will take a look at additional deployment models in OpenShift. If you have feedback or experience then please share your thoughts. I hope you have found this article useful and informative.
Happy OpenShifting!
(c) 2016 Keith Tenzer