
Cloud Systems Management: Satellite 6.2 Getting Started Guide
Overview
In this article we will look at how to install Satellite 6.2 and configure a base environment. This article builds on a similar article I published for Satellite 6.1. In addition to installing and configuring Satellite we will also look at one of the long awaited new features remote-cmd execution.
If you are coming from Satellite 5 world then you will want to familiarize yourself with the concepts and how they apply in Satellite 6. The biggest change is around how you manage content through stages (life-cycle enviornments) but there is also a lot more.
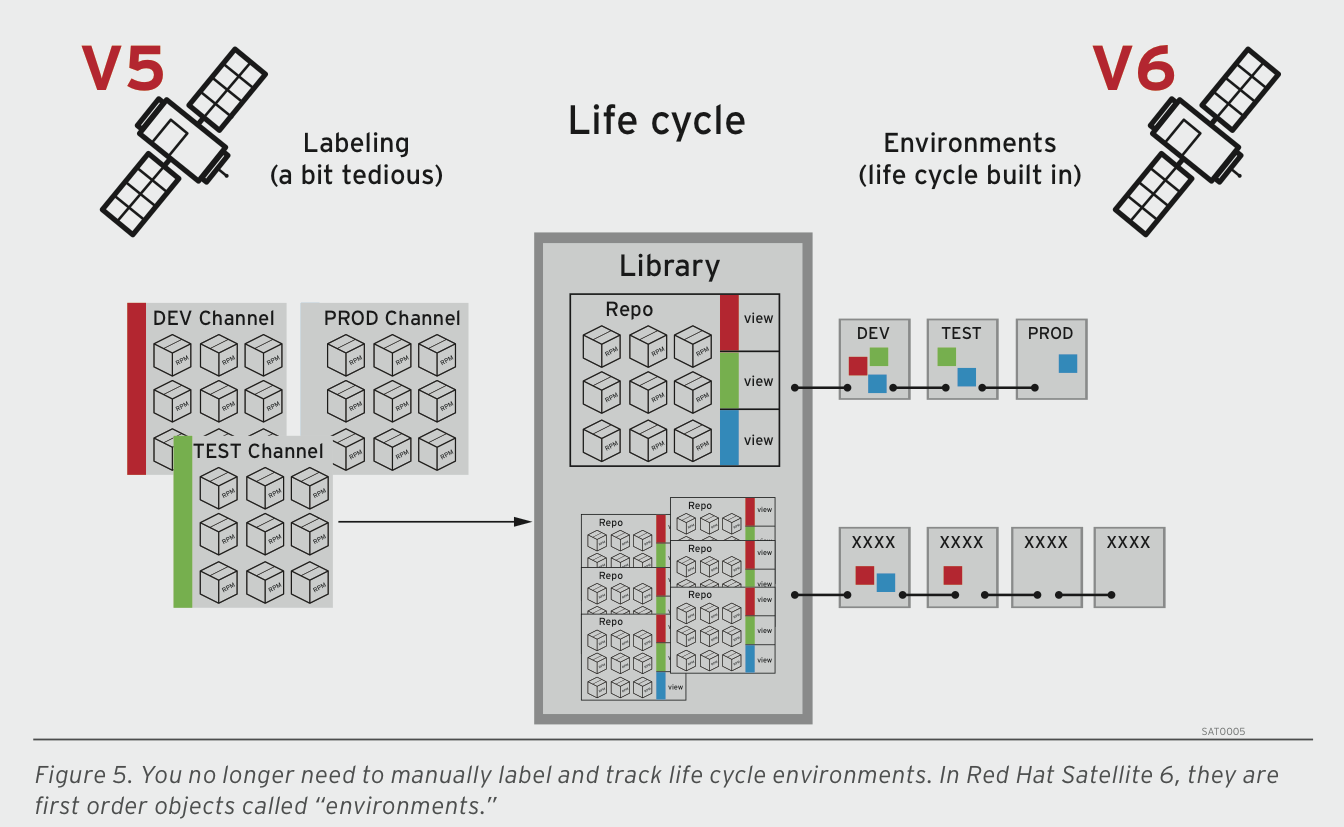
source: https://www.windowspro.de/sites/windowspro.de/files/imagepicker/6/Red_Hat_Satellite_6_Life_Cycle.png
Features
Satellite 6.2 continues to build on that release and provides the following features:
-
Automated Workflows -- This includes remote execution, scheduling for remote execution jobs and expanded bootstrap and provisioning options.
-
Air-gapped security and federation -- Inter-Satellite sync is now available to export RPM content from one Satellite to import into another
-
Software Management Improvements -- Simplified Smart Variable management is now available.
-
Capsule improvements -- Users now have deeper insight into Capsule health and overall performance; Capsules are lighter-weight and can be configured to store only the content that has been requested by its clients; and a new Reference Architecture including deploying a Highly Available Satellite Capsule is now available.
-
Atomic OSTree and containers -- Mirror, provision and manage RHEL Atomic hosts and content with Satellite; mirror container repositories such as Red Hat Registry, DockerHub™ and other 3rd-party sources; and Satellite provides a secure, curated point of entry for container content
-
Enhanced documentation -- Both new and improved documentation is available. (https://access.redhat.com/documentation/red-hat-satellite/)
-
New Guides
-
Virtual Instance Guide (How to configure virt-who)
-
Hammer CLI Guide (How to use Satellite’s CLI)
-
Content Management Guide (How to easily manage Satellite’s content )
-
Quickstart Guide (How to get up and running quickly)
-
-
-
Improved/more user-friendly documentation
-
User Guide split to make more topical and easier to follow:
-
Server Administration Guide
-
Host Configuration Guide
-
“Cheat Sheets” available for specific topics (Hammer)
-
Updated Feature Overviews
-
Prerequisites
In order to install Satellite we need a subscription and of course RHEL 6 or 7.
subscription-manager register
subscription-manager list --available
subscription-manager attach --pool=934893843989289
subscription-manager repos --disable "*"
RHEL 6
subscription-manager repos --enable=rhel-6-server-rpms \
--enable=rhel-server-rhscl-6-rpms \
--enable=rhel-6-server-satellite-6.2-rpms
RHEL 7
subscription-manager repos --enable=rhel-7-server-rpms \
--enable=rhel-server-rhscl-7-rpms \
--enable=rhel-7-server-satellite-6.2-rpms
Update all packages.
# yum update -y
Add Firewall rules.
RHEL 6
# iptables -A INPUT -m state --state NEW -p udp --dport 53 -j ACCEPT \
&& iptables -A INPUT -m state --state NEW -p tcp --dport 53 -j ACCEPT \
&& iptables -A INPUT -m state --state NEW -p udp --dport 67 -j ACCEPT \
&& iptables -A INPUT -m state --state NEW -p udp --dport 69 -j ACCEPT \
&& iptables -A INPUT -m state --state NEW -p tcp --dport 80 -j ACCEPT \
&& iptables -A INPUT -m state --state NEW -p tcp --dport 443 -j ACCEPT \
&& iptables -A INPUT -m state --state NEW -p tcp --dport 5647 -j ACCEPT \
&& iptables -A INPUT -m state --state NEW -p tcp --dport 8140 -j ACCEPT \
&& iptables-save > /etc/sysconfig/iptables
RHEL 7
# firewall-cmd --add-service=RH-Satellite-6
# firewall-cmd --permanent --add-service=RH-Satellite-6
NTP
# yum install chrony

# systemctl start chronyd

# systemctl enable chronyd
SOS
Setting up SOS is a good idea to get faster responses from Red Hat support.
#yum install -y sos
DNS Configuration
This is only required if you want to setup an external DNS server. If you use the integrated DNS provided by Satellite you can skip this step.
[root@ipa ]# vi /etc/named.conf
 //
 // named.conf
 //
 // Provided by Red Hat bind package to configure the ISC BIND named(8) DNS
 // server as a caching only nameserver (as a localhost DNS resolver only).
 //
 // See /usr/share/doc/bind*/sample/ for example named configuration files.
 //

include "/etc/rndc.key";

controls {
 inet 192.168.0.26 port 953 allow { 192.168.38.27; 192.168.38.26; } keys { "capsule"; };
 };

options {
 listen-on port 53 { 192.168.0.26; };
 listen-on-v6 port 53 { ::1; };
 directory "/var/named";
 dump-file "/var/named/data/cache_dump.db";
 statistics-file "/var/named/data/named_stats.txt";
 memstatistics-file "/var/named/data/named_mem_stats.txt";
 //allow-query { localhost; };
 //forwarders {
 //8.8.8.8;
 //};
 forwarders { 8.8.8.8; 8.8.4.4; };

/*
 - If you are building an AUTHORITATIVE DNS server, do NOT enable recursion.
 - If you are building a RECURSIVE (caching) DNS server, you need to enable
 recursion.
 - If your recursive DNS server has a public IP address, you MUST enable access
 control to limit queries to your legitimate users. Failing to do so will
 cause your server to become part of large scale DNS amplification
 attacks. Implementing BCP38 within your network would greatly
 reduce such attack surface
 */
 recursion yes;

dnssec-enable yes;
 dnssec-validation yes;

/* Path to ISC DLV key */
 bindkeys-file "/etc/named.iscdlv.key";

managed-keys-directory "/var/named/dynamic";

pid-file "/run/named/named.pid";
 session-keyfile "/run/named/session.key";
 };

logging {
 channel default_debug {
 file "data/named.run";
 severity dynamic;
 };
 };

zone "0.168.192.in-addr.arpa" IN {
 type master;
 file "/var/named/dynamic/0.168.192-rev";
 //allow-update { 192.168.0.27; };
 update-policy {
 grant capsule zonesub ANY;
 };
 };

zone "lab" IN {
 type master;
 file "/var/named/dynamic/lab.zone";
 //allow-update { 192.168.0.27; };
 update-policy {
 grant capsule zonesub ANY;
 };

};

include "/etc/named.rfc1912.zones";
 include "/etc/named.root.key";
DNS ZONES
[root@ipa ]# cat /var/named/dynamic/
 0.168.192-rev 0.168.192-rev.old lab.zone lab.zone.jnl managed-keys.bind testdns.sh
 [root@ipa dynamic]# cat /var/named/dynamic/lab.zone
 $ORIGIN lab.
 $TTL 86400
 @ IN SOA dns1.lab. hostmaster.lab. (
 2001062501 ; serial
 21600 ; refresh after 6 hours
 3600 ; retry after 1 hour
 604800 ; expire after 1 week
 86400 ) ; minimum TTL of 1 day
 ;
 ;
 IN NS dns1.lab.
 rhevm IN A 192.168.0.20
 rhevh01 IN A 192.168.0.21
 osp8 IN A 192.168.0.22
 cf IN A 192.168.0.24
 ipa IN A 192.168.0.26
 sat6 IN A 192.168.0.27
 IN AAAA aaaa:bbbb::1
 ose-master IN A 192.168.0.25
 * 300 IN A 192.168.0.25
 ;
 ;
[root@ipa ]# cat /var/named/dynamic/0.168.192-rev
 $TTL 86400 ; 24 hours, could have been written as 24h or 1d
 $ORIGIN 0.168.192.IN-ADDR.ARPA.

@ IN SOA dns1.lab. hostmaster.lab. (
 2001062501 ; serial
 21600 ; refresh after 6 hours
 3600 ; retry after 1 hour
 604800 ; expire after 1 week
 86400 ) ; minimum TTL of 1 day

; Name servers for the zone - both out-of-zone - no A RRs required
 IN NS dns1.lab.
 ; server host definitions
 20 IN PTR rhevm.lab.
 21 IN PTR rhevh01.lab.
 22 IN PTR osp8.lab.
 24 IN PTR cf.lab.
 25 IN PTR ose3-master.lab.
 26 IN PTR ipa.lab.
 27 IN PTR sat6.lab.
Installation
Before we start with manual install, a Solution Architect and colleague of mine, Sebastian Hetze, created an automated setup script that also can integrate IDM. I strongly recommend using this script and contributing to further enhancements.
https://github.com/shetze/hammer-scripts/blob/master/sat62-setup.sh
If you are of course doing this to learn then it is definitely good to walk through manual steps so you understand concepts and what is involved.
#yum install -y satellite
With Integrated DNS
# satellite-installer --scenario satellite --foreman-admin-username admin --foreman-admin-password redhat01 --foreman-proxy-dns true --foreman-proxy-dns-interface eth0 --foreman-proxy-dns-zone example.com --foreman-proxy-dns-forwarders 8.8.8.8 --foreman-proxy-dns-reverse 0.168.192.in-addr.arpa --foreman-proxy-dhcp true --foreman-proxy-dhcp-interface eth0 --foreman-proxy-dhcp-range "192.168.0.100 192.168.0.199" --foreman-proxy-dhcp-gateway 192.168.0.1 --foreman-proxy-dhcp-nameservers 192.168.0.27 --foreman-proxy-tftp true --foreman-proxy-tftp-servername $(hostname) --capsule-puppet true --foreman-proxy-puppetca true
Without Integrated DNS
# satellite-installer --scenario satellite --foreman-admin-username admin --foreman-admin-password redhat01 --foreman-proxy-dns true --foreman-proxy-dns-interface eth0 --foreman-proxy-dns-zone sat.lab --foreman-proxy-dns-forwarders 192.168.0.26 --foreman-proxy-dns-reverse 0.168.192.in-addr.arpa --foreman-proxy-dhcp true --foreman-proxy-dhcp-interface eth0 --foreman-proxy-dhcp-range "192.168.0.225 192.168.0.250" --foreman-proxy-dhcp-gateway 192.168.0.1 --foreman-proxy-dhcp-nameservers 192.168.0.27 --foreman-proxy-tftp true --foreman-proxy-tftp-servername $(hostname) --capsule-puppet true --foreman-proxy-puppetca true
Configuration
At this point you should be able to reach the web UI using HTTPS. In this environment the url is https://sat6.lab.com. Next we need to setup the hammer CLI. Configure hammer so that we automatically pass authentication credentials.
mkdir ~/.hammer
cat > .hammer/cli_config.yml <<EOF
:foreman:
    :host: 'https://sat6.lab/'
    :username: 'admin'
    :password: 'redhat01'

EOF
External DNS Configuration
If you setup external DNS then you need to allow Satellite server to update DNS records on your external DNS server.
# vi /etc/foreman-proxy/settings.d/dns.yml
---
:enabled: true
:dns_provider: nsupdate
:dns_key: /etc/rndc.key
:dns_server: 192.168.38.2
:dns_ttl: 86400
# systemctl restart foreman-proxy
Register Satellite Server in Red Hat Network (RHN).

Assign subscriptions to the Satellite server and download manifest from RHN.

Note: In the next section we will be using the hammer CLI to configure Satellite. In this environment we are using the organization "Default Organization", you would probably change this to a more specific organization name. If so you need to first create a new organization.
Upload manifest file to Satellite server.
#hammer subscription upload --organization "Default Organization" --file /root/manifest_d586388b-f556-4623-b6a0-9f76857bedbc.zip
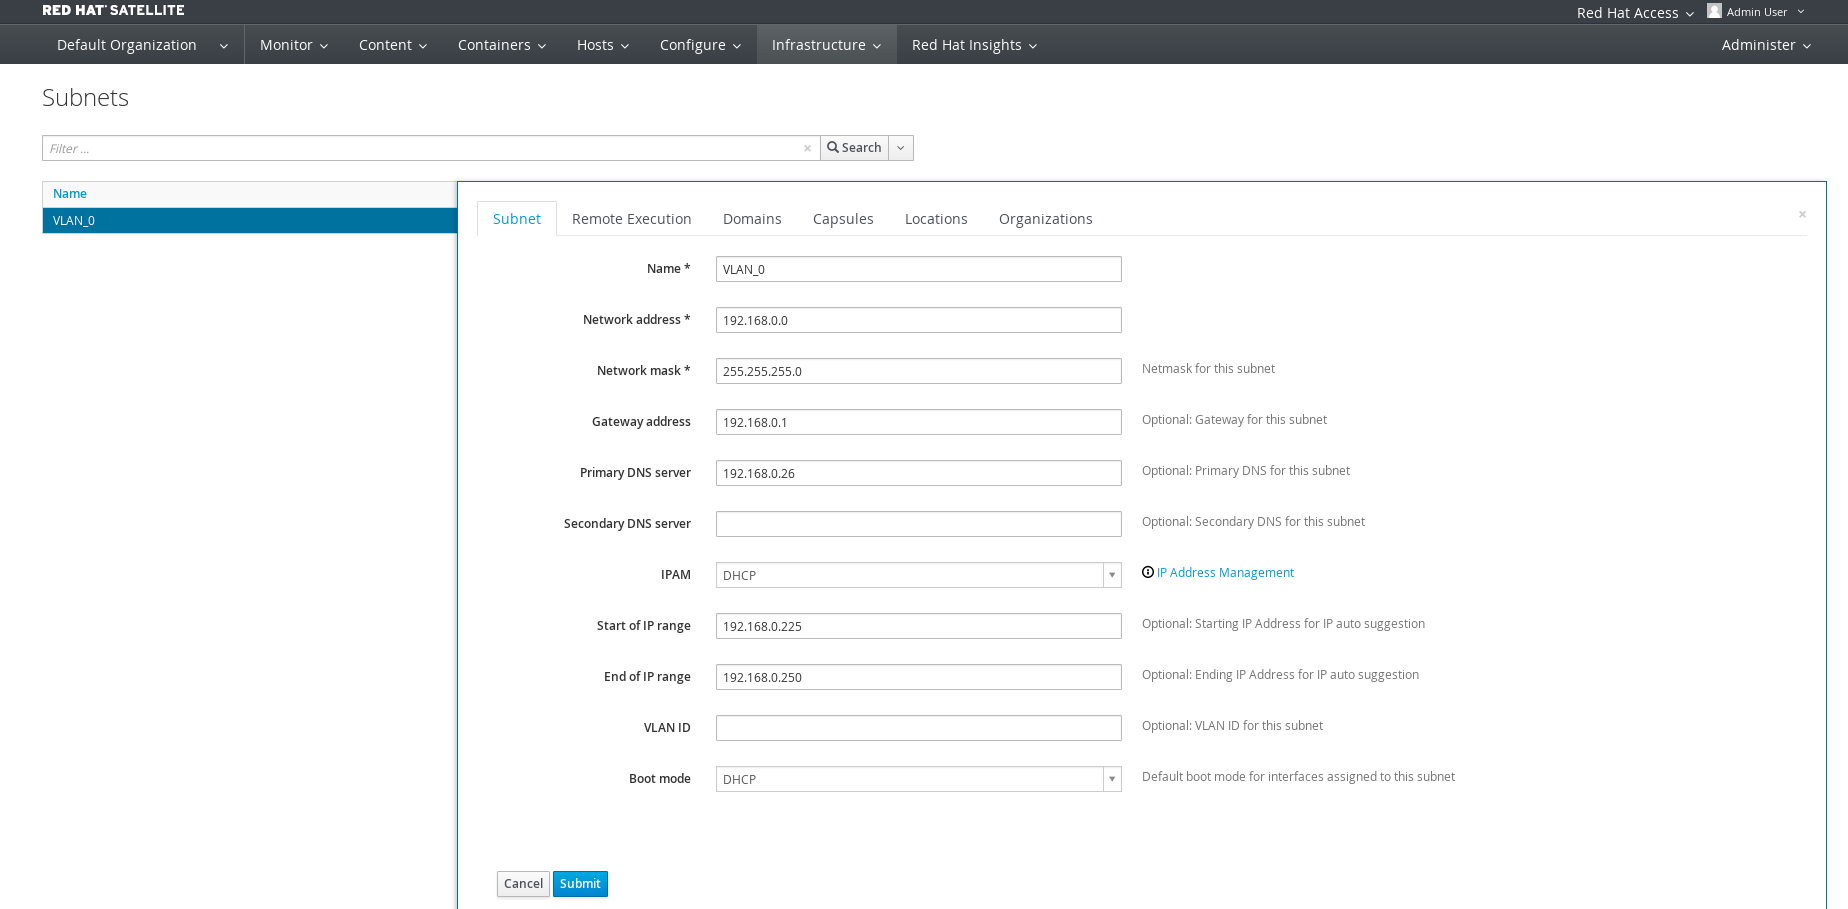
Create a subnet in Satellite 6 under Infrastructure->Subnet. In this environment the subnet is 192.168.122.0/24 and we are using external D.
Enable basic repositories.
At minimum you need RHEL Server, Satellite Tools and RH Common.
#hammer repository-set enable --organization "Default Organization" --product 'Red Hat Enterprise Linux Server' --basearch='x86_64' --releasever='7Server' --name 'Red Hat Enterprise Linux 7 Server (RPMs)'
#hammer repository-set enable --organization "Default Organization" --product 'Red Hat Enterprise Linux Server' --basearch='x86_64' --releasever='7Server' --name 'Red Hat Enterprise Linux 7 Server (Kickstart)'
#hammer repository-set enable --organization "Default Organization" --product 'Red Hat Enterprise Linux Server' --basearch='x86_64' --name 'Red Hat Satellite Tools 6.2 (for RHEL 7 Server) (RPMs)'

#hammer repository-set enable --organization "Default Organization" --product 'Red Hat Enterprise Linux Server' --basearch='x86_64' --name 'Red Hat Enterprise Linux 7 Server - RH Common RPMs x86_64 7Server'
Enable EPEL repository for 3rd party packages.
#wget -q https://dl.fedoraproject.org/pub/epel/RPM-GPG-KEY-EPEL-7  -O /root/RPM-GPG-KEY-EPEL-7
#hammer gpg create --key /root/RPM-GPG-KEY-EPEL-7  --name 'GPG-EPEL-7' --organization "Default Organization"
Create a new product for the EPEL repository. In Satellite 6 products are a groupings of external content outside of RHN. Products can contain RPM repositories, Puppet modules or container images.
#hammer product create --name='EPEL 3rd Party Packages' --organization "Default Organization" --description 'EPEL 3rd Party Packages'
#hammer repository create --name='EPEL 7 - x86_64' --organization "Default Organization" --product='EPEL 3rd Party Packages' --content-type='yum' --publish-via-http=true --url=http://dl.fedoraproject.org/pub/epel/7/x86_64/ --checksum-type=sha256 --gpg-key=GPG-EPEL-7
Synchronize the repositories. This will take a while as all of the RPM packages will be downloaded. Note: you can also use the --async option to run tasks in parallel.
#hammer repository synchronize --async --organization "Default Organization" --product 'Red Hat Enterprise Linux Server'  --name 'Red Hat Enterprise Linux 7 Server Kickstart x86_64 7Server'
#hammer repository synchronize --async --organization "Default Organization" --product 'Red Hat Enterprise Linux Server'  --name 'Red Hat Satellite Tools 6.2 for RHEL 7 Server RPMs x86_64'
#hammer repository synchronize --async --organization "Default Organization" --product 'Red Hat Enterprise Linux Server'  --name 'Red Hat Enterprise Linux 7 Server RPMs x86_64 7Server'

#hammer repository synchronize --async --organization "Default Organization" --product 'Red Hat Enterprise Linux Server'  --name 'Red Hat Enterprise Linux 7 Server - RH Common RPMs x86_64 7Server'

#hammer repository synchronize --async --organization "$ORG" --product 'EPEL 3rd Party Packages  --name  'EPEL 7 - x86_64'
Create life cycles for development and production.
#hammer lifecycle-environment create --organization "Default Organization" --description 'Development' --name 'DEV' --label development --prior Library
#hammer lifecycle-environment create --organization "Default Organization" --description 'Production' --name 'PROD' --label production --prior 'DEV'
Create content view for RHEL 7 base.
#hammer content-view create --organization "Default Organization" --name 'RHEL7_base' --label rhel7_base --description 'Core Build for RHEL 7'

#hammer content-view add-repository --organization "Default Organization" --name 'RHEL7_base' --product 'Red Hat Enterprise Linux Server' --repository 'Red Hat Enterprise Linux 7 Server RPMs x86_64 7Server'
#hammer content-view add-repository --organization "Default Organization" --name 'RHEL7_base' --product 'Red Hat Enterprise Linux Server' --repository 'Red Hat Satellite Tools 6.2 for RHEL 7 Server RPMs x86_64'

#hammer content-view add-repository --organization "Default Organization" --name 'RHEL7_base' --product 'Red Hat Enterprise Linux Server' --repository 'Red Hat Enterprise Linux 7 Server - RH Common RPMs x86_64 7Server'

#hammer content-view add-repository --organization "Default Organization" --name 'RHEL7_base' --product 'EPEL 3rd Party Packages'  --repository  'EPEL 7 - x86_64'
Publish and promote content view to the environments.
#hammer content-view publish --organization "Default Organization" --name RHEL7_base --description 'Initial Publishing'
#hammer content-view version promote --organization "Default Organization" --content-view RHEL7_base --to-lifecycle-environment DEV
#hammer content-view version promote --organization "Default Organization" --content-view RHEL7_base --to-lifecycle-environment PROD
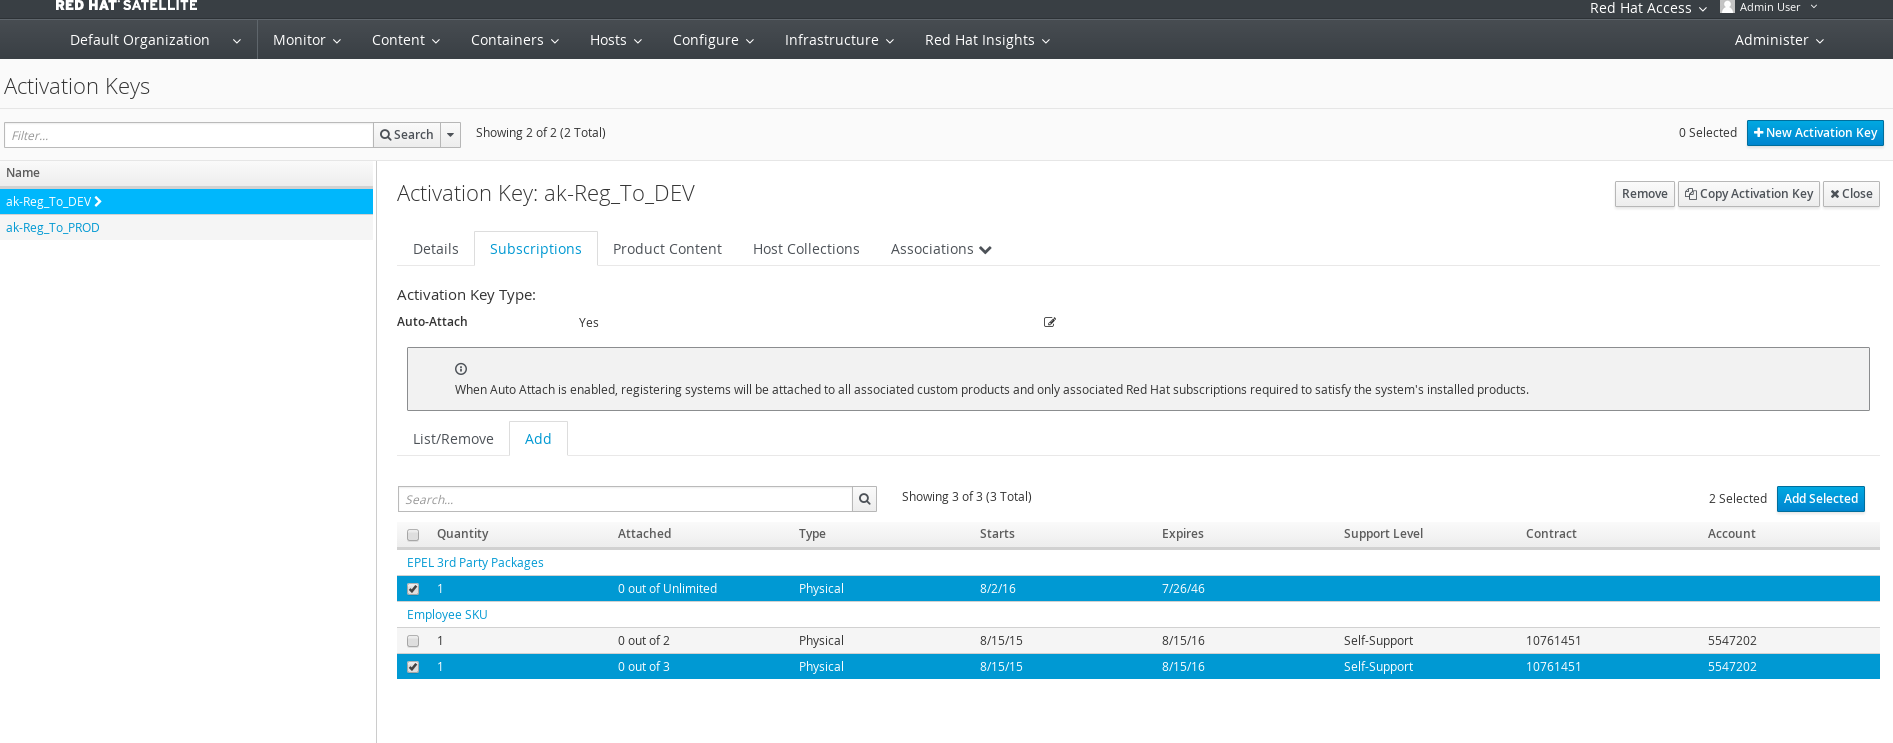
Add activation keys for both stage environments.
#hammer activation-key create --organization "Default Organization" --description 'RHEL7 Key for DEV' --content-view 'RHEL7_base' --unlimited-hosts --name ak-Reg_To_DEV --lifecycle-environment 'DEV'
#hammer activation-key create --organization "Default Organization" --description 'RHEL7 Key for PROD' --content-view 'RHEL7_base' --unlimited-hosts --name ak-Reg_To_PROD --lifecycle-environment 'PROD'
Add subscriptions to activation keys.
Get medium id needed for hostgroup creation.
#hammer medium list
---|----------------------------------------------------------------------------------|---------------------------------------------------------------------------------
ID | NAME | PATH
---|----------------------------------------------------------------------------------|---------------------------------------------------------------------------------
1 | CentOS mirror | http://mirror.centos.org/centos/$version/os/$arch
8 | CoreOS mirror | http://$release.release.core-os.net
2 | Debian mirror | http://ftp.debian.org/debian
9 | Default_Organization/Library/Red_Hat_Server/Red_Hat_Enterprise_Linux_7_Server... | http://sat6.lab/pulp/repos/Default_Organization/Library/content/dist/rhel/ser...
4 | Fedora Atomic mirror | http://dl.fedoraproject.org/pub/alt/atomic/stable/Cloud_Atomic/$arch/os/
3 | Fedora mirror | http://dl.fedoraproject.org/pub/fedora/linux/releases/$major/Server/$arch/os/
5 | FreeBSD mirror | http://ftp.freebsd.org/pub/FreeBSD/releases/$arch/$version-RELEASE/
6 | OpenSUSE mirror | http://download.opensuse.org/distribution/$version/repo/oss
7 | Ubuntu mirror | http://archive.ubuntu.com/ubuntu
---|----------------------------------------------------------------------------------|---------------------------------------------------------------------------------
Create a host group. A host group is a foreman construct and is used for automation of provisioning parameters. A host is provisioned based on its host group. The host group contains kickstart/provisioning templates, OS information, network information, activation keys, parameters, puppet environment and if virtual a compute profile. Note: you will need to change the hostname sat6.lab.com.
#hammer hostgroup create --architecture x86_64 --content-source-id 1 --content-view RHEL7_base --domain lab --lifecycle-environment DEV --locations 'Default Location' --name RHEL7_DEV_Servers --organizations "Default Organization" --puppet-ca-proxy sat6.lab --puppet-proxy sat6.lab --subnet VLAN_0 --partition-table 'Kickstart default' --operatingsystem 'RedHat 7.2' --medium-id 9
Add compute resource for RHEV.
# hammer compute-resource create --provider Ovirt --name RHEV --url https://rhevm.lab/api --organizations "Default Organization" --locations 'Default Location' --user admin@internal --password redhat01
Satellite 6 Bootstrapping
Satellite bootstrapping is the process for taking an already provisioned system and attaching it to the Satellite server. The minimum process is outlined below:
Install Katello package from Satellite server.
#rpm -Uvh http://sat6.lab.com/pub/katello-ca-consumer-latest.noarch.rpm
Subscribe using activation key.
#subscription-manager register --org="Default_Organization" --activationkey="DEV_CORE"Enable Satellite tools repository and install katello agent.
#yum -y install --enablerepo rhel-7-server-satellite-tools-6.2-rpms katello-agent
In addition to get full functionality you would also need to install and configure Puppet. Many customers are also looking for a solution that would gracefully move a system attached to Satellite 5 into Satellite 6. As such there is a bootstrapping script I can recommend from Evgeni Golov (one of our top Satellite Consultants @Red Hat):
https://github.com/buildout/buildout/blob/master/bootstrap/bootstrap.py
Remote Command Execution
A new feature many Satellite 5 customers have been waiting for is remote-cmd execution. This feature allows you to run and schedule commands on clients connected to Satellite 6 server. You can think of this as poor-man's Ansible.
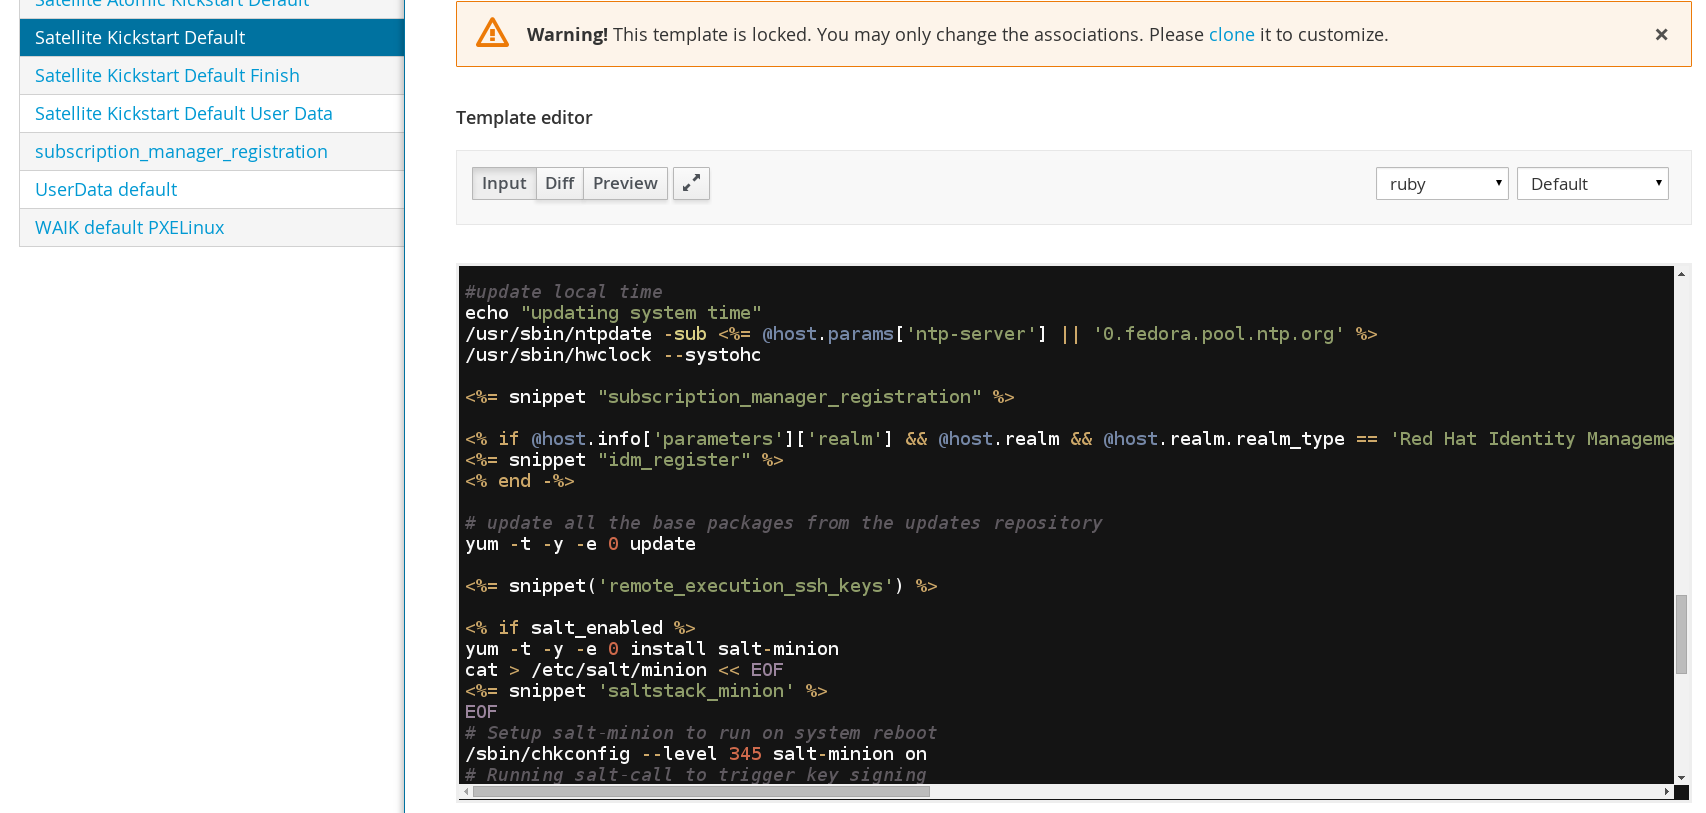
Ensure remote-cmd execution is configured for Satellite capsule.
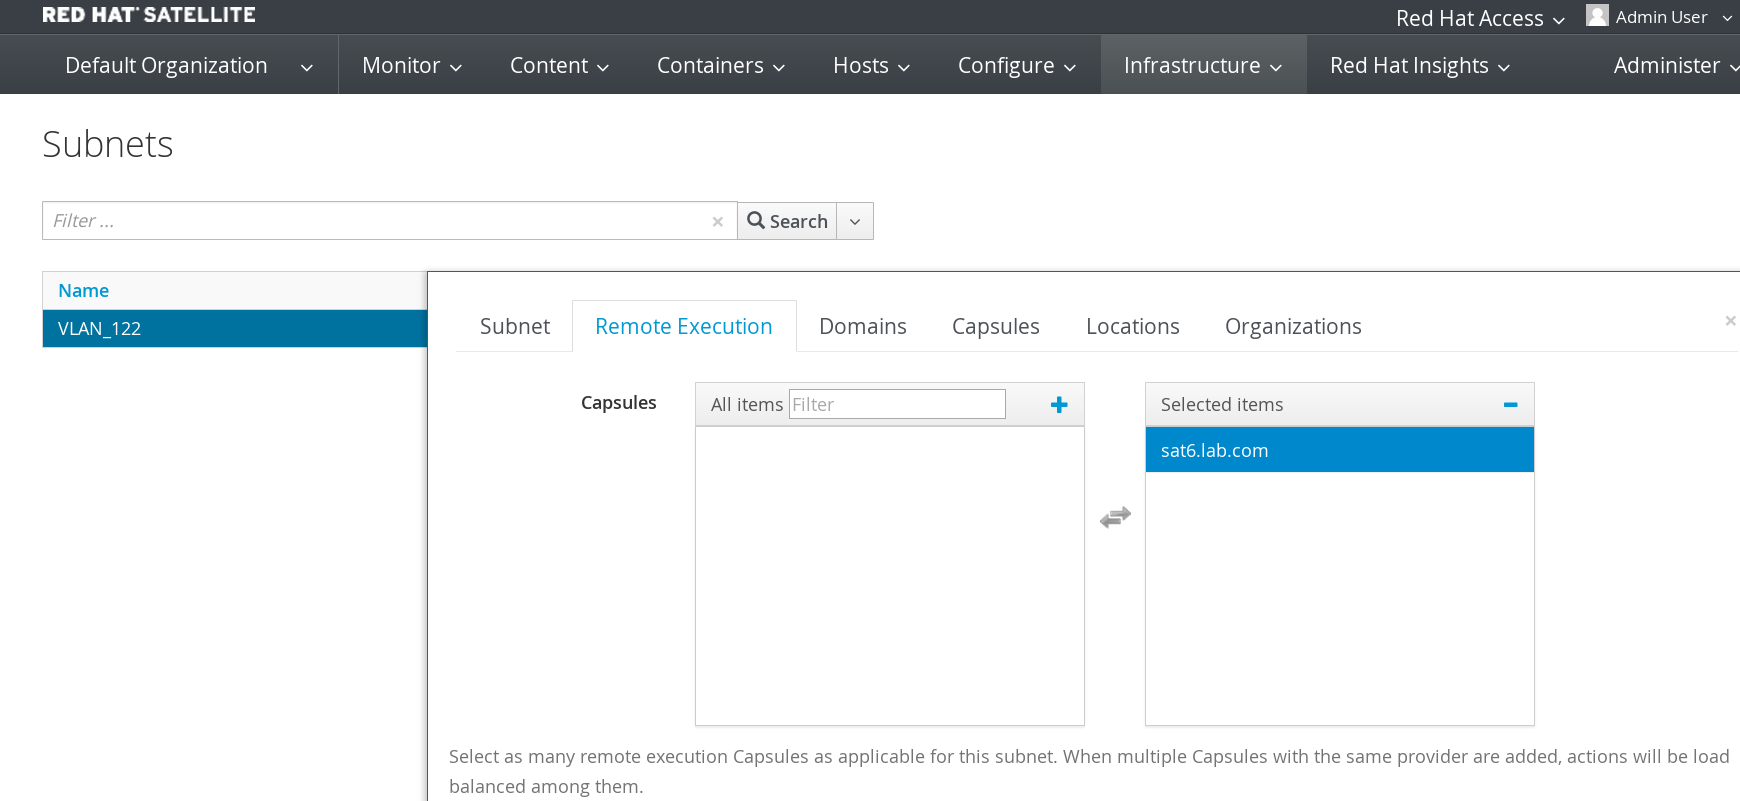
Note: If you aren't using provisioning template "Satellite Kickstart Default" and you upgraded from Satellite 6.1, you will need to re-clone the "Satellite Kickstart Default" template and apply your changes. A snippet was added to "Satellite Kickstart Default" in order to automatically configure foreman-proxy ssh keys.
For systems that are already provisioned you need to copy foreman-proxy ssh key.
# ssh-copy-id -i /usr/share/foreman-proxy/.ssh/id_rsa_foreman_proxy.pub root@192.168.122.210
Run "ls" command for a given client using remote-cmd execution.
# hammer job-invocation create --async --inputs "command=ls -l /root" --search-query name=client1.lab.com --job-template "Run Command - SSH Default"
Run command using input file or script.
# hammer job-invocation create --async --input-files command=/root/script.sh --search-query name=client1.lab.com --job-template "Run Command - SSH Default"
Run command on multiple hosts.
# hammer job-invocation create --async --inputs "command=ls -l /root" --search-query "name ~ client1.lab.com|client2.lab.com" --job-template "Run Command - SSH Default"
List jobs that are running, completed or failed.
# hammer job-invocation list
---|---------------------|-----------|---------|--------|---------|-------|------------------------
ID | DESCRIPTION | STATUS | SUCCESS | FAILED | PENDING | TOTAL | START
---|---------------------|-----------|---------|--------|---------|-------|------------------------
4 | Run ls -l /root | succeeded | 1 | 0 | 0 | 1 | 2016-08-23 11:10:50 UTC
3 | Run puppet agent -t | succeeded | 1 | 0 | 0 | 1 | 2016-08-23 10:43:20 UTC
2 | Run puppet agent -t | failed | 0 | 1 | 0 | 1 | 2016-08-23 10:37:18 UTC
1 | Run puppet agent -t | failed | 0 | 1 | 0 | 1 | 2016-08-23 10:19:41 UTC
---|---------------------|-----------|---------|--------|---------|-------|------------------------
Show details of a completed job.
# hammer job-invocation info --id 3
ID: 4
Description: Run ls -l /root
Status: succeeded
Success: 2
Failed: 0
Pending: 0
Total: 2
Start: 2016-08-23 11:34:05 UTC
Job Category: Commands
Mode:
Cron line:
Recurring logic ID:
Hosts:
 - client1.lab.com
 - client2.lab.com
Show output from a completed command for a given host. Satellite will show stdout and return code from command.
# hammer job-invocation output --host client1.lab.com --id 4
total 36
-rw-------. 1 root root 4256 Aug 23 10:34 anaconda-ks.cfg
-rw-r--r--. 1 root root 21054 Aug 23 10:34 install.post.log
-rw-r--r--. 1 root root 54 Aug 23 10:33 install.postnochroot.log
Exit status: 0
Summary
In this article we learned how to deploy Satellite 6.2 environment. We looked at some different options regarding DNS. Provided a guideline for getting a basic Satellite 6.2 environment up and running. Finally we looked a bit more into the new feature remote-cmd execution. I hope you found this article useful. If you have anything to share or otherwise feedback please don't be shy.
Happy Satelliting!
(c) 2016 Keith Tenzer