
Storage for Containers using NetApp SolidFire– Part VI
Overview
In this article we will look at how you can configure and dynamically provision NetApp SolidFire Storage for containerized applications in a Kubernetes/OpenShift environment. This article is a work from Kapil Arora (Cloud Platform Architect @NetApp).
- Storage for Containers Overview – Part I
- Storage for Containers using Gluster – Part II
- Storage for Containers using Container Native Storage – Part III
- Storage for Containers using Ceph – Part IV
- Storage for Containers using NetApp ONTAP NAS – Part V
- Storage for Containers using NetApp SolidFire – Part VI
NetApp recently released an open source project known as Trident, the first external storage provisioner for Kubernetes leveraging on-premises storage.
Trident enables the use of the new storage class concept in Kubernetes, acting as a provisioning controller that watches for PVCs (persistent volume requests) and creates them on-demand.
This means that when a pod requests storage from a storage class that Trident is responsible for, it will provision a volume that meets those requirements and make it available to the pod in real-time.
To learn more check-out these Trident videos.
This is how it works:
- The OpenShift/Kubernetes Administrator deploys and configures Trident with SolidFire and defines StorageClasses and Quotas.
- The developer creates a PVC with the respective StorageClass.
- Trident dynamically provisions storage for the developer.
Installation and Configuration Instructions
Steps to install and configure NetApp SolidFire backend with Trident in your OpenShift/Kubernetes environment:
1) Ensure OpenShift 3.4+, or OpenShift Origin 1.4+
Create a service account for trident.
oc create serviceaccount trident
oc adm policy add-cluster-role-to-user storage-admin system:serviceaccount:myproject:trident
oc adm policy add-scc-to-user anyuid system:serviceaccount:myproject:trident
oc adm policy add-role-to-user edit system:serviceaccount:myproject:trident
You can find detailed instructions here.
2) Install 'kubectl' client for Trident install script
curl -LO https://storage.googleapis.com/kubernetes-release/release/$(curl -s https://storage.googleapis.com/kubernetes-release/release/stable.txt)/bin/linux/amd64/kubectlchmod +x ./kubectlsudo mv ./kubectl /usr/local/bin/kubectl
You can find detailed instructions here.
3) Download and untar the Trident installer bundle.
4) Install iscsi initiater utils on all your OpenShift nodes if not already installed.
$ sudo yum install iscsi-initiator-utils
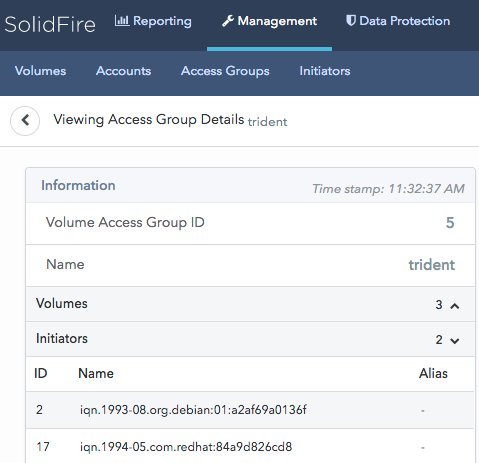
5) Create a VAG (Volume Access Group) name 'trident' on your SolidFire cluster.
6) Add IQNs of all OpenShift nodes to the 'trident' VAG.
$ sudo cat /etc/iscsi/initiatorname.iscsi
9) Discover iscsi Targets on each node
$ sudo iscsiadm -m discoverydb -t st -p sf-svip.demo.netapp.com --discover
10) Login to discovered iscsi targets
$ sudo iscsiadm -m node -p sf-svip.demo.netapp.com —-login
11) Enable and start iscsi
$ sudo systemctl enable iscsi
$ sudo systemctl start iscsi
Follow instructions here for iscsi multipathing setup.
12) Configure the SolidFire backend. A sample is provided here sample-input/backend-solidfire.json. Copy the edited file to setup/backed.json
https://gist.github.com/kapilarora/bf73342961aeb7256e04089c097a6055
https://gist.github.com/kapilarora/38b26138e1facb0c03e06c4bbaa42c12
13) Execute Trident installer script.
$ ./install_trident.sh --namespace myproject --serviceaccount trident
14) Wait until the deployment is complte. You should see Trident deployment when you execute 'oc get deployment' and trident pod when you execute 'oc get pods'
15) If you face issues, check this troubleshooting session.
16) Register you backend with Trident
$ cat setup/backend.json | kubectl exec -i -- post.sh backend17) Edit storage-class-gold.yaml to configure your storage class.
https://gist.github.com/kapilarora/e339f780a8651624dcabe457a4e2724f
18) Create storage class in kubernetes:
$ oc create -f storage-class-gold.yaml
19) Trident is now installed and we have also defined a storage class for SolidFire.
20) Now Storage is dynamically provisioned when we create a PVC. e.g.
https://gist.github.com/kapilarora/007266ca364db8dc370f1deadc3ecd08
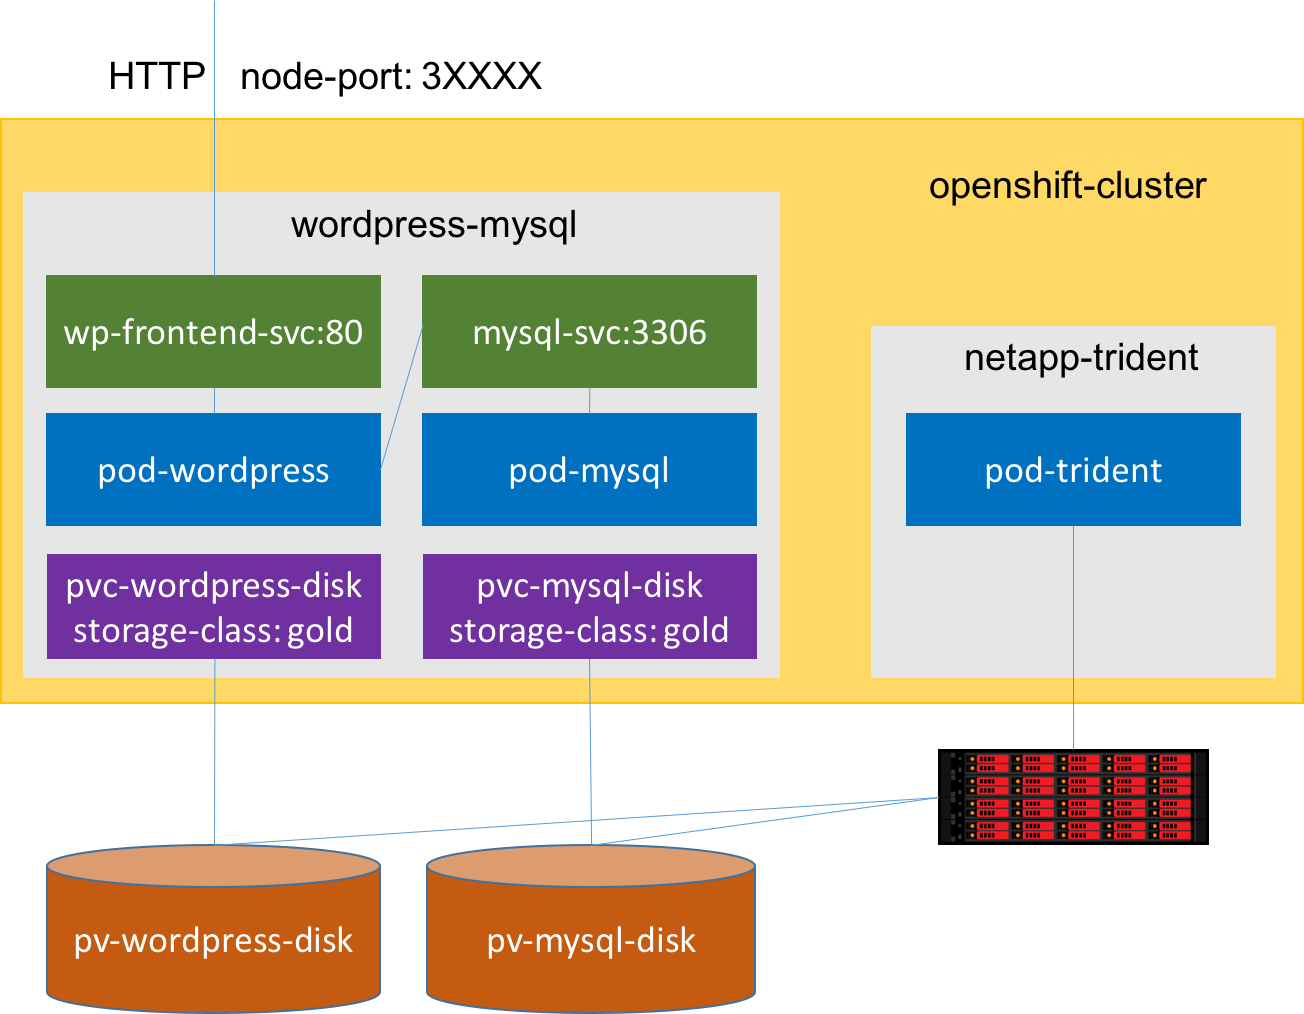
Application use-case
Let us look at how we can deploy a Wordpress application backed by a MySQl database.
In the below example we have use Trident to dynamically provision SolidFire storage for our Wordpress (+ MySQL) application using PVCs and gold StorageClass.
https://gist.github.com/kapilarora/57e6cdfbd618712958ff8e25baaad438
NetApp SolidFire
NetApp SolidFire is a zero-touch, all flash, scale-out , block-storage system that provides guaranteed QoS (Quality of Service) to each and every storage volume.
Why SolidFire?
NetApp SolidFire offers following key benefits for your applications:
- Guaranteed QoS: With SolidFire you can guarantee minimum, maximum and burst IOPS to each and every Application Volume.
- Zero-touch Storage: SolidFire requires minimum possible administration and is literally zero touch infrastructure. It enables your infrastructure teams to not worry about Storage systems and performance and concentrate on automation and business focussed tasks.
- Scale-out: SolidFire is a true Scale out storage system which scales upto 100 nodes.
- Speed: SolidFire is a all Flash Storage system to power your most demanding applications.
- Automation: All SolidFire operations can be performed using REST based APIs.
- Always ON global efficiencies and data assurance
Summary
With NetApp Trident dynamic provisioner NetApp SolidFire zero-touch storage can be provisioned on-demand for your containerized applications.
Trident can help you deploy Stateful containerized applications e.g. Databases with NetApp SolidFire.
References
- NetApp Trident GitHub project
- NetApp thePub website
- Join NetApp on Slack
- NetApp Trident and OpenShift
- Trident Videos
Happy SolidFireing!
(c) 2017 Keith Tenzer