
Storage for Containers Using Ceph RBD - Part IV

Overview
In this article we will look at how to integrate Ceph RBD (Rados Block Device) with Kubernetes and OpenShift. Ceph is of course a scale-out software-defined storage system that provides block, file and object storage. It focuses primarily on cloud-storage use cases. Providing storage for Kubernetes and OpenShift is just one of many use cases that fit very well with Ceph.
- Storage for Containers Overview – Part I
- Storage for Containers using Gluster – Part II
- Storage for Containers using Container Native Storage – Part III
- Storage for Containers using Ceph – Part IV
- Storage for Containers using NetApp ONTAP NAS – Part V
- Storage for Containers using NetApp SolidFire – Part VI
Ceph integrates with Kubernetes and OpenShift using the kubernetes.io/rbd driver or provisioner. As you will see this enables dynamic provisioning, allowing storage to be provisioned automatically when developers or users request it. Essentially a developer or OpenShift user, requests a PVC (Persistent Volume Claim) against a storage-class where the the kubernetes.io/rbd provisionier is configured. A PVC will create a RBD image in a specific RBD pool on Ceph and map it to a PV (Persistent Volume) in OpenShift. Once a container starts, the PV pointing to an RBD image is mounted. RBD client then maps the RBD image to the appropriate OpenShift node and mounts it using desired filesystem (ext4). The wonderful thing is everything happens automatically and the Ceph storage administrators only need to manage OpenShift project quotas for storage. Since each storage-class maps to an RBD pool it is possible to create various storage SLAs (gold, silver, bronze, etc).
Prerequisites
Before going any further an OpenShift 3.4 or higher cluster is required as well as a Ceph 1.3 or higher cluster. Not to worry, you can set this all up using below guides in a few hours and learn more about OpenShift and Ceph. I ran everything required OpenShift (all-in-one) and Ceph (3 node cluster) on my laptop with 12GB RAM.
Configuring Ceph
In Ceph we need to create an RBD pool for OpenShift and also create a Ceph authx keyring to access the Ceph cluster from OpenShift.
[Ceph Monitor]
Create RBD Pool
[ceph@ceph1]$ sudo ceph osd pool create ose 128
Note: if you don't have enough free PGs (placement groups) you can go with 32 or even 16 for lab setups.
Create Keyring
[ceph@ceph1]$ sudo ceph auth get-or-create client.ose mon 'allow r' \
osd 'allow class-read object_prefix rdb_children, allow rwx pool=ose' \
-o /etc/ceph/ceph.client.ose.keyring
Copy Keyring file to all OpenShift Nodes
[ceph@ceph1]$ scp /etc/ceph/ceph.client.ose.keyring \
root@192.168.122.60:/etc/ceph
Convert Ceph key to base64 for client.admin user
[ceph@ceph1]$ sudo ceph auth get client.admin
 exported keyring for client.admin
 [client.admin]
 key = AQA8nJBYZAQDKxAAuSX4mzY1YODtPU8gzmIufQ==
 caps mds = "allow *"
 caps mon = "allow *"
 caps osd = "allow *"
[ceph@ceph1]$  echo AQA8nJBYZAQDKxAAuSX4mzY1YODtPU8gzmIufQ== |base64
QVFBOG5KQllaQVFES3hBQXVTWDRtelkxWU9EdFBVOGd6bUl1ZlE9PQo=
Note: save the new base64 key you will need it later.
Convert Ceph key to base64 for client.ose user
[ceph@ceph1]$ sudo ceph auth get client.ose
 exported keyring for client.ose
 [client.ose]
 key = AQDvU+ZYooHxHBAANGVNCfRpA24iYiTtMgt/tQ==
 caps mon = "allow r"
 caps osd = "allow class-read object_prefix rdb_children, allow rwx pool=ose"
[ceph@ceph1]$ echo AQDvU+ZYooHxHBAANGVNCfRpA24iYiTtMgt/tQ== |base64
 QVFEdlUrWllvb0h4SEJBQU5HVk5DZlJwQTI0aVlpVHRNZ3QvdFE9PQo=
Note: save the new base64 key you will need it later.
Configure Ceph Storage Class in OpenShift
[OpenShift Master]
Install ceph-common on all OpenShift nodes
[root@ose3-master ~]# yum install -y ceph-common
Create /var/run/ceph directory
[root@ose3-master ~]# mkdir /var/run/ceph
Create New Project
[root@ose3-master ~]# oc login -u admin
[root@ose3-master ~]# oc new-project ceph
Create Secret for Ceph client.admin user
The key in the secret should be the Ceph authx key converted to base64.
[root@ose3-master ~]# vi /root/ceph-secret.yaml
apiVersion: v1
kind: Secret
metadata:
  name: ceph-secret
  namespace: default
data:
  key: QVFBOG5KQllaQVFES3hBQXVTWDRtelkxWU9EdFBVOGd6bUl1ZlE9PQo=
[root@ose3-master ~]# oc create -f /root/ceph-secret.yaml
Note: Ceph admin secret should be in default project
[root@ose3-master ~]# oc get secret ceph-secret -n default
 NAME TYPE DATA AGE
 ceph-secret Opaque 1 25s
Create Secret for Ceph client.ose user
The key in the secret should be the Ceph authx key converted to base64.
[root@ose3-master ~]# vi /root/ceph-secret-user.yaml
apiVersion: v1
kind: Secret
metadata:
  name: ceph-secret
data:
  key: QVFEdlUrWllvb0h4SEJBQU5HVk5DZlJwQTI0aVlpVHRNZ3QvdFE9PQo=
[root@ose3-master ~]# oc create -f /root/ceph-secret-user.yaml
Note: Ceph admin secret must be in the project requesting Ceph storage.
Create Storage Class for Ceph
[root@ose3-master ~]# vi /root/ceph-rbd-storage-class.yaml
apiVersion: storage.k8s.io/v1beta1
kind: StorageClass
metadata:
  name: ceph
  annotations:
    storageclass.beta.kubernetes.io/is-default-class: "true"
provisioner: kubernetes.io/rbd
parameters:
  monitors: 192.168.122.81:6789,192.168.122.82:6789,192.168.122.83:6789
  adminId: admin
  adminSecretName: ceph-secret
  adminSecretNamespace: default
  pool: ose
  userId: ose
  userSecretName: ceph-secret-user
[root@ose3-master ~]# oc create -f /root/ceph-rbd-storage-class.yaml
Dynamic Provisioning using Ceph RBD
Create PVC (Persistent Volume Claim)
Using the storage-class for Ceph we can now create a PVC.
[root@ose3-master ~]# vi /root/ceph-pvc.yaml
kind: PersistentVolumeClaim
apiVersion: v1
metadata:
  name: ceph-claim
  annotations:
    volume.beta.kubernetes.io/storage-class: ceph
spec:
  accessModes:
    - ReadWriteOnce
  resources:
    requests:
      storage: 2Gi
[root@ose3-master ~]# oc create -f /root/ceph-pvc.yaml
Examine PVC and PV
The PVC will create a RBD image in the ose RBD pool and map it to a PV.
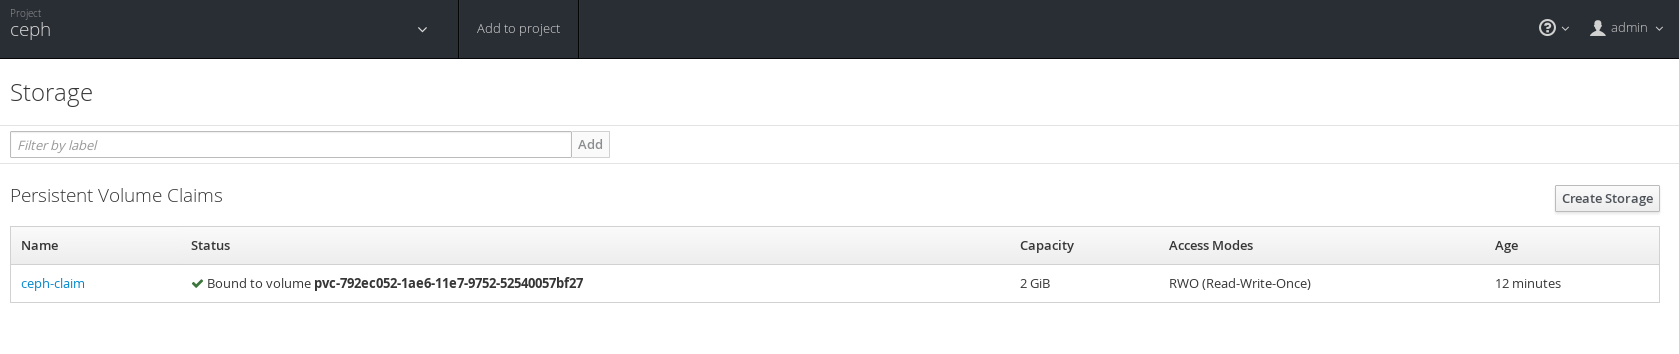
[root@ose3-master ~]# oc get pvc
 NAME STATUS VOLUME CAPACITY ACCESSMODES AGE
 ceph-claim Bound pvc-792ec052-1ae6-11e7-9752-52540057bf27 2Gi RWO 3s
[root@ose3-master ~]# oc get pv
 NAME CAPACITY ACCESSMODES RECLAIMPOLICY STATUS CLAIM REASON AGE
 pvc-792ec052-1ae6-11e7-9752-52540057bf27 2Gi RWO Delete Bound ceph/ceph-claim 50s
List RBD Images
[root@ose3-master ~]# rbd list -p ose --name client.ose \
--keyring /etc/ceph/ceph.client.ose.keyring
 kubernetes-dynamic-pvc-7930af93-1ae6-11e7-9752-52540057bf27
Dynamic Provisioning using OpenShift UI
In OpenShift UI login in and go to the project ceph. Under "resources->storage" you can view the already created PVC.
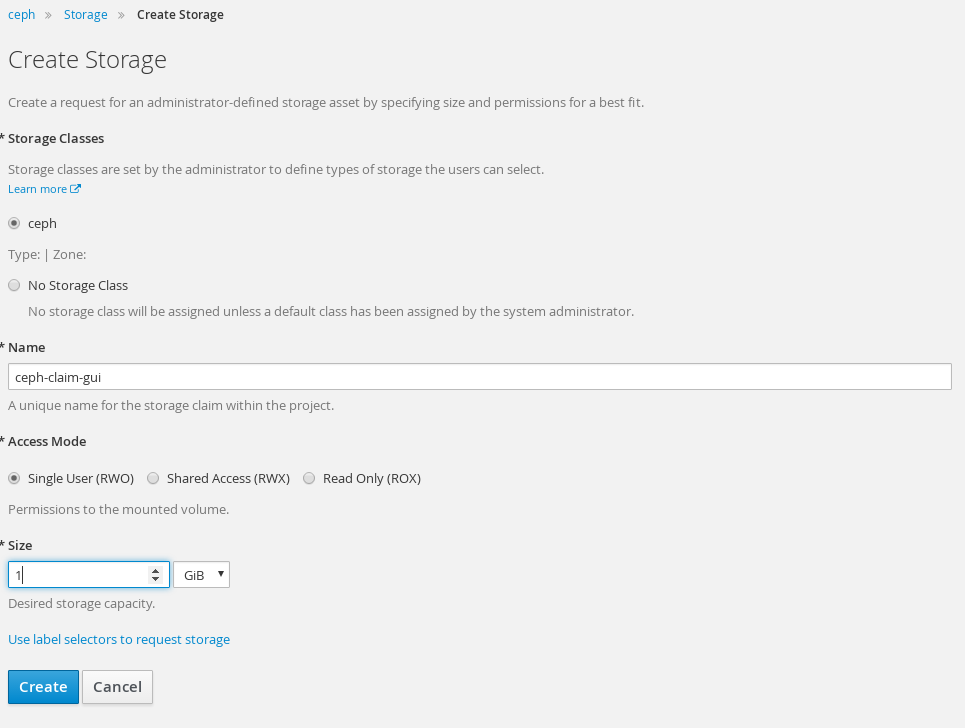
Request New PVC
Clicking "create storage" you can choose storage class and create a PVC. This is repeating what we already did with PVC.
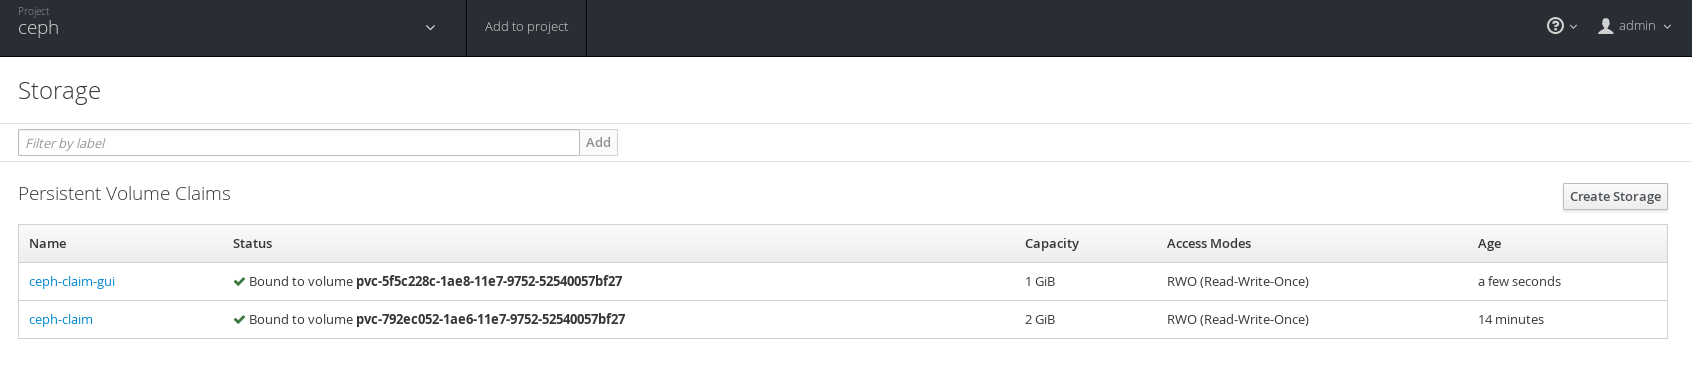
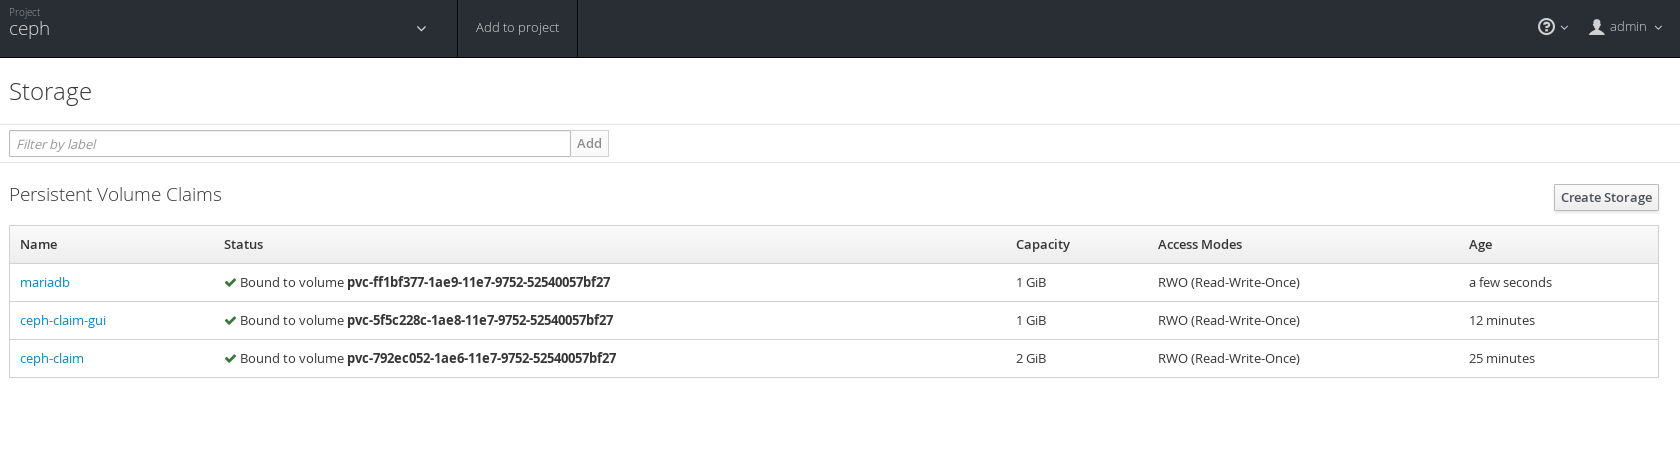
Under storage we now see both PVCs.
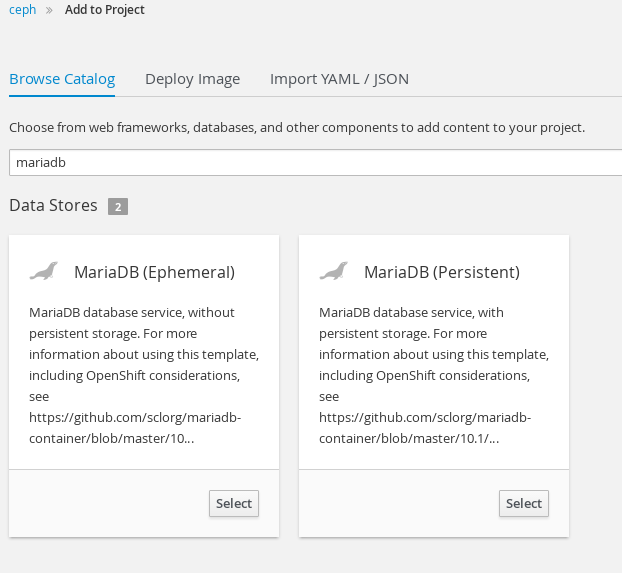
Create MariaDB Persistent Database
In order to use a PVC we need to mount it's PV in a running Pod. In this case we will click "add to project", search for MariaDB and select the MariaDB persistent template from the OpenShift services catalog.
On the next screen accept the defaults and create the MariaDB persistent service. Once the MariaDB Pod is deploying, under "resources->storage" you will see the newly created PVC for mariadb.
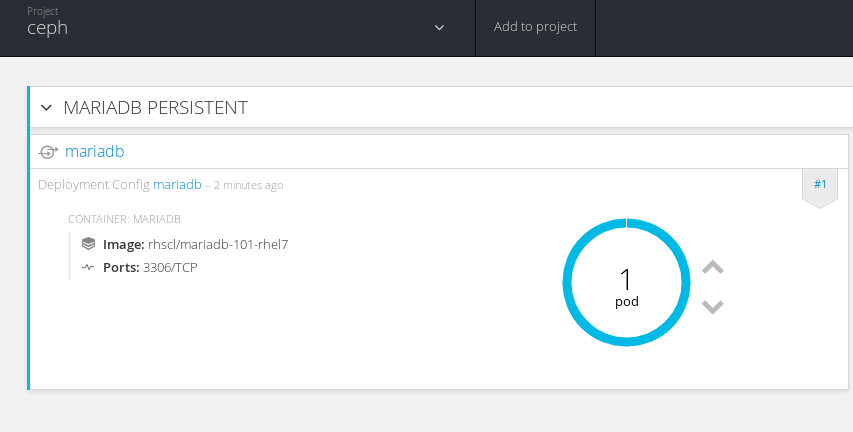
Finally we see that the MariaDB persistent Pod is started and passed health as well as readiness checks. At this point any data written to this database will be saved in an RBD image residing on a Ceph storage cluster.
Summary
In this article we discussed how Ceph RBD integrates with OpenShift and Kubernetes. We saw how to configure Ceph and OpenShift to use RBD through a storage-class. Finally we observed how developers or users can easily consume Ceph storage within OpenShift. Dynamic storage in OpenShift is a huge shift in how we consume storage. I view this as a new beginning in storage. Finally we are really providing storage-as-a-service!
Happy Cephing in OpenShift!
(c) 2017 Keith Tenzer