
OpenStack Networking 101 for non-Network engineers
Overview
In this article we will take a deeper look into OpenStack networking and try to understand general networking concepts . We will look at how various networking concepts are implemented within OpenStack and also discuss SDNs, network scalability and HA.
The most complex service within OpenStack is certainly Neutron. Networking principles have not changed, however Neutron provides a lot of new abstractions that make is rather difficult to follow or understand traffic flows. On top of that there are many, many ways to build Network architectures within Neutron and a huge 3rd party ecosystem exists around Neutron that can make things even more confusing.
Networking Basics
You cannot really start a discussion around networking basics without mentioning the OSI model so that is where we will begin as well.
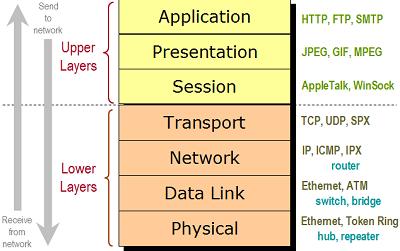
The OSI model identifies 7 layers, for the purposes of Neutron we are primarily concerned with layer 1 (physical), layer 2 (data link ), layer 3 (network) and layer 4 (transport). Ethernet data is transmitted in packets on layer 1. An Ethernet frame is encapsulated within a packet on layer 2.
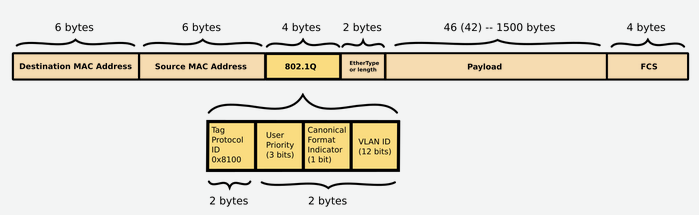
Ethernet frames have source and destination MAC addresses however do not include routing information. Layer 2 can only broadcast on the local network segment. It does have a place holder for VLAN ID so traffic can be delivered to correct network segment based on VLAN. A VLAN is nothing more than a logical representation of a layer 2 segment.
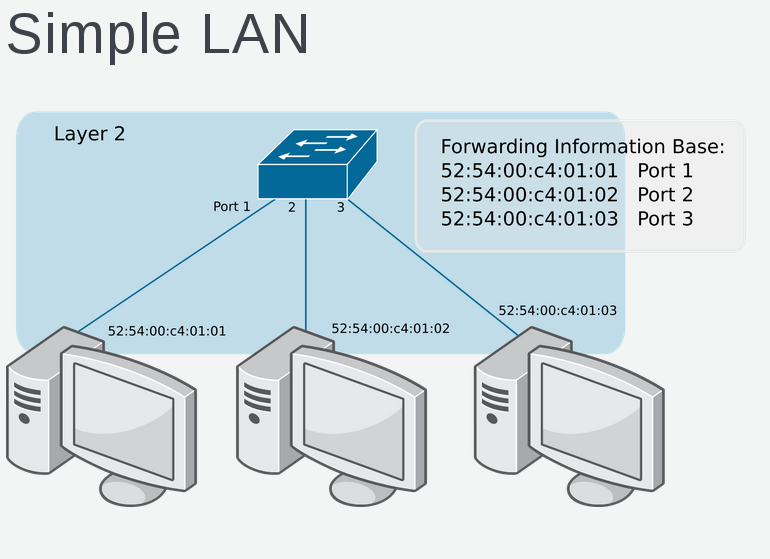
Each host on the layer 2 network segment can communicate with one another using Ethernet frame and specifying source / destination MAC address. ARP (Address Resolution Protocol) is used to find out the location of a MAC address.
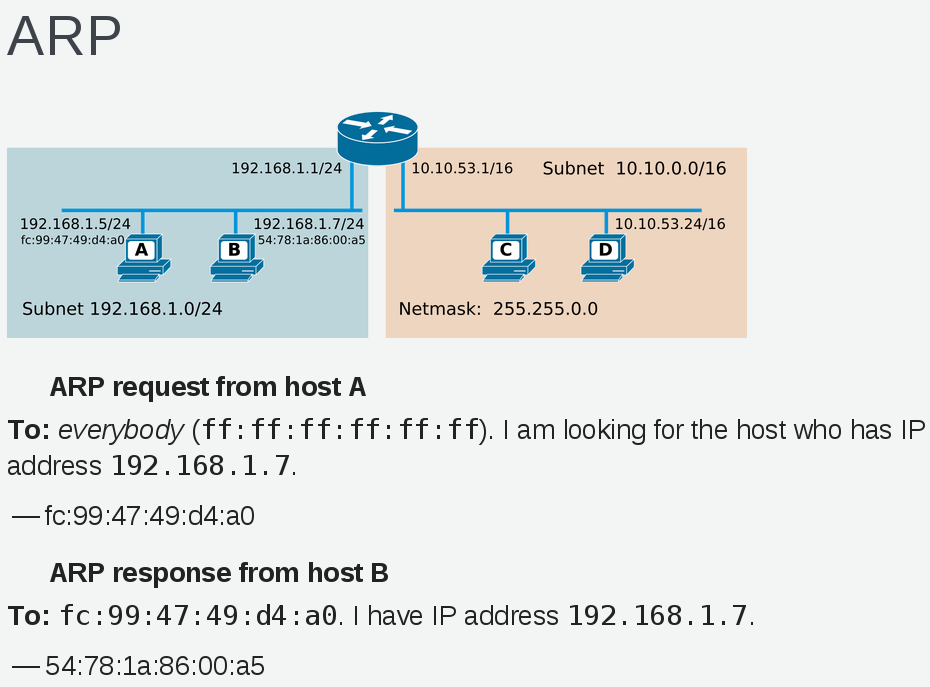
Once a MAC address has been discovered it is cached on the clients and stored in the ARP cache.

Traffic bound for MAC addresses that don't exist on layer 2 network segment must be routed over layer 3. In other words layer 3 simply connects multiple layer 2 networks together.
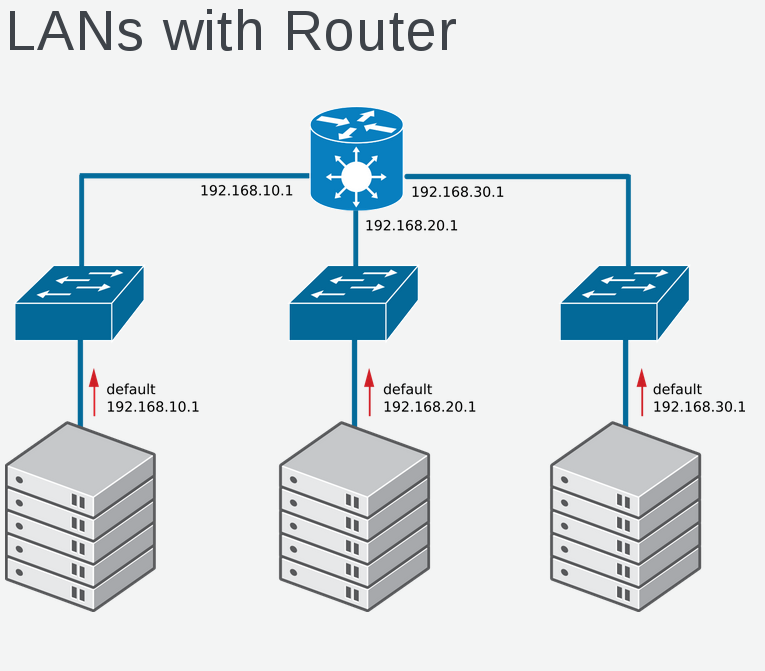
In this example we have three class C (255.255.255.0) network subnets. Communication between subnets requires layer 3 routing. Communication within subnet uses layer 2 ethernet frame and ARP. ICMP (Internet Control Messaging Protocol) works at layer 3, tools that use ICMP are ping and mtr. Layer 3 traffic traverses networks and each device has a routing table that understands the next hop.
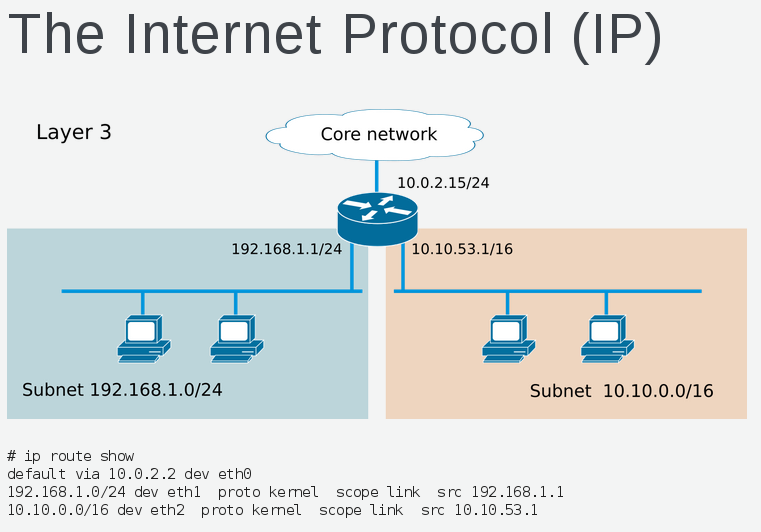
We can look at the routing table and using commands like "ip route get", "traceroute" and "tracepath" we can understand traffic patterns within layer 3 network.
Layer 4 is of course where we get into TCP (Transmission Control Protocol) and UDP (User Datagram Protocol).
TCP is a reliable protocol that ensures flow control, retransmission and ordered delivery of packets. Ports or socket streams are used to uniquely identify applications communicating with one another. Port range that exists is 1 - 65535 with 1-1023 being reserved for system ports. The default ephemeral port range in Linux is 32768 - 61000.
UDP unlike TCP is a connectionless protocol. Since delivery and sequential ordering are not guaranteed, UDP is not a reliable protocol. Common applications important in OpenStack ecosystem that use UDP are DHCP, DNS, NTP and VXLAN.
Network Tunneling
Tunneling allows a network to support a service or protocol that isnt natively supported within network. Tunneling works by encapsulating metadata into IP packet header. It allows for connecting dissimilar networks, encapsulating services like IPV6 in IPV4 and securely connecting non-trusted networks such as is the case with VPNs. Open vSwitch (out-of-box) SDN provided with OpenStack supports following tunneling protocols: GRE, (Generic Routing Encapsulation) VXLAN (Virtual Extensible LAN) and GENEVE (General Network Virtualization Encapsulation).
Network Namespaces
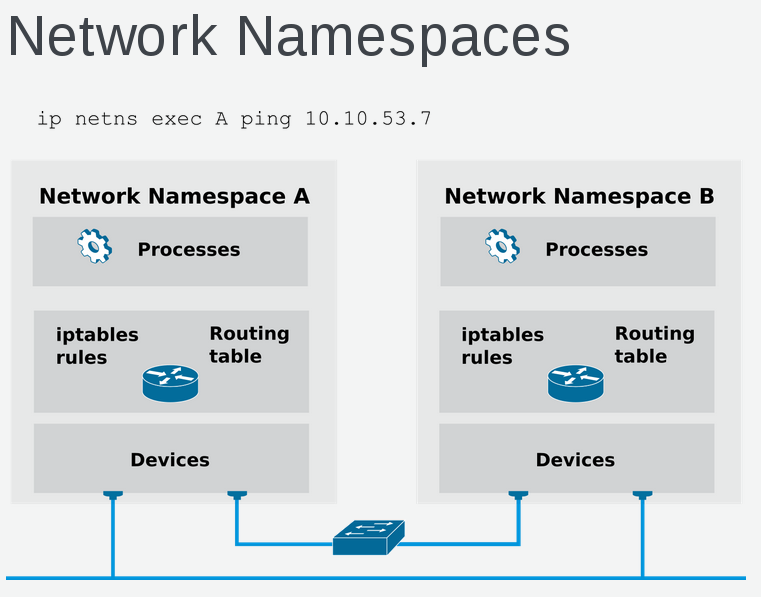
Linux network namespaces allow for more granular segregation of software-defined networks. Since namespaces are logically segregated there is no overlap of ip ranges. In order to see networking within namespace commands such as ip, ping, tcdump, etc need to be executed within namespace.
To list network namespaces use below command.
# ip netns show

qdhcp-e6c4e128-5a86-47a7-b501-737935680090
qrouter-e7d9bf3c-22a7-4413-9e44-c1fb450f1432
To get list of interfaces use below command.
# ip netns exec qrouter-e7d9bf3c-22a7-4413-9e44-c1fb450f1432 ip a
Network Concepts Applied to OpenStack
Now that we have a basic overview of networking lets see how this is applied to Neutron. First Neutron is software-defined, certainly you need hardware (switches, routers, etc) but Neutron does not concern itself directly with hardware. It is an abstraction that works with layer 2, layer 3 and layer 4. Neutron defines two types of networks: tenant and provider.
Tenant Network
A tenant network is a layer 2 network that exists only within the OpenStack environment. A tenant network spans compute nodes and tenant networks are isolated from one another. A tenant network is not reachable outside the OpenStack environment. The main idea behind tenant networks is to abstract network complexity from consumer. Since tenant networks are isolated you dont have to worry about IP address range conflicts. This allows creating new networks in a simple scalable fashion.
Floating IPs
Neutron creates a abstraction around IP ranges, tenant networks are completely isolated from real physical networks. In OpenStack an instance gets a tenant IP. You can certainly put your tenant networks on physical networks but then you lose a lot of scalability and flexibility, hence most OpenStack deployments use Floating IPs to connect instances to the outside world. Floating IPs are an SNAT/DNAT that get created in iptables of qrouter network namespace. From within instance you will only see tenant IP, not any floating IPs. Floating IPs are only needed for accessing a tenant from outside, for example connecting via ssh.
Provider Network
A provider network connects to a physical network that exists outside of OpenStack. IN this case each instance gets a IP on the external physical network. Floating IPs are not used or needed. From a networking standpoint using provider networks makes things simple but you lose a lot of flexibility and scalability. Each compute node needs a physical connection to each provider network. Usually what most do is create a large bond and due VLAN tagging on bond to access provider networks.
Traffic Flows
Both north/south and east/west traffic flows exist within an OpenStack environment. A north/south traffic flow occurs when traffic is leaving OpenStack environment and its source or destination is a external network. A east/west traffic flow exists when instances within a tenant network or between tenant networks communicate with one another. Traffic between tenant networks to external networks requires layer 3 (unless using provider networks) and that means routing is involved through the Neutron l3-agent. Traffic within tenant network occurs at layer 2 through Neutron l2-agent.
Network Architectures
OpenStack Neutron offers a vast choice of networking architectures. Out-of-the-box the Neutron OVS Reference Architecture or Nova network can be configured. By integrating with 3rd party SDNs (software-defined networks) the l3-agent within Neutron is replaced by the SDN. Using provider networks also bypasses network overlay and VXLAN or GRE encapsulation.
High Availability
In OpenStack you will deploy either the Neutron reference architecture or an external SDN. The Neutron reference architecture uses haproxy to provide HA for the l3-agent running on OpenStack controllers. This of course creates a scalability bottleneck since all routed traffic needs to go through l3-agent and it is running on controllers. I have seen the neutron reference architecture have performance issues around 1000 instances but this can vary depending on workload.
Scalability
As mentioned the l3-agent in Neutron can become a bottleneck. To address this you have two options DVR (Distributed Virtual Routing) or 3rd Party SDN. DVR allows the l3-agent to run on compute nodes and this of course scales a lot better, however this is not really supported in all OpenStack distros and can be very challenging to troubleshoot. The best option to scale network beyond 1000 instances is at a 3rd party SDN. Neutron will still acts as abstraction in front of SDN but you wont need l3-agent, the SDN will handle this with a more scalable solution. Using SDN is also in my opinion a cleaner approach and allows network teams to maintain network control as they did in pre-openstack era. In future openvswitch should get its own SDN controller to be able to offload l3 traffic but this is not quite ready at this time.
Examples
Below we will look at configuring OpenStack to use provider network and Floating IP network.
Prerequisites
Below are some prerequisites you need to implement within your OpenStack environment.
Get CentOS 7.2 Cloud Image.
curl -O http://cloud.centos.org/centos/7/images/CentOS-7-x86_64-GenericCloud.qcow2
glance image-create --name centos72 --visibility public --disk-format qcow2 --container-format bare --file CentOS-7-x86_64-GenericCloud.qcow2
Create Security Group.
# nova secgroup-create all "Allow all tcp ports"
# nova secgroup-add-rule all TCP 1 65535 0.0.0.0/0
# nova secgroup-add-rule all ICMP -1 -1 0.0.0.0/0
Create a private ssh key for connecting to instances remotely.
# nova keypair-add admin
Create admin.pem file and add private key from output of keypair-add command.
# vi /root/admin.pem
# chmod 400 /root/admin.pem
Example: Provider Network
# neutron net-create external_network --shared --provider:network_type flat --provider:physical_network extnet
Configure Provider Network Subnet.
# neutron subnet-create --name public_subnet --allocation-pool=start=192.168.0.200,end=192.168.0.250 --gateway=192.168.0.1 external_network 192.168.0.0/24 --dns-nameserver 8.8.8.8
Enable isolated metadata server. Metadata server is used for injecting cloud-init and part of bootstrapping process. Other option is to setup route in iptables that goes from metadata server to gateway of provider network.
# vi /etc/neutron/dhcp_agent.ini
enable_isolated_metadata = True
Get the Network Id
# neutron net-list
+--------------------------------------+------------------+-----------------------------------------------------+
| id | name | subnets |
+--------------------------------------+------------------+-----------------------------------------------------+
| 459f477d-4c67-4800-ad07-adb9b096caf5 | external_network | 84c5e031-ed09-4ec0-86e4-609b27e21efb 192.168.0.0/24 |
+--------------------------------------+------------------+-----------------------------------------------------+
Start instance on the provider network
# nova boot --flavor m1.medium --image "centos72" --nic net-id=459f477d-4c67-4800-ad07-adb9b096caf5 --key-name admin --security-groups all mycentos
Connect to mycentos instance using the private ssh key stored in the admin.pem file. Note: The first floating IP in the range 192.168.122.201.
# ssh -i admin.pem cirros@192.168.122.201
Example: Floating-ip Network
# neutron net-create private
# neutron subnet-create private 10.10.1.0/24 --name private_subnet --allocation-pool start=10.10.1.100,end=10.10.1.200
Create public network. Note: these steps assume the physical network connected to eth0 is 192.168.122.0/24.
# neutron net-create public --router:external
# neutron subnet-create public 192.168.122.0/24 --name public_subnet --allocation-pool start=192.168.122.100,end=192.168.122.200 --disable-dhcp --gateway 192.168.122.1
Add a new router and configure router interfaces.
# neutron router-create router1 --ha False
# neutron router-gateway-set router1 public
# neutron router-interface-add router1 private_subnet
List the network IDs.
# neutron net-list
 +--------------------------------------+---------+-------------------------------------------------------+
 | id | name | subnets |
 +--------------------------------------+---------+-------------------------------------------------------+
 | d4f3ed19-8be4-4d56-9f95-cfbac9fdf670 | private | 92d82f53-6e0b-4eef-b8b9-cae32cf40457 10.10.1.0/24     |
 | 37c024d6-8108-468c-bc25-1748db7f5e8f | public  | 22f2e901-186f-4041-ad93-f7b5ccc30a81 192.168.122.0/24 |
Start instance on the provider network
# nova boot --flavor m1.medium --image "centos72" --nic net-id=459f477d-4c67-4800-ad07-adb9b096caf5 --key-name admin --security-groups all mycentos
Create a floating IP and assign it to the mycirros instance.
# nova floating-ip-create
# nova floating-ip-associate mycirros <FLOATING IP>
Connect to mycentos instance using the private ssh key stored in the admin.pem file. Note: The first floating IP in the range 192.168.122.201.
# ssh -i admin.pem cirros@192.168.122.201
Summary
In this article we looked at basic network concepts and applied them to OpenStack. We saw various network implementations like provider networks and floating ip networks. Finally we implemented these networks in an OpenStack environment. I hope you found this article useful. I think the most challenging aspect of OpenStack is networking. If you have material or additional information please share.
Happy OpenStacking!
(c) 2016 Keith Tenzer