
Red Hat OpenStack Platform 10 (Newton) Installation and Configuration Guide

Overview
In this article we will setup an OpenStack environment based off Newton using the Red Hat OpenStack Platform. OpenStack is OpenStack but every distribution differs in what capabilities or technologies are supported and how OpenStack is installed, configured as well as upgraded.
The Red Hat OpenStack Platform uses OpenStack director based on the TripleO (OpenStack on OpenStack) project to install, configure and update OpenStack. Director is a lifecycle management tool for OpenStack. Red Hat's approach is to make OpenStack easy to manage, without compromising on the "Open" part of OpenStack. If management of OpenStack can be simpler and the learning curve brought down then it has a real chance to be the next-gen virtualization platform. What company wouldn't want to be able to consume their internal IT resources like using AWS, GCE or Azure if they didn't give up anything to do so? We aren't there yet but Red Hat is making bold strides and as you will see in this article, is on a journey to make OpenStack consumable for everyone!
Red Hat OpenStack Platform
The Red Hat OpenStack platform uses director to build, manage and upgrade Red Hat OpenStack. Director is in fact a minimal OpenStack deployment itself, with everything needed to deploy OpenStack. The main piece outside of the OpenStack core (Nova, Neutron, Glance, Swift and Heat) is Ironic. The Ironic project is focused on baremetal-as-a-service.
Director allows you to add physical nodes to Ironic and assign them OpenStack roles: compute, control, storage, network, etc. Once roles are assigned an OpenStack environment can be deployed, upgraded and even scaled. As mentioned director is a complete life-cycle management tool that uses OpenStack to manage OpenStack.
In this article we will deploy director (undercloud) on a single VM. We will add three baremetal nodes (VMs) and then deploy OpenStack (overcloud) in a minimal configuration (1 controller node and 1 compute node). I am able to run this on a laptop with just 12GB RAM.
Lab Environment
My idea for this configuration was build the most minimal OpenStack environment possible, something that would run on my laptop with just 12GB RAM using Red Hat OpenStack Director. In the end this experiment was successful and the configuration used is as follows:
- KVM Hypervisor Physical Laptop: RHEL 7.3, CentOS or Fedora, Dual core, 12 GB RAM and 250GB disk
- Undercloud VM: RHEL 7.3, 2x vCPUs, 4GB RAM, 1 x NIC 8(provisioning), 1 x NIC (external) and 40GB disk
- Overcloud Controller VM: RHEL 7.3, 2 x vCPUs, 6GB RAM, 1 x NIC (provisioning), 2 x NICs (external) and 30GB disk
- Overcloud Compute VM: RHEL 7.3, 2 x vCPU, 4GB RAM, 1 x NIC (provisioning), 2 x NICs (external) and 20GB disk
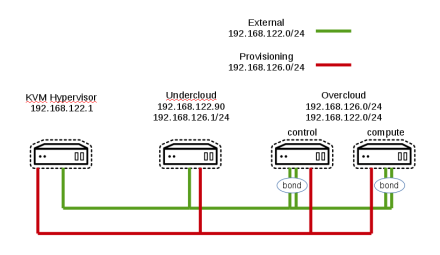
Networking Setup
In this configuration we are using virtual networks provided by the hypervisor host (my laptop). Create provisioning and external networks on KVM Hypervisor host. Ensure that NAT forwarding is enabled and DHCP is disabled on the external network. We run OpenStack overcloud on the external network. The provisioning network should be non-routable and DHCP disabled. The undercloud will handle DHCP services for the provisioning network and other IPs will be statically assigned.
[Hypervisor]
Create external network for the overcloud.
[ktenzer@ktenzer ~]$ cat > /tmp/external.xml <<EOF
<network>
   <name>external</name>
   <forward mode='nat'>
      <nat> <port start='1024' end='65535'/>
      </nat>
   </forward>
   <ip address='192.168.122.1' netmask='255.255.255.0'>
   </ip>
</network>
Note: hypervisor is 192.168.122.1 and reachable via this IP from undercloud.
[ktenzer@ktenzer ~]$ sudo virsh net-define /tmp/external.xml
[ktenzer@ktenzer ~]$ sudo virsh net-autostart external
[ktenzer@ktenzer ~]$ sudo virsh net-start external
Create provisioning network for undercloud.
Note: gateway is 192.168.126.254 as we will use 192.168.126.1 as IP for the VM running our undercloud.
[ktenzer@ktenzer ~]$ cat > /tmp/provisioning.xml <<EOF
<network>
   <name>provisioning</name>
   <ip address='192.168.126.254' netmask='255.255.255.0'>
   </ip>
</network>
[ktenzer@ktenzer ~]$ sudo virsh net-define /tmp/provisioning.xml
[ktenzer@ktenzer ~]$ sudo virsh net-autostart provisioning
[ktenzer@ktenzer ~]$ sudo virsh net-start provisioning
Deploy Undercloud
First install Red Hat Enterprise Linux (RHEL) 7.3 on undercloud VM. Register with subscription manager and configure required RPM repositories for Red Hat OpenStack Platform.
[Undercloud]
[root@director ~]# subscription-manager register
[root@director ~]#subscription-manager list --available \
subscription-manager attach --pool=
[root@director ~]# subscription-manager repos --disable=*
[root@director ~]# subscription-manager repos --enable=rhel-7-server-rpms \
--enable=rhel-7-server-extras-rpms \
--enable=rhel-7-server-rh-common-rpms \
--enable=rhel-ha-for-rhel-7-server-rpms \
--enable=rhel-7-server-openstack-10-rpms
Update all pacakges and reboot.
[root@director ~]# yum update -y
[root@director ~]# systemctl reboot
Install Director Packages.
[root@director ~]# yum install -y python-tripleoclient
Ensure host is defined in /etc/hosts.
[root@director ~]# vi /etc/hosts
192.168.122.90 ospd.lab.com ospd
Create Stack User.
[root@director ~]# useradd stack
[root@director ~]# passwd stack  # specify a password
Configure user with sudo permissions.
[root@director ~]# echo "stack ALL=(root) NOPASSWD:ALL" | tee -a /etc/sudoers.d/stack
[root@director ~]# chmod 0440 /etc/sudoers.d/stack
Switch to new stack user.
[root@director ~]# su - stack
[stack@director ~]$
Create directories for images and templates. Images are used to boot initial systems and provide baseline OS. Templates are used to customize deployment.
[stack@director ~]$ mkdir ~/images
[stack@director ~]$ mkdir ~/templates
Configure Director using the sample.
[stack@director ~]$ cp /usr/share/instack-undercloud/undercloud.conf.sample \
~/undercloud.conf
In my environment the 192.168.126.0/24 network is the undercloud network and used for provisioning as well as deploying the overcloud.
[stack@undercloud ~]$ vi ~/undercloud.conf
 [DEFAULT]
 local_ip = 192.168.126.1/24
 undercloud_public_vip = 192.168.126.2
 undercloud_admin_vip = 192.168.126.3
 local_interface = eth1
 masquerade_network = 192.168.126.0/24
 dhcp_start = 192.168.126.100
 dhcp_end = 192.168.126.150
 network_cidr = 192.168.126.0/24
 network_gateway = 192.168.126.1
 inspection_iprange = 192.168.126.130,192.168.126.99
 generate_service_certificate = true
 certificate_generation_ca = local
Install the undercloud.
[stack@odpd ~]$ openstack undercloud install
#############################################################################
 Undercloud install complete.
The file containing this installation's passwords is at
 /home/stack/undercloud-passwords.conf.
There is also a stackrc file at /home/stack/stackrc.
These files are needed to interact with the OpenStack services, and should be
 secured.
#############################################################################
Import overcloud images.
[stack@odpd ~]$ source stackrc
[stack@odpd ~]$ sudo yum install -y \
rhosp-director-images rhosp-director-images-ipa
[stack@odpd ~]$ cd ~/images $ for i in \
/usr/share/rhosp-director-images/overcloud-full-latest-10.0.tar \
/usr/share/rhosp-director-images/ironic-python-agent-latest-10.0.tar; \
do tar -xvf $i; done
[stack@odpd ~]$ openstack overcloud image upload --image-path \
/home/stack/images/
Configure DNS on undercloud network.
[stack@odpd ~]$ neutron subnet-list
+--------------------------------------+------+------------------+--------------------------------------------------------+
| id | name | cidr | allocation_pools |
+--------------------------------------+------+------------------+--------------------------------------------------------+
| 294ff536-dc8b-49a3-8327-62d9792d30a6 | | 192.168.126.0/24 | {"start": "192.168.126.100", "end": "192.168.126.200"} |
+--------------------------------------+------+------------------+--------------------------------------------------------+
[stack@odpd ~]$ neutron subnet-update 294ff536-dc8b-49a3-8327-62d9792d30a6 \
--dns-nameserver 8.8.8.8
[Hypervisor]
Registering Overcloud Nodes. Create VM hulls in KVM using virsh on hypervisor host.
Note: You will need to change the disk path to suit your needs.
ktenzer$ cd /home/ktenzer/VirtualMachines
ktenzer$ sudo for i in {1..3}; do qemu-img create -f qcow2 -o preallocation=metadata overcloud-node$i.qcow2 60G; done
ktenzer$ sudo for i in {1..3}; do virt-install --ram 4096 --vcpus 4 --os-variant rhel7 --disk path=/home/ktenzer/VirtualMachines/overcloud-node$i.qcow2,device=disk,bus=virtio,format=qcow2 --noautoconsole --vnc --network network:provisioning --network network:external --network network:external --name overcloud-node$i --cpu SandyBridge,+vmx --dry-run --print-xml > /tmp/overcloud-node$i.xml; virsh define --file /tmp/overcloud-node$i.xml; done
[Undercloud]
Copy ssh key from undercloud system to KVM hypervisor host for stack user.
[stack@odpd ~]$ ssh-copy-id -i ~/.ssh/id_rsa.pub stack@192.168.122.1
Save the MAC addresses of the NICs used for provisioning.
Note: Ironic needs to know what MAC addresses a node has associated for provisioning network.
[stack@odpd images]$ for i in {1..3}; do virsh \
-c qemu+ssh://stack@192.168.122.1/system domiflist overcloud-node$i \
| awk '$3 == "provisioning" {print $5};'; done > /tmp/nodes.txt
[stack@odpd images]$ cat /tmp/nodes.txt
52:54:00:7e:d8:01
52:54:00:f6:a6:73
52:54:00:c9:b2:84
[stack@undercloud ~]$ jq . << EOF > ~/instackenv.json
{
  "ssh-user": "stack",
  "ssh-key": "$(cat ~/.ssh/id_rsa)",
  "power_manager": "nova.virt.baremetal.virtual_power_driver.VirtualPowerManager",
  "host-ip": "192.168.122.1",
  "arch": "x86_64",
  "nodes": [
    {
      "pm_addr": "192.168.122.1",
      "pm_password": "$(cat ~/.ssh/id_rsa)",
      "pm_type": "pxe_ssh",
      "mac": [
        "$(sed -n 1p /tmp/nodes.txt)"
      ],
      "cpu": "2",
      "memory": "4096",
      "disk": "60",
      "arch": "x86_64",
      "pm_user": "stack"
    },
    {
      "pm_addr": "192.168.122.1",
      "pm_password": "$(cat ~/.ssh/id_rsa)",
      "pm_type": "pxe_ssh",
      "mac": [
        "$(sed -n 2p /tmp/nodes.txt)"
      ],
      "cpu": "4",
      "memory": "2048",
      "disk": "60",
      "arch": "x86_64",
      "pm_user": "stack"
    },
    {
      "pm_addr": "192.168.122.1",
      "pm_password": "$(cat ~/.ssh/id_rsa)",
      "pm_type": "pxe_ssh",
      "mac": [
        "$(sed -n 3p /tmp/nodes.txt)"
      ],
      "cpu": "4",
      "memory": "2048",
      "disk": "60",
      "arch": "x86_64",
      "pm_user": "stack"
    }
  ]
}
EOF
Validate introspection configuration.
[stack@odpd ~]$ curl -O
https://raw.githubusercontent.com/rthallisey/clapper/master/instackenv-validator.py
Import nodes into Ironic and set them to bootable.
[stack@odpd ~]$ openstack baremetal import --json ~/instackenv.json
[stack@odpd ~]$ openstack baremetal configure boot
[stack@odpd ~]$ openstack baremetal node list
 +--------------------------------------+------+---------------+-------------+--------------------+-------------+
 | UUID | Name | Instance UUID | Power State | Provisioning State | Maintenance |
 +--------------------------------------+------+---------------+-------------+--------------------+-------------+
 | ea61b158-9cbd-46d2-93e9-eadaccb1589b | None | None | power off | available | False |
 | 11aaf849-361e-4bda-81f5-74c245f554af | None | None | power off | available | False |
 | 275448c1-aa8d-4854-bb3b-bc73e1e1a794 | None | None | power off | available | False |
 +--------------------------------------+------+---------------+-------------+--------------------+-------------+
Set nodes to managed.
[stack@odpd ~]$ for node in $(openstack baremetal node list -c UUID \
-f value) ; do openstack baremetal node manage $node ; done
List nodes.
[stack@odpd ~]$ openstack baremetal node list
 +--------------------------------------+------+---------------+-------------+--------------------+-------------+
 | UUID | Name | Instance UUID | Power State | Provisioning State | Maintenance |
 +--------------------------------------+------+---------------+-------------+--------------------+-------------+
 | ea61b158-9cbd-46d2-93e9-eadaccb1589b | None | None | power off | manageable | False |
 | 11aaf849-361e-4bda-81f5-74c245f554af | None | None | power off | manageable | False |
 | 275448c1-aa8d-4854-bb3b-bc73e1e1a794 | None | None | power off | manageable | False |
 +--------------------------------------+------+---------------+-------------+--------------------+-------------+
Run introspection against all managed nodes.
Note: Nodes are booted using ramdisk and their hardware inspected. Introspection prepares nodes for deployment into overcloud.
[stack@odpd ~]$ openstack overcloud node introspect --all-manageable \
--provide
Tag Control Nodes.
Note: tagging nodes allows us to associate a node with a specific role in the overcloud.
[stack@odpd ~]$ openstack baremetal node set \
--property capabilities='profile:control,boot_option:local' \
0e30226f-f208-41d3-9780-15fa5fdabbde
Tag Compute Nodes.
[stack@odpd ~]$ openstack baremetal node set \
--property capabilities='profile:compute,boot_option:local' \
cd3e3422-e7db-45c7-9645-858503a2cdc8
[stack@odpd ~]$ openstack baremetal node set \
--property capabilities='profile:compute,boot_option:local' \
5078e1c1-fbe5-4d7f-a222-0c0fd32af423
Check Overcloud Profiles.
[stack@odpd ~]$ openstack overcloud profiles list
+--------------------------------------+-----------+-----------------+-----------------+-------------------+
| Node UUID | Node Name | Provision State | Current Profile | Possible Profiles |
+--------------------------------------+-----------+-----------------+-----------------+-------------------+
| 0e30226f-f208-41d3-9780-15fa5fdabbde | | available | control | |
| cd3e3422-e7db-45c7-9645-858503a2cdc8 | | available | compute | |
| 5078e1c1-fbe5-4d7f-a222-0c0fd32af423 | | available | compute | |
+--------------------------------------+-----------+-----------------+-----------------+-------------------+
Deploy Overcloud
There are two ways to deploy overcloud 1) default 2) customize. You will pretty much always want to customize your deployment but for starting out the default method can be a good way to simplify things and rule out potential problems. I recommend always doing default install just to get a baseline working environment and then throwing it away, redeploying with a customized install
[Undercloud]
Option 1: Default Deployment
The default deployment will put the overcloud on the provisioning network. That means you end up with one network hosting both undercloud and overcloud. The external network is not used.
[stack@odpd ~]$ openstack overcloud deploy --templates --control-scale 1 \
--compute-scale 1 --neutron-tunnel-types vxlan --neutron-network-type vxlan
Option 2: Customized Deployment
The really nice thing about director is you have a high degree of customization. In this example we are setting overcloud up on a single 192.168.122.0/24 network. However normally you would have separate networks for OpenStack management, API, public, storage, etc.
Clone my github repository.
[stack@odpd ~]$ git clone https://github.com/ktenzer/openstack-heat-templates.git
Copy my templates to your local ~/templates directory.
[stack@odpd ~]$ cp ~/openstack-heat-templates/director/lab/osp10/templates/* ~/templates
Deploy overcloud using templates.
[stack@odpd ~]$ openstack overcloud deploy --templates \
-e /usr/share/openstack-tripleo-heat-templates/environments/network-isolation.yaml \
-e ~/templates/network-environment.yaml \
-e /usr/share/openstack-tripleo-heat-templates/environments/low-memory-usage.yaml \
-e ~/templates/firstboot-environment.yaml --control-scale 1 \
--compute-scale 1 --control-flavor control \
--compute-flavor compute --ntp-server pool.ntp.org \
--neutron-network-type vxlan --neutron-tunnel-types vxlan

2017-04-12 14:46:11Z [overcloud.AllNodesDeploySteps]: CREATE_COMPLETE Stack CREATE completed successfully
2017-04-12 14:46:12Z [overcloud.AllNodesDeploySteps]: CREATE_COMPLETE state changed
2017-04-12 14:46:12Z [overcloud]: CREATE_COMPLETE Stack CREATE completed successfully

Stack overcloud CREATE_COMPLETE

Started Mistral Workflow. Execution ID: 000ecec3-46aa-4e3f-96d9-8a240d34d6aa
/home/stack/.ssh/known_hosts updated.
Original contents retained as /home/stack/.ssh/known_hosts.old
Overcloud Endpoint: http://192.168.122.106:5000/v2.0
Overcloud Deployed
List overcloud nodes.
[stack@odpd ~]$ nova list
+--------------------------------------+------------------------+--------+------------+-------------+--------------------------+
| ID | Name | Status | Task State | Power State | Networks |
+--------------------------------------+------------------------+--------+------------+-------------+--------------------------+
| 1e286764-9334-4ecd-9baf-e37a49a4fbd5 | overcloud-compute-0 | ACTIVE | - | Running | ctlplane=192.168.126.106 |
| a21a14f5-94df-4a3a-8629-ba8d851525ff | overcloud-controller-0 | ACTIVE | - | Running | ctlplane=192.168.126.103 |
+--------------------------------------+------------------------+--------+------------+-------------+--------------------------+
Connect to overcloud controller from undercloud.
[stack@odpd ~]$ ssh heat-admin@192.168.126.103
[Overcloud Controller]
Get overcloud admin password.
Overcloud parameters generated during deployment such as password are stored in hiera.
[root@overcloud-controller-0 ~]$ sudo -i
[root@overcloud-controller-0 ~]# hiera keystone::admin_password
HngV6vc4ZP2bZ78ePfgWAvHAh
[Undercloud]
Create overcloud keystone source file.
[stack@odpd ~]$ vi overcloudrc
export OS_NO_CACHE=True
export OS_CLOUDNAME=overcloud
export OS_AUTH_URL=http://192.168.122.106:5000/v2.0
export NOVA_VERSION=1.1
export COMPUTE_API_VERSION=1.1
export OS_USERNAME=admin
export OS_PASSWORD=HngV6vc4ZP2bZ78ePfgWAvHAh
export PYTHONWARNINGS="ignore:Certificate has no, ignore:A true SSLContext object is not available"
export OS_TENANT_NAME=admin
export PS1='[\u@\h \W]$ '
Source overcloudrc.
[stack@odpd ~]$ source overcloudrc
List hypervisor hosts in overcloud.
[stack@odpd ~]$ nova hypervisor-list
+----+---------------------------------+-------+---------+
| ID | Hypervisor hostname | State | Status |
+----+---------------------------------+-------+---------+
| 1 | overcloud-compute-0.localdomain | up | enabled |
+----+---------------------------------+-------+---------+
Troubleshooting Deployment
Let's face it in OpenStack there is a lot that can go wrong. I like this quote from Dirk Wallerstorfer.
"In short, OpenStack networking is a lot like Venice—there are masquerades and bridges all over the place!"
-Dirk Wallerstorfer
source: https://www.dynatrace.com/blog/openstack-network-mystery-2-bytes-cost-me-two-days-of-trouble/
[Undercloud]
Red Hat is making it much easier to troubleshoot deployment problems.While the deployment is running you can follow along in Heat by showing nested steps.
[stack@odpd ~]$ heat stack-list --show-nested
If for some reason the deployment fails, there is now a command to gather up all the information to make it really easy to find out what happened.
[stack@odpd ~]$ openstack stack failures list --long overcloud
Summary
OpenStack is the way of the future for virtualization platforms and I think in the future many traditional virtualization environments will be moving to OpenStack. The choice is simple either they will stay on-premise and become OpenStack or move to public cloud. Of course there will be those that stick with traditional virtualization, there are still lots and lots of mainframes around but clear trend will be to public cloud or OpenStack. The only thing holding OpenStack back is complexity and manageability. Red Hat is focused on making OpenStack simple without losing the "Open" in OpenStack. In other words without compromising on what makes OpenStack a great cloud computing platform. As you have seen in this article Red Hat OpenStack Platform is making great strides and the fact that you can setup an OpenStack environment using enterprise production grade tooling on a 12GB RAM laptop is a good sign.
Happy OpenStacking!
(c) 2017 Keith Tenzer