
OpenShift Enterprise 3.2: all-in-one Lab Environment

Overview
In this article we will setup a OpenShift Enterprise 3.2 all-in-one configuration. We will also setup the integration with CloudForms that allows additional management of OpenShift environments.
OpenShift has several different roles: masters, nodes, etcd and load balancers. An all-in-one setup means running all service on a single system. Since we are only using a single system a load balancer or ha-proxy won't be configured. If you would like to read more about OpenShift I can recommend the following:
- General OpenShift Product Blogs
- Persistent Storage
- OpenShift Networking Part I
- OpenShift Networking Part II
Prerequisites
Configure a VM with following:
- RHEL 7.2
- 2 CPUs
- 4096 RAM
- 30GB disk for OS
- 25GB disk for docker images
# subscription-manager repos --disable="*"
# subscription-manager repos \
    --enable="rhel-7-server-rpms" \
    --enable="rhel-7-server-extras-rpms" \
    --enable="rhel-7-server-ose-3.2-rpms"
# yum install -y wget git net-tools bind-utils iptables-services bridge-utils bash-completion
# yum update -y
# yum install -y atomic-openshift-utils
# systemctl reboot
# yum install -y docker-1.10.3
# vi /etc/sysconfig/docker
OPTIONS='--selinux-enabled --insecure-registry 172.30.0.0/16'
# cat <<EOF > /etc/sysconfig/docker-storage-setup
DEVS=/dev/vdb
VG=docker-vg
EOF
# docker-storage-setup
# systemctl enable docker
# systemctl start docker
# ssh-keygen
# ssh-copy-id -i /root/.ssh/id_rsa-pub ose3-master.lab.com
DNS Setup
DNS is a requirement for OpenShift Enterprise. In fact most issues you may run into are a result of not having a properly working DNS environment. For OpenShift you can either use dnsmasq or bind. I recommend using bind but in this article I will cover both options.
DNSMASQ
A colleague Ivan Mckinely was nice enough to create an ansible playbook for deploying dnsmasq. To deploy dnsmasq run following steps on OpenShift master.
# git clone https://github.com/ivanthelad/ansible-aos-scripts.git
#cd ansible-aos-scripts
Edit inventory file and set dns to IP of the system that should be providing DNS. Also ensure nodes and masters have correct IPs for your OpenShift servers. In our case 192.168.122.60 is master, node and DNS.
#vi inventory

[dns]
192.168.122.60
[nodes]
192.168.122.60
[masters]
192.168.122.60
Configure dnsmasq and add wildcard DNS so all hosts with
# vi playbooks/roles/dnsmasq/templates/dnsmasq.conf

strict-order
domain-needed
local=/lab.com/
bind-dynamic
resolv-file=/etc/resolv.conf.upstream
no-hosts
address=/.cloudapps.lab.com/192.168.122.60
address=/ose3-master.lab.com/192.168.122.60
log-queries
Ensure all hosts you want in DNS are also in /etc/hosts. The dnsmasq service reads /etc/hosts upon startup so all entries in hosts file can be queried through DNS.
#vi /etc/hosts

192.168.122.60  ose3-master.lab.com     ose3-master
Configure ssh on DNS host
#ssh-keygen
#ssh-copy-id -i ~/.ssh/id_rsa.pub ose3-master.lab.com
Install dnsmasq via ansible
# ansible-playbook -i inventory playbooks/install_dnsmas.yml
If you need to make changes you can edit the /etc/dnsmasq.conf file and restart dnsmasq service. Below is a sample dnsmasq.conf.
# vi /etc/dnsmasq.conf
strict-order
domain-needed
local=/example.com/
bind-dynamic
resolv-file=/etc/resolv.conf.upstream
no-hosts
address=/.apps.lab.com/192.168.122.60
address=/ose3-master.lab.com/192.168.122.60
address=/kubernetes.default.svc/192.168.122.60
log-queries
NAMED
Install DNS tools and utilities.
# yum -y install bind bind-utils
# systemctl enable named
# systemctl start named
Set firewall rules using iptables.
# iptables -A INPUT -p tcp -m state --state NEW -m tcp --dport 53 -j ACCEPT
# iptables -A INPUT -p udp -m state --state NEW -m udp --dport 53 -j ACCEPT
Save the iptables Using.
# service iptables save
iptables: Saving firewall rules to /etc/sysconfig/iptables:[  OK  ]
Note: If you are using firewalld you can just enable service DNS using firwall-cmd utility.
Example of zone file for lab.com.
vi /var/named/dynamic/lab.com.zone

$ORIGIN lab.com.
$TTL 86400
@ IN SOA dns1.lab.com. hostmaster.lab.com. (
 2001062501 ; serial
 21600 ; refresh after 6 hours
 3600 ; retry after 1 hour
 604800 ; expire after 1 week
 86400 ) ; minimum TTL of 1 day
;
;
 IN NS dns1.lab.com.
dns1 IN A 192.168.122.1
 IN AAAA aaaa:bbbb::1
ose3-master IN A 192.168.122.60
*.cloudapps 300 IN A 192.168.122.60
Example of named configuration.
# vi /etc/named.conf
//
// named.conf
//
// Provided by Red Hat bind package to configure the ISC BIND named(8) DNS
// server as a caching only nameserver (as a localhost DNS resolver only).
//
// See /usr/share/doc/bind*/sample/ for example named configuration files.
//

options {
 listen-on port 53 { 127.0.0.1;192.168.122.1; };
 listen-on-v6 port 53 { ::1; };
 directory "/var/named";
 dump-file "/var/named/data/cache_dump.db";
 statistics-file "/var/named/data/named_stats.txt";
 memstatistics-file "/var/named/data/named_mem_stats.txt";
 allow-query { localhost;192.168.122.0/24;192.168.123.0/24; };

/*
 - If you are building an AUTHORITATIVE DNS server, do NOT enable recursion.
 - If you are building a RECURSIVE (caching) DNS server, you need to enable
 recursion.
 - If your recursive DNS server has a public IP address, you MUST enable access
 control to limit queries to your legitimate users. Failing to do so will
 cause your server to become part of large scale DNS amplification
 attacks. Implementing BCP38 within your network would greatly
 reduce such attack surface
 */
 recursion yes;

dnssec-enable yes;
 dnssec-validation yes;
 dnssec-lookaside auto;

/* Path to ISC DLV key */
 bindkeys-file "/etc/named.iscdlv.key";

managed-keys-directory "/var/named/dynamic";

pid-file "/run/named/named.pid";
 session-keyfile "/run/named/session.key";

//forward first;
 forwarders {
 //10.38.5.26;
 8.8.8.8;
 };
};

logging {
 channel default_debug {
 file "data/named.run";
 severity dynamic;
 };
};

zone "." IN {
 type hint;
 file "named.ca";
};

zone "lab.com" IN {
 type master;
 file "/var/named/dynamic/lab.com.zone";
 allow-update { none; };
};

//zone "122.168.192.in-addr.arpa" IN {
// type master;
// file "/var/named/dynamic/122.168.192.db";
// allow-update { none; };
//};

include "/etc/named.rfc1912.zones";
include "/etc/named.root.key";
Note: I have left out reverse DNS, PTR records. If you need this you can of course add zone file and set that up but it isn't required for a lab configuration.
Install OpenShift.
Here we are enabling ovs-subnet SDN and setting authentication to use htpasswd. This is the most basic configuration as we are doing an all-in-one setup. For actual deployments you would want multi-master, dedicated nodes and seperate nodes for handling etcd.
##########################
### OSEv3 Server Types ###
##########################
[OSEv3:children]
masters
nodes
etcd

################################################
### Set variables common for all OSEv3 hosts ###
################################################
[OSEv3:vars]
ansible_ssh_user=root
os_sdn_network_plugin_name='redhat/openshift-ovs-subnet'
deployment_type=openshift-enterprise
openshift_master_default_subdomain=apps.lab.com
openshift_master_identity_providers=[{'name': 'htpasswd_auth', 'login': 'true', 'challenge': 'true', 'kind': 'HTPasswdPasswordIdentityProvider', 'filename': '/etc/origin/master/htpasswd'}]
openshift_node_kubelet_args={'maximum-dead-containers': ['100'], 'maximum-dead-containers-per-container': ['2'], 'minimum-container-ttl-duration': ['10s'], 'max-pods': ['110'], 'image-gc-high-threshold': ['90'], 'image-gc-low-threshold': ['80']}
logrotate_scripts=[{"name": "syslog", "path": "/var/log/cron\n/var/log/maillog\n/var/log/messages\n/var/log/secure\n/var/log/spooler\n", "options": ["daily", "rotate 7", "compress", "sharedscripts", "missingok"], "scripts": {"postrotate": "/bin/kill -HUP `cat /var/run/syslogd.pid 2> /dev/null` 2> /dev/null || true"}}]
openshift_docker_options="-log-driver json-file --log-opt max-size=1M --log-opt max-file=3"
openshift_node_iptables_sync_period=5s
openshift_master_pod_eviction_timeout=3m
osm_controller_args={'resource-quota-sync-period': ['10s']}
osm_api_server_args={'max-requests-inflight': ['400']}
openshift_use_dnsmasq=true

##############################
### host group for masters ###
##############################
[masters]
ose3-master.lab.com

###################################
### host group for etcd servers ###
###################################
[etcd]
ose3-master.lab.com

##################################################
### host group for nodes, includes region info ###
##################################################
[nodes]
ose3-master.lab.com openshift_schedulable=True
Run Ansible playbook to install and configure OpenShift.
# ansible-playbook /usr/share/ansible/openshift-ansible/playbooks/byo/config.yml
Configure OpenShift
Create local admin account and enable permissions.
[root@ose3-master ~]#oc login -u system:admin -n default
[root@ose3-master ~]#htpasswd -c /etc/origin/master/htpasswd admin
[root@ose3-master ~]#oadm policy add-cluster-role-to-user cluster-admin admin
[root@ose3-master ~]#oc login -u admin -n default
Configure OpenShift image registry. Image streams are stored in registry. When you build application, your application code will be added as a image stream. This enables S2I (Source to Image) and allows for fast build times.
[root@ose3-master ~]#oadm registry --service-account=registry \
--config=/etc/origin/master/admin.kubeconfig \
--images='registry.access.redhat.com/openshift3/ose-${component}:${version}'
Configure OpenShift router. The OpenShift router is basically an HA-Proxy that sends incoming service requests to node where pod is running.
[root@ose3-master ~]#oadm router router --replicas=1 \
    --credentials='/etc/origin/master/openshift-router.kubeconfig' \
    --service-account=router
CloudForms Integration
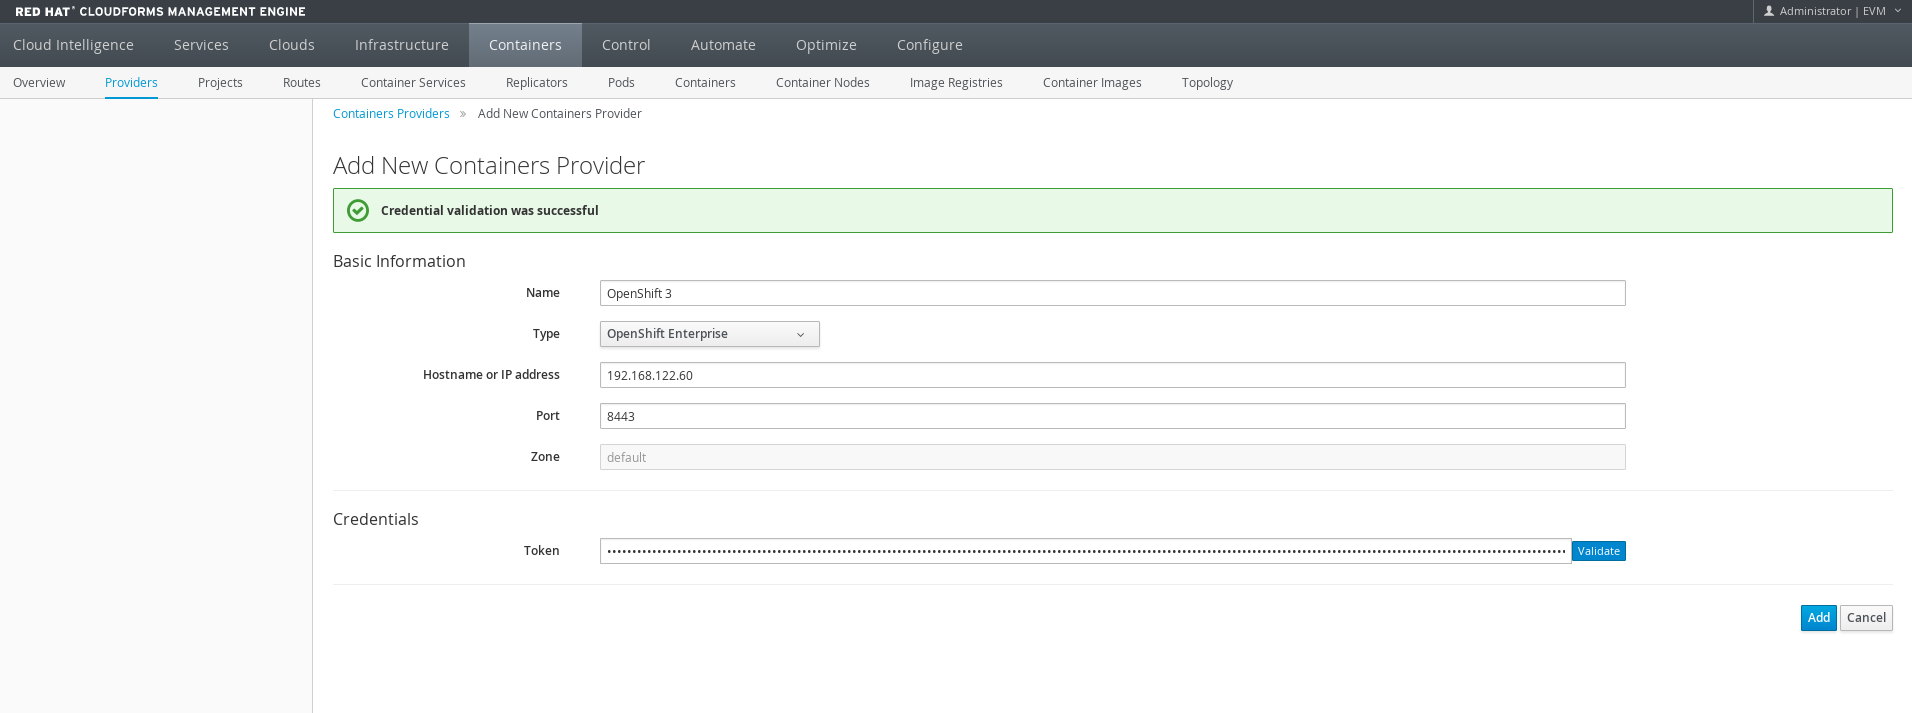
CloudForms is a cloud management platform. It integrates not only with OpenShift but also other Cloud platforms (OpenStack, Amazon, GCE, Azure) and traditional virtualization platforms (VMware, RHEV, Hyper-V). Since OpenShift is usually running on cloud or traditional virtualization platforms, CloudForms enables true end-to-end visibility. CloudForms provides not only performance metrics, events, smart state analysis of containers (scanning container contents) but also can provide chargeback for OpenShift projects. CloudForms is included in OpenShift subscription for purpose of managing OpenShift. To add OpenShift as provider in CloudForms follow the below steps.
The management-admin project is designed for scanning container images. A container is started in this context and the image to be scanned mounted. List tokens that are configured in management-admin project (this is created at install time).
[root@ose3-master ~]# oc get sa management-admin -o yaml
apiVersion: v1
imagePullSecrets:
- name: management-admin-dockercfg-ln1an
kind: ServiceAccount
metadata:
 creationTimestamp: 2016-07-24T11:36:58Z
 name: management-admin
 namespace: management-infra
 resourceVersion: "400"
 selfLink: /api/v1/namespaces/management-infra/serviceaccounts/management-admin
 uid: ee6a1426-5192-11e6-baff-001a4ae42e01
secrets:
- name: management-admin-token-wx17s
- name: management-admin-dockercfg-ln1an
Use describe to get token to enable CloudForms to accesss the management-admin project.
[root@ose3-master ~]# oc describe secret management-admin-token-wx17s
Name: management-admin-token-wx17s
Namespace: management-infra
Labels: <none>
Annotations: kubernetes.io/service-account.name=management-admin,kubernetes.io/service-account.uid=ee6a1426-5192-11e6-baff-001a4ae42e01

Type: kubernetes.io/service-account-token

Data
====
ca.crt: 1066 bytes
namespace: 16 bytes
token: eyJhbGciOiJSUzI1NiIsInR5cCI6IkpXVCJ9.eyJpc3MiOiJrdWJlcm5ldGVzL3NlcnZpY2VhY2NvdW50Iiwia3ViZXJuZXRlcy5pby9zZXJ2aWNlYWNjb3VudC9uYW1lc3BhY2UiOiJtYW5hZ2VtZW50LWluZnJhIiwia3ViZXJuZXRlcy5pby9zZXJ2aWNlYWNjb3VudC9zZWNyZXQubmFtZSI6Im1hbmFnZW1lbnQtYWRtaW4tdG9rZW4td3gxN3MiLCJrdWJlcm5ldGVzLmlvL3NlcnZpY2VhY2NvdW50L3NlcnZpY2UtYWNjb3VudC5uYW1lIjoibWFuYWdlbWVudC1hZG1pbiIsImt1YmVybmV0ZXMuaW8vc2VydmljZWFjY291bnQvc2VydmljZS1hY2NvdW50LnVpZCI6ImVlNmExNDI2LTUxOTItMTFlNi1iYWZmLTAwMWE0YWU0MmUwMSIsInN1YiI6InN5c3RlbTpzZXJ2aWNlYWNjb3VudDptYW5hZ2VtZW50LWluZnJhOm1hbmFnZW1lbnQtYWRtaW4ifQ.Y0IlcwhHW_CpKyFvk_ap-JMAT69fbIqCjkAbmpgZEUJ587LP0pQz06OpBW05XNJ3cJg5HeckF0IjCJBDbMS3P1W7KAnLrL9uKlVsZ7qZ8-M2yvckdIxzmEy48lG0GkjtUVMeAOJozpDieFClc-ZJbMrYxocjasevVNQHAUpSwOIATzcuV3bIjcLNwD82-42F7ykMn-A-TaeCXbliFApt6q-R0hURXCZ0dkWC-za2qZ3tVXaykWmoIFBVs6wgY2budZZLhT4K9b4lbiWC5udQ6ga2ATZO1ioRg-bVZXcTin5kf__a5u6c775-8n6DeLPcfUqnLucaYr2Ov7RistJRvg
Add OpenShift provider to CloudForms using the management-admin service token.
Performance Metrics
OpenShift provides ability to collect performance metrics using Hawkular. This runs as container and uses cassandra to persist the data. CloudForms is able to display capacity and utilization metrics for OpenShift using Hawkular.
Switch to openshift-infra project. This is intended for running infrastructure containers such as hawkular or ELK for logging.
[root@ose3-master ~]# oc project openshift-infra
Create service account for metrics-deployer pod.
[root@ose3-master ~]# oc create -f - <<API
apiVersion: v1
kind: ServiceAccount
metadata:
 name: metrics-deployer
secrets:
- name: metrics-deployer
API
Enable permissions and set secret.
[root@ose3-master ~]# oadm policy add-role-to-user edit system:serviceaccount:openshift-infra:metrics-deployer
[root@ose3-master ~]#oadm policy add-cluster-role-to-user cluster-reader system:serviceaccount:openshift-infra:heapster
[root@ose3-master ~]# oc secrets new metrics-deployer nothing=/dev/null
Deploy metrics environment for OpenShift.
[root@ose3-master ~]# oc new-app -f /usr/share/openshift/examples/infrastructure-templates/enterprise/metrics-deployer.yaml \
-p HAWKULAR_METRICS_HOSTNAME=hawkular-metrics.apps.lab.com \
-p USE_PERSISTENT_STORAGE=false -p MASTER_URL=https://ose3-master.lab.com:8443
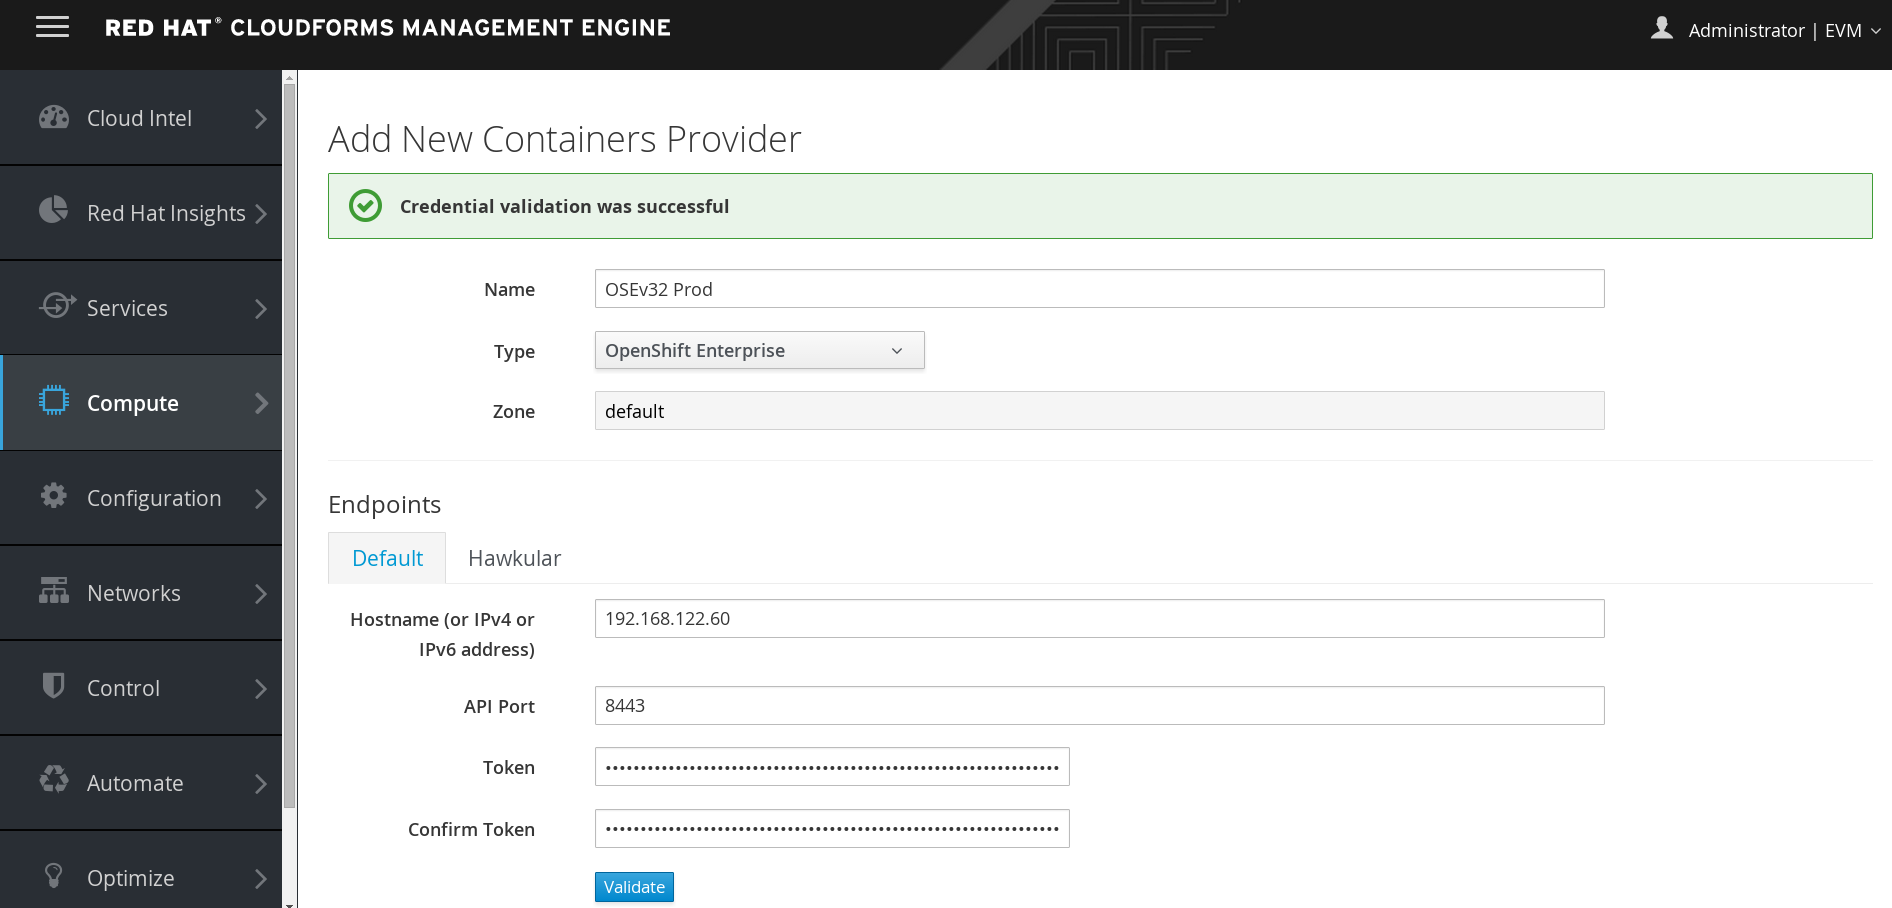
CloudForms Container Provider
CloudForms is a cloud management platform. It integrates not only with OpenShift but also other Cloud platforms (OpenStack, Amazon, GCE, Azure) and traditional virtualization platforms (VMware, RHEV, Hyper-V). Since OpenShift is usually running on cloud or traditional virtualization platforms, CloudForms enables true end-to-end visibility. CloudForms provides not only performance metrics, events, smart state analysis of containers (scanning container contents) but also can provide chargeback for OpenShift projects. CloudForms is included in OpenShift subscription for purpose of managing OpenShift. To add OpenShift as provider in CloudForms follow the below steps.
Use management-admin token that is created in management-admin project during install to provide access to CloudForms.
[root@ose3-master ~]# oc describe sa -n management-infra management-admin
Name: management-admin
Namespace: management-infra
Labels: <none>

Mountable secrets: management-admin-token-vr21i
 management-admin-dockercfg-5j3m3

Tokens: management-admin-token-mxy4m
 management-admin-token-vr21i

Image pull secrets: management-admin-dockercfg-5j3m3
[root@ose3-master ~]# oc describe secret -n management-infra management-admin-token-mxy4m
Name: management-admin-token-mxy4m
Namespace: management-infra
Labels: <none>
Annotations: kubernetes.io/service-account.name=management-admin,kubernetes.io/service-account.uid=87f8f4e4-4c0f-11e6-8aca-52540057bf27

Type: kubernetes.io/service-account-token

Data
====
token: eyJhbGciOiJSUzI1NiIsInR5cCI6IkpXVCJ9.eyJpc3MiOiJrdWJlcm5ldGVzL3NlcnZpY2VhY2NvdW50Iiwia3ViZXJuZXRlcy5pby9zZXJ2aWNlYWNjb3VudC9uYW1lc3BhY2UiOiJtYW5hZ2VtZW50LWluZnJhIiwia3ViZXJuZXRlcy5pby9zZXJ2aWNlYWNjb3VudC9zZWNyZXQubmFtZSI6Im1hbmFnZW1lbnQtYWRtaW4tdG9rZW4tbXh5NG0iLCJrdWJlcm5ldGVzLmlvL3NlcnZpY2VhY2NvdW50L3NlcnZpY2UtYWNjb3VudC5uYW1lIjoibWFuYWdlbWVudC1hZG1pbiIsImt1YmVybmV0ZXMuaW8vc2VydmljZWFjY291bnQvc2VydmljZS1hY2NvdW50LnVpZCI6Ijg3ZjhmNGU0LTRjMGYtMTFlNi04YWNhLTUyNTQwMDU3YmYyNyIsInN1YiI6InN5c3RlbTpzZXJ2aWNlYWNjb3VudDptYW5hZ2VtZW50LWluZnJhOm1hbmFnZW1lbnQtYWRtaW4ifQ.dN-CmGdSR2TRh1h0qHvwkqnW6TLvhXJtuHX6qY2jsrZIZCg2LcyuQI9edjBhl5tDE6PfOrpmh9-1NKAA6xbbYVJlRz52gnEdtm1PVgvzh8_WnKiQLZu-xC1qRX_YL7ohbglFSf8b5zgf4lBdJbgM_2P4sm1Czhu8lr5A4ix95y40zEl3P2R_aXnns62hrRF9XpmweASGMjooKOHB_5HUcZ8QhvdgsveD4j9de-ZzYrUDHi0NqOEtenBThe5kbEpiWzSWMAkIeC2wDPEnaMTyOM2bEfY04bwz5IVS_IAnrEF7PogejgsrAQRtYss5yKSZfwNTyraAXSobgVa-e4NsWg
ca.crt: 1066 bytes
namespace: 16 bytes
Add OpenShift provider to CloudForms using token.
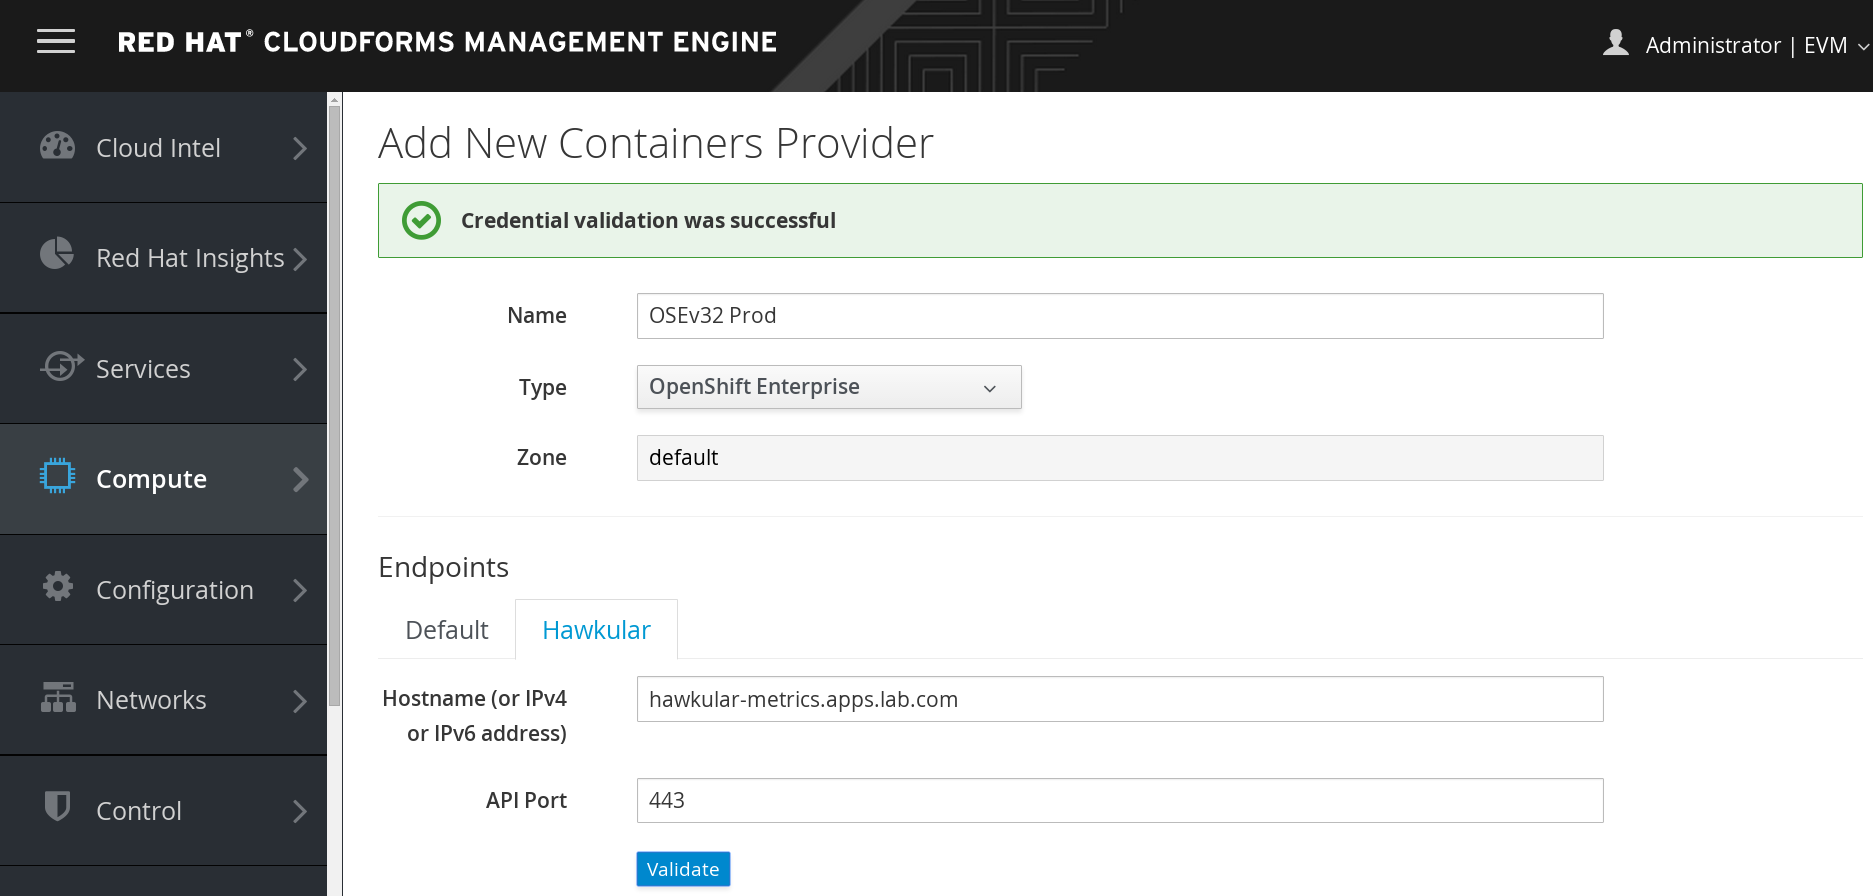
Configure metrics by supplying the service name exposed by OpenShift.
Choose a container image to scan.
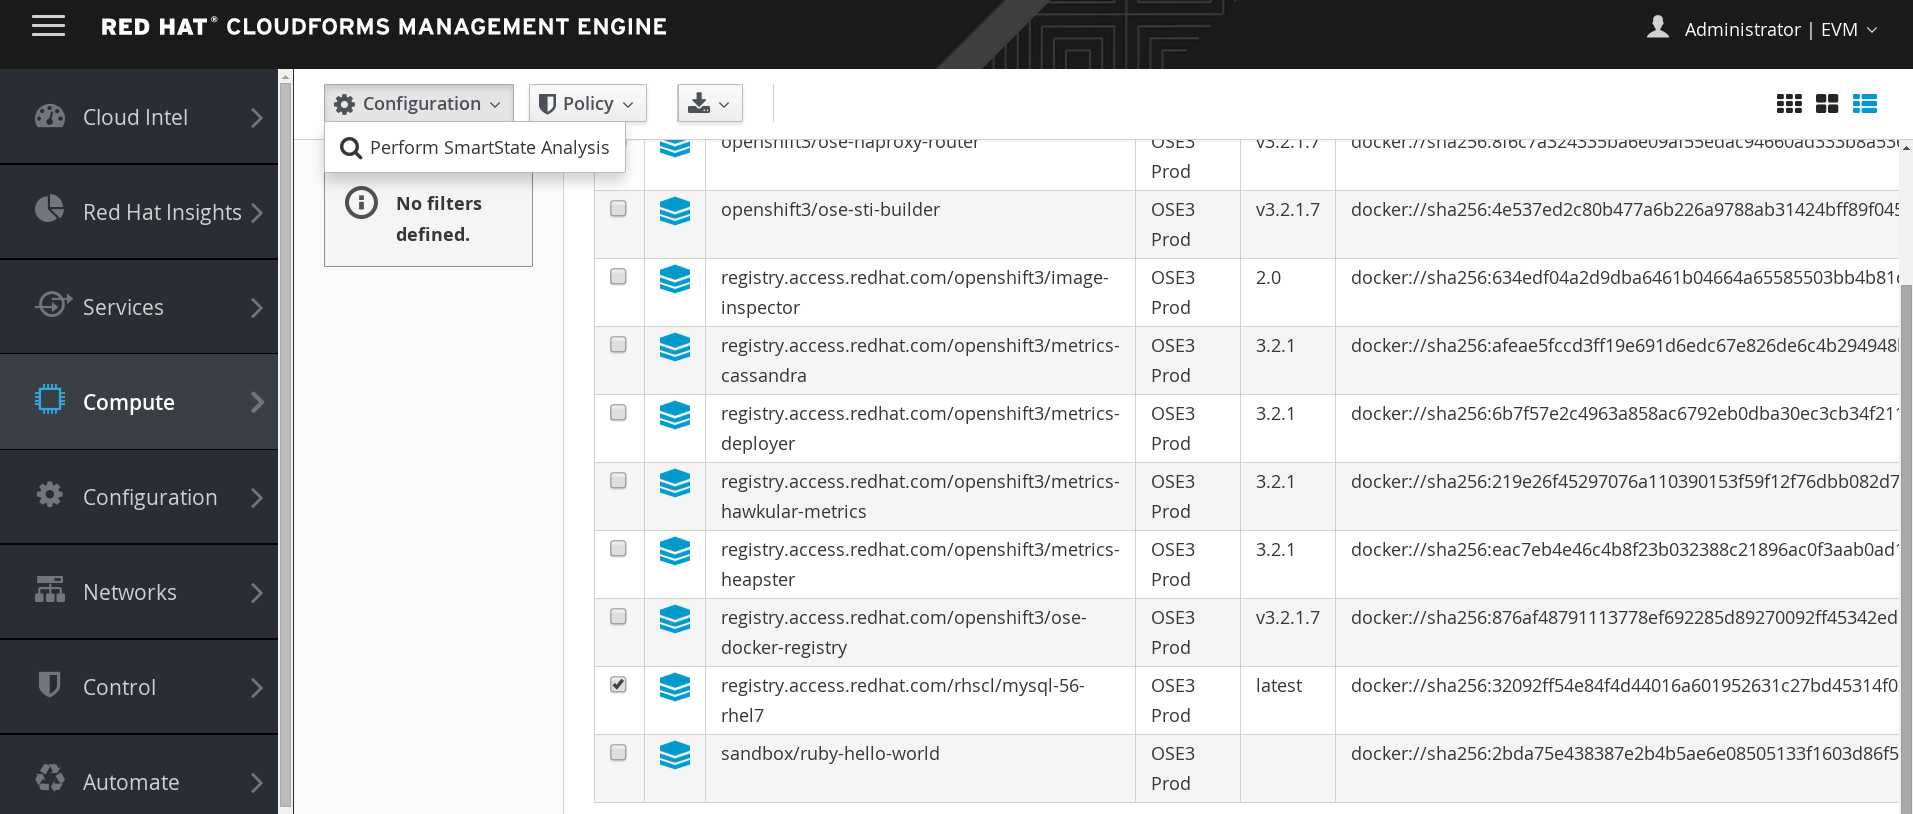
You should see scanning container start in the project management-infra.
[root@ose3-master ~]# oc project management-infra
[root@ose3-master ~]# oc get pods
NAME READY STATUS RESTARTS AGE
manageiq-img-scan-24297 0/1 ContainerCreating 0 12s
[root@ose3-master ~]# oc get pods
NAME READY STATUS RESTARTS AGE
manageiq-img-scan-24297 1/1 Running 0 1m
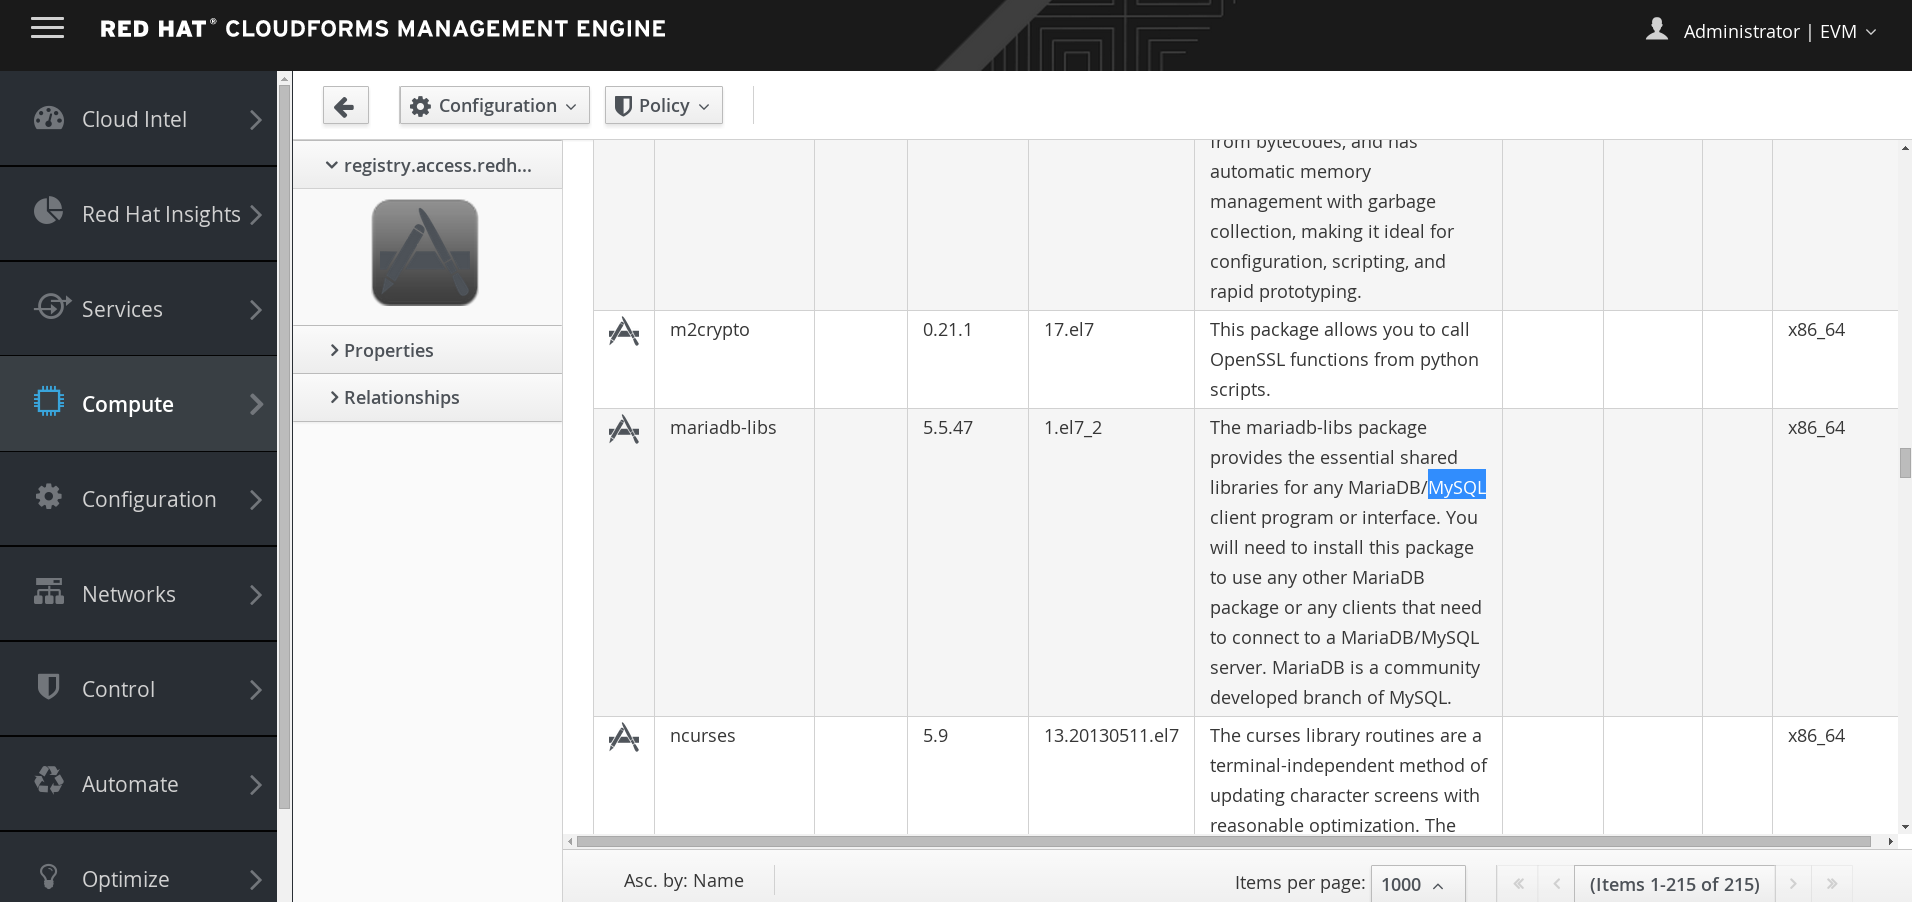
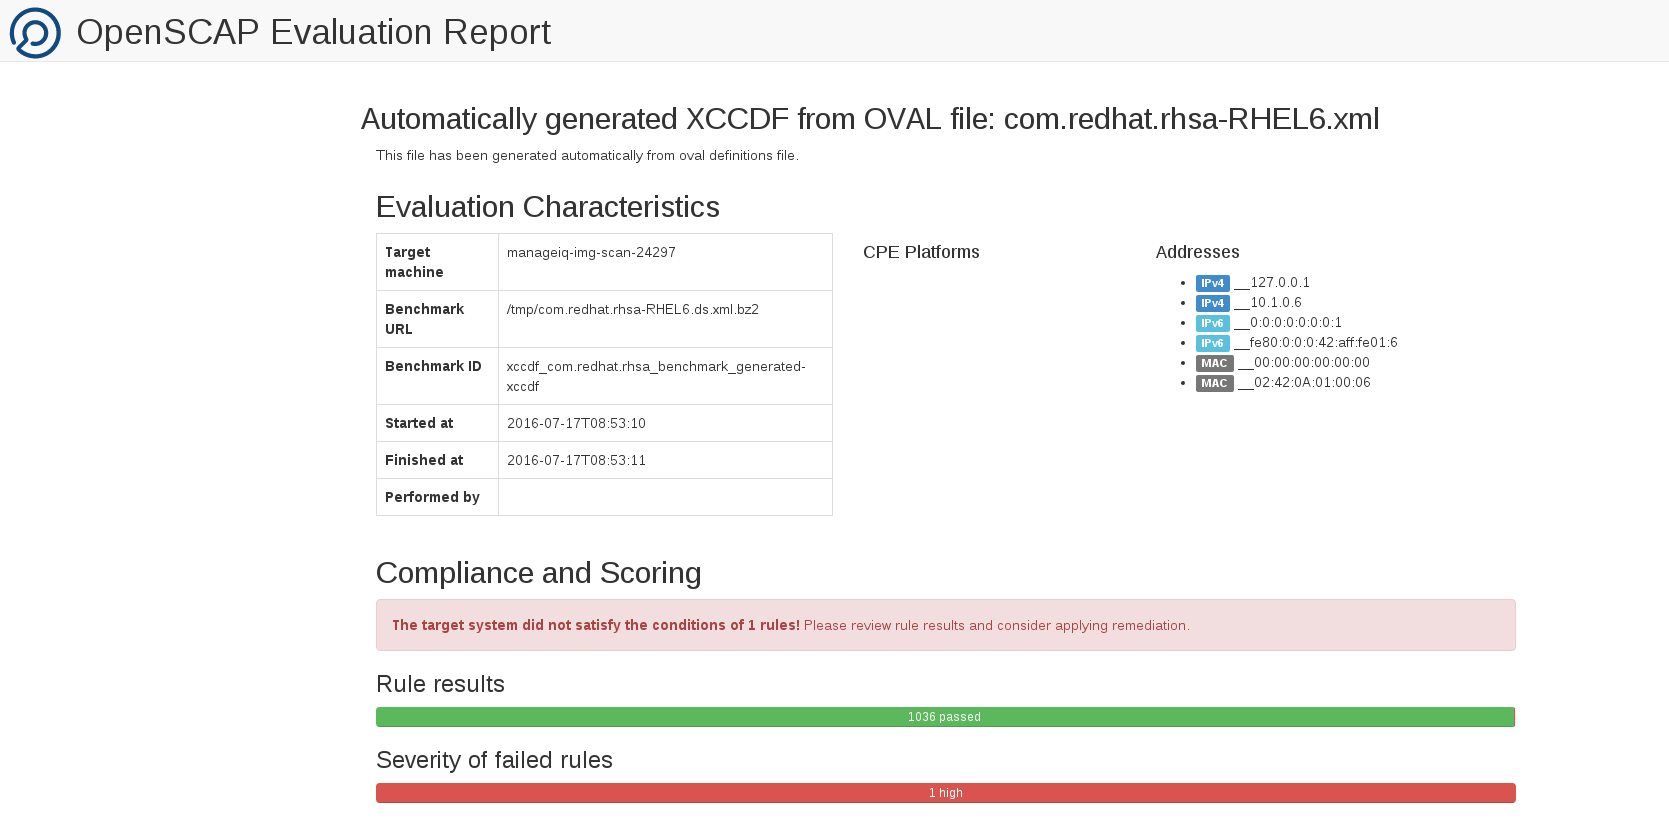
Check image in CloudForms and you should now see an OpenSCAP report and in addition visibility into packages that are actually installed in the container itself.
Compute->Containers-Container Images->MySQL
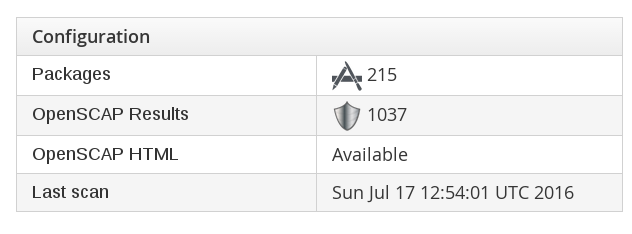
Packages
OpenScap HTML Report
Aggregate Logging
OpenShift Enterprise supports Kibana and the ELK Stack for log aggregation. Any pod and container that log to STDOUT will have all their log messages aggregated. This provides centralized logging for all application components. Logging is completely integrated within OpenShift and the ELK Stack runs of course containerized within OpenShift.
In openshift-infra project create service account for logging and necessary permissions.
[root@ose3-master ~]# oc project openshift-infra
[root@ose3-master ~]# oc secrets new logging-deployer nothing=/dev/null
[root@ose3-master ~]# oc create -f - <<API
apiVersion: v1
kind: ServiceAccount
metadata:
  name: logging-deployer
secrets:
- name: logging-deployer
API
[root@ose3-master ~]# oc policy add-role-to-user edit --serviceaccount logging-deployer
[root@ose3-master ~]# oadm policy add-scc-to-user privileged system:serviceaccount:logging:aggregated-logging-fluentd
[root@ose3-master ~]# oadm policy add-cluster-role-to-user cluster-reade system:serviceaccount:logging:aggregated-logging-fluentd
Deploy the logging stack. This creates a template or blueprint.
[root@ose3-master ~]# oc new-app logging-deployer-template \
             --param KIBANA_HOSTNAME=kibana.apps.lab.com \
             --param ES_CLUSTER_SIZE=1 \
             --param KIBANA_OPS_HOSTNAME=kibana-ops.apps.lab.com \
             --param PUBLIC_MASTER_URL=https://ose3-master.lab.com:8443
[root@ose3-master ~]# oc get pods
NAME READY STATUS RESTARTS AGE
logging-deployer-1de06 0/1 Completed 0 3m
Once logger deployer is complete, execute the template.
[root@ose3-master ~]# oc new-app logging-support-template
If you don' see containers creating then you need to manually import image streams.
[root@ose3-master ~]#oc import-image logging-auth-proxy:3.2.0 --from registry.access.redhat.com/openshift3/logging-auth-proxy:3.2.0
[root@ose3-master ~]# oc import-image logging-kibana:3.2.0 --from registry.access.redhat.com/openshift3/logging-kibana:3.2.0
[root@ose3-master ~]# oc import-image logging-elasticsearch:3.2.0 --from registry.access.redhat.com/openshift3/logging-elasticsearch:3.2.0
[root@ose3-master ~]# oc import-image logging-fluentd:3.2.0 --from registry.access.redhat.com/openshift3/logging-fluentd:3.2.0
[root@ose3-master ~]#  oc get pods
NAME READY STATUS RESTARTS AGE
logging-deployer-9lqkt 0/1 Completed 0 15m
logging-es-pm7uamdy-2-rdflo 1/1 Running 0 8m
logging-kibana-1-e13r3 2/2 Running 0 13m
Once ELK Stack is running update deployment so that persistent storage is used (optional). Note: this requires configuring persistent storage and that is explained in a different blog post referenced above.
#vi pvc.json

{
    "apiVersion": "v1",
    "kind": "PersistentVolumeClaim",
    "metadata": {
         "name": "logging-es-1"
    },
    "spec": {
        "accessModes": [ "ReadWriteOnce" ],
            "resources": {
                "requests": {
                    "storage": "10Gi"
                }
            }
     }
}
[root@ose3-master ~]# oc create -f pvc.json
[root@ose3-master ~]# oc get dc
NAME TRIGGERS LATEST
logging-es-pm7uamdy ConfigChange, ImageChange 2
[root@ose3-master ~]# oc volume dc/logging-es-pm7uamdy --add --overwrite --name=elasticsearch-storage --type=persistentVolumeClaim --claim-name=logging-es-1
OpenShift on RHEV or VMware.
If you are running OpenShift on traditional virtualization platform ensure mac spoofing is enabled or allowed. If it isn't the hypervisor will most likely drop packets going outbound from OpenShift. Enabling mac spoofing for RHEV is documented here under configure RHEV for OpenStack (same issue exists when running OpenStack nested in RHEV). For VMware or Hyper-V, I am not sure so just keep this in mind.
Summary
In this article we have seen how to configure an OpenShift 3.2 all-in-one lab environment. We have also seen how install and configuration can be adapted through ansible playbook. We have seen how to configure various DNS options. It should be repeated that most OpenShift problems are a direct result of improper DNS setup! We have seen how to integrate OpenShift in CloudForms and how to configure metrics using hawkular. Finally we even covered configuring log aggregation using containerized ELK stack. If you have any feedback please share.
Happy OpenShifting!
(c) 2016 Keith Tenzer