
OpenStack Neutron: Configuring L3 HA

Overview
In this article we will look at how to setup L3 HA in OpenStack Neutron. OpenStack networking can be rather complex, certainly when coming from a traditional networking world. The basic principles behind networking have not changed but OpenStack introduces lots of abstractions that make end-to-end visibility of network traffic flows very difficult to follow. As such before we get into the material it would be good to provide an overview of L3 as it pertains to OpenStack Neutron.
In Neutron L3 allows you to provide external connectivity to instances running in tenant networks that by nature are non-routable. Tenant networks are L2 networks and as such can only communicate with instances on same tenant network. L3 is implemented in Neutron using floating ip addresses. A floating ip is a address of an external network that uses NAT (SNAT/DNAT) to forward traffic to instance ip on tenant network. The below diagram illustrates this connectivity.
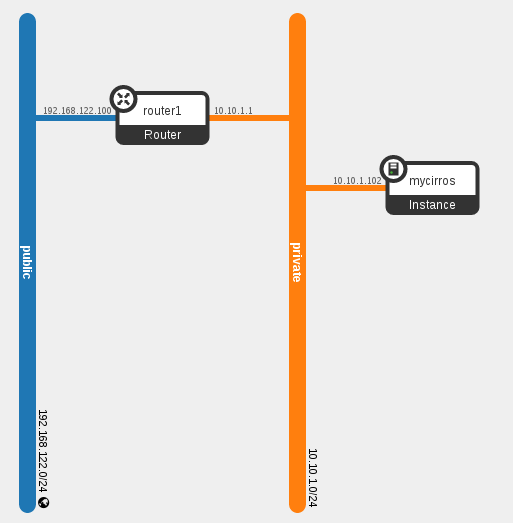
In this case we have two networks, a tenant network 10.10.1.0/24 named private and an external network 192.168.122.0/24 named public. The instance mycirros has the ip of 10.10.1.102. In order to communicate with other instances or devices outside the tenant network 10.10.1.0/24 an L3 router is required. Note that floating ips are only associated to an instance, the instance itself is completely unaware of floating ip. If you were to do an "ip a" on an instance you would not see the floating ip. Neutron implements NAT (SNAT/DNAT) in order to forward traffic between instance ip and floating ip using iptables rules. Since these rules can only be configured on a single network node per floating ip we have a problem. If that network node is lost then external connectivity will be interrupted to those instances.
Neutron solves this problem with L3 HA. In L3 HA you configure multiple network nodes and on each the Open vSwitch (OVS) agent plugin. In event that a network node is lost, the HA router will failover to a standy on another node and connectivity will not be interrupted for those instances. Neutron ml2 plugins exist for many different SDN solutions not just OVS. Out-of-the-box OVS is of course provided. If you are using another SDN then you most likely would not care about L3 HA within Neutron since you wouldn't use the L3 agent but rather the SDN plugin and the SDN would provide its own HA solution.
Install and Configure OpenStack Kilo
In this example we will configure two systems running RHEL or CentOS 7.1. We will use RDO (packstack) to deploy OpenStack Kilo. In OpenStack there are different roles a node can have: controller, network, compute and storage. Things can be customized to even break out individual services like keystone. We will deploy one node as a controller, compute and network node. The second node will only be a network node. This is the minimum configuration required to configure L3 HA since you need two network nodes.
[Controller node]
- Install RHEL or CentOS 7.1.
- Ensure name resolution is working
#vi /etc/hosts
192.168.122.81 osp7-ctr1.lab.com osp7-ctr1
- Ensure the hostname is set statically.
#hostnamectl set-hostname osp7-ctr1.lab.com
- Disable network manager.
#systemctl disable NetworkManager.service
- Disable firewalld to make configuration easier.
#systemctl disable firewalld.service
- For RHEL systems register with subscription manager.
 #subscription-manager register
 #subscription-manager subscribe --auto
 #subscription-manager repos --disable=*
 #subscription-manager repos --enable=rhel-7-server-rpms
 #subscription-manager repos --enable=rhel-7-server-openstack-7.0-rpms
- Install yum-utils and update the system.
 #yum install -y yum-utils
 #yum update -y
 #reboot
[Network node]
- Install RHEL or CentOS 7.1.
- Ensure name resolution is working
#vi /etc/hosts
192.168.122.82 osp7-net1.lab.com osp7-net1
- Ensure the hostname is set statically.
#hostnamectl set-hostname osp7-net1.lab.com
- Disable network manager.
#systemctl disable NetworkManager.service
- Disable firewalld to make configuration easier.
#systemctl disable firewalld.service
- For RHEL systems register with subscription manager.
 #subscription-manager register
 #subscription-manager subscribe --auto
 #subscription-manager repos --disable=*
 #subscription-manager repos --enable=rhel-7-server-rpms
 #subscription-manager repos --enable=rhel-7-server-openstack-7.0-rpms
- Install yum-utils and update the system.
 #yum install -y yum-utils
 #yum update -y
 #reboot
[Controller node]
- Install packstack packages.
#yum install -y openstack-packstack
- Create packstack answers file for customizing the installer.
#packstack --gen-answer-file /root/answers.txt
- Update the packstack answers file. Add the second host (in this case 192.168.122.82) to list of network hosts.
#vi /root/answers.txt
 CONFIG_NETWORK_HOSTS=192.168.122.81,192.168.122.82
 CONFIG_KEYSTONE_ADMIN_PW=redhat
 CONFIG_HORIZON_SSL=y
 CONFIG_PROVISION_DEMO=n
 CONFIG_HEAT_INSTALL=y
 CONFIG_HEAT_CLOUDWATCH_INSTALL=y
 CONFIG_HEAT_CFN_INSTALL=y
 CONFIG_SAHARA_INSTALL=y
 CONFIG_TROVE_INSTALL=y
 CONFIG_CEILOMETER_INSTALL=y
 CONFIG_LBAAS_INSTALL=y
- Install OpenStack using packstack from RDO.
#packstack --answer-file /root/answers.txt
. /root/keystonerc_admin
- Check status of openstack services.
#openstack-status
[Controller and Network nodes]
- Backup the ifcfg-etho script.
#cp /etc/sysconfig/network-scripts/ifcfg-eth0 /root/
- Configure external bridge for floating ip networks.
#vi /etc/sysconfig/network-scripts/ifcfg-eth0
 DEVICE=eth0
 ONBOOT=yes
 TYPE=OVSPort
 DEVICETYPE=ovs
 OVS_BRIDGE=br-ex
#vi /etc/sysconfig/network-scripts/ifcfg-br-ex
 DEVICE=br-ex
 BOOTPROTO=static
 ONBOOT=yes
 TYPE=OVSBridge
 DEVICETYPE=ovs
 USERCTL=yes
 PEERDNS=yes
 IPV6INIT=no
 IPADDR=<www.xxx.yyy.zzz>
 NETMASK=255.255.255.0
 GATEWAY=<GW IP>
 DNS1=<DNS IP>
- Add the eht0 physical interface to the br-ex bridge in openVswitch for floating IP networks.
#ovs-vsctl add-port br-ex eth0 ; systemctl restart network.service
Configure L3 HA
[Controller node]
- Configure common settings and enable L3 HA.
#openstack-config --set /etc/neutron/neutron.conf DEFAULT l3_ha True

#openstack-config --set /etc/neutron/neutron.conf DEFAULT l3_ha_net_cidr 168.254.192.0/18

#openstack-config --set /etc/neutron/neutron.conf DEFAULT max_l3_agents_per_router 3

#openstack-config --set /etc/neutron/neutron.conf DEFAULT min_l3_agents_per_router 2

#openstack-config --set /etc/neutron/neutron.conf DEFAULT dhcp_agents_per_network 2
[Controller node]
- Configure ml2 plugin.
#openstack-config --set /etc/neutron/plugins/ml2/ml2_conf.ini ml2 type_drivers flat,vlan,gre,vxlan

#openstack-config --set /etc/neutron/plugins/ml2/ml2_conf.ini ml2 tenant_network_types vxlan,vlan,gre

#openstack-config --set /etc/neutron/plugins/ml2/ml2_conf.ini ml2 mechanism_drivers openvswitch,l2population

#openstack-config --set /etc/neutron/plugins/ml2/ml2_conf.ini ml2 extension_drivers port_security

#openstack-config --set /etc/neutron/plugins/ml2/ml2_conf.ini ml2_type_flat flat_networks external

#openstack-config --set /etc/neutron/plugins/ml2/ml2_conf.ini ml2_type_vlan network_vlan_ranges datacenter:1000:2999

#openstack-config --set /etc/neutron/plugins/ml2/ml2_conf.ini ml2_type_gre tunnel_id_ranges 10:100

#openstack-config --set /etc/neutron/plugins/ml2/ml2_conf.ini ml2_type_vxlan vni_ranges 10:100

#openstack-config --set /etc/neutron/plugins/ml2/ml2_conf.ini securitygroup enable_ipset True

#openstack-service restart neutron
- Configure OVS Agent on Network node.
[Network node]
#openstack-config --set /etc/neutron/plugins/openvswitch/ovs_neutron_plugin.ini ovs bridge_mappings external:br-ex

#openstack-config --set /etc/neutron/plugins/openvswitch/ovs_neutron_plugin.ini agent tunnel_types vxlan,gre

#openstack-config --set /etc/neutron/plugins/openvswitch/ovs_neutron_plugin.ini agent l2_population True

#openstack-config --set /etc/neutron/plugins/openvswitch/ovs_neutron_plugin.ini agent prevent_arp_spoofing True

#openstack-config --set /etc/neutron/plugins/openvswitch/ovs_neutron_plugin.ini securitygroup firewall_driver neutron.agent.linux.iptables_firewall.OVSHybridIptablesFirewallDriver

#openstack-config --set /etc/neutron/plugins/openvswitch/ovs_neutron_plugin.ini securitygroup enable_security_group True
- Configure L3 Agent on Network nodes.
[Network node]
#openstack-config --set /etc/neutron/l3_agent.ini DEFAULT interface_driver neutron.agent.linux.interface.OVSInterfaceDriver

#openstack-config --set /etc/neutron/l3_agent.ini DEFAULT use_namespaces True

#openstack-config --set /etc/neutron/l3_agent.ini DEFAULT external_network_bridge ""

#openstack-config --set /etc/neutron/l3_agent.ini DEFAULT agent_mode legacy
- Configure DHCP agent on Network nodes.
[Network node]
#openstack-config --set /etc/neutron/dhcp_agent.ini DEFAULT interface_driver neutron.agent.linux.interface.OVSInterfaceDriver

#openstack-config --set /etc/neutron/dhcp_agent.ini DEFAULT dhcp_driver neutron.agent.linux.dhcp.Dnsmasq

#openstack-config --set /etc/neutron/dhcp_agent.ini DEFAULT enable_isolated_metadata True

Ensure that the metadata IP is correct, should be IP of controller.

#openstack-config --get /etc/neutron/metadata_agent.ini DEFAULT nova_metadata_ip
- Check shared secret for metadata agent.
#openstack-config --get /etc/neutron/metadata_agent.ini DEFAULT metadata_proxy_shared_secret
- The output should match that of controller node.
#openstack-config --get /etc/nova/nova.conf neutron metadata_proxy_shared_secret
- Restart Services.
[Network node]
#systemctl restart openvswitch

#systemctl restart neutron-openvswitch-agent

#systemctl restart neutron-l3-agent

#systemctl restart neutron-dhcp-agent

#systemctl restart neutron-metadata-agent
- Configure OVS Agent on compute nodes. Note: since we are running compute on the controller node we already did this but in case you have separate compute nodes these steps would be required.
[Compute node]
#openstack-config --set /etc/neutron/plugins/ml2/openvswitch_agent.ini ovs bridge_mappings datacenter:br-vlan

#openstack-config --set /etc/neutron/plugins/ml2/openvswitch_agent.ini agent tunnel_types vxlan,gre

#openstack-config --set /etc/neutron/plugins/ml2/openvswitch_agent.ini agent l2_population False

#openstack-config --set /etc/neutron/plugins/ml2/openvswitch_agent.ini agentprevent_arp_spoofing True

#openstack-config --set /etc/neutron/plugins/ml2/openvswitch_agent.ini securitygroup firewall_driver neutron.agent.linux.iptables_firewall.OVSHybridIptablesFirewallDriver

#openstack-config --set /etc/neutron/plugins/ml2/openvswitch_agent.ini securitygroup enable_security_group True
- Restart services.
#systemctl restart openvswitch

#systemctl restart neutron-openvswitch-agent
- Verify Neutron agents are working.
[Controller node]
#source keystonerc_admin
#neutron agent-list
+--------------------------------------+--------------------+-------------------+-------+----------------+---------------------------+
| id | agent_type | host | alive | admin_state_up | binary |
+--------------------------------------+--------------------+-------------------+-------+----------------+---------------------------+
| 0bc9823c-30d8-479f-9690-2a2a99e6b099 | Open vSwitch agent | osp7-ctr2.lab.com | :-) | True | neutron-openvswitch-agent |
| 5d104819-f28f-4a3c-9e18-7dfad70d938d | L3 agent | osp7-ctr1.lab.com | :-) | True | neutron-l3-agent |
| 68c8f35c-47d0-4e84-b089-c0c01f0b7570 | L3 agent | osp7-net1.lab.com | :-) | True | neutron-l3-agent |
| 995ab293-af3b-4386-b041-eac98359a84f | DHCP agent | osp7-net1.lab.com | :-) | True | neutron-dhcp-agent |
| ab98e58a-162c-460f-a34d-a700375d65e4 | Loadbalancer agent | osp7-ctr1.lab.com | :-) | True | neutron-lbaas-agent |
| b7ca70c9-0d3d-4ba6-ad73-a7cd12bd29f9 | Open vSwitch agent | osp7-ctr1.lab.com | :-) | True | neutron-openvswitch-agent |
| d5220a38-ba15-4e29-850f-bdadafdc72c5 | DHCP agent | osp7-ctr1.lab.com | :-) | True | neutron-dhcp-agent |
| dd63e733-ef74-46c7-b59c-5d4684d93d1b | Metadata agent | osp7-net1.lab.com | :-) | True | neutron-metadata-agent |
| df9bc78b-558a-44c0-96bc-8dec4c0f5ec0 | Loadbalancer agent | osp7-net1.lab.com | :-) | True | neutron-lbaas-agent |
| f343cdb4-3d34-46ac-bd7e-ac1c7e98fa78 | Metadata agent | osp7-ctr1.lab.com | :-) | True | neutron-metadata-agent |
+--------------------------------------+--------------------+-------------------+-------+----------------+---------------------------+
Create Networks with HA router
[Controller node]
- Create private network.
#neutron net-create private
#neutron subnet-create private 10.10.1.0/24 --name private_subnet --allocation-pool start=10.10.1.100,end=10.10.1.200
- Create public network. Note: these steps assume the physical network connected to eth0 is 192.168.122.0/24.
#neutron net-create public --router:external
#neutron subnet-create public 192.168.122.0/24 --name public_subnet --allocation-pool start=192.168.122.100,end=192.168.122.200 --disable-dhcp --gateway 192.168.122.1
- Add a new HA router and configure router interfaces.
#neutron router-create router1 --ha True
#neutron router-gateway-set router1 public
#neutron router-interface-add router1 private_subnet
- Check status of HA router router1 and ensure HA is enabled.
#neutron router-show router1
+-----------------------+---------------------------------------------------------------------------------------------------------------------------------------------------------------------------------------------+
| Field | Value |
+-----------------------+---------------------------------------------------------------------------------------------------------------------------------------------------------------------------------------------+
| admin_state_up | True |
| distributed | False |
| external_gateway_info | {"network_id": "59307306-7592-42c3-bae9-add052644040", "enable_snat": true, "external_fixed_ips": [{"subnet_id": "cd2ba99a-6d61-4106-af6a-71a7615fe891", "ip_address": "192.168.122.100"}]} |
| ha | True |
| id | e7d9bf3c-22a7-4413-9e44-c1fb450f1432 |
| name | router1 |
| routes | |
| status | ACTIVE |
| tenant_id | e8fa02de88824e85a2b4fcf36c510d60 |
+-----------------------+---------------------------------------------------------------------------------------------------------------------------------------------------------------------------------------------+
- Check which network node is hosting the router.
#neutron l3-agent-list-hosting-router router1
+--------------------------------------+-------------------+----------------+-------+----------+
| id | host | admin_state_up | alive | ha_state |
+--------------------------------------+-------------------+----------------+-------+----------+
| 68c8f35c-47d0-4e84-b089-c0c01f0b7570 | osp7-net1.lab.com | True | :-) | active |
| 5d104819-f28f-4a3c-9e18-7dfad70d938d | osp7-ctr1.lab.com | True | :-) | standby |
+--------------------------------------+-------------------+----------------+-------+----------+
- Upload a glance image. In this case we will use a Cirros image because it is small and thus good for testing OpenStack.
#glance image-create --name "Cirros 0.3.4" --disk-format qcow2 --container-format bare --is-public True --copy http://download.cirros-cloud.net/0.3.4/cirros-0.3.4-x86_64-disk.img
- Create a new m1.nano flavor for running Cirros image.
#nova flavor-create m1.nano 42 64 0 1
- Create security group and allow all TCP ports.
#nova secgroup-create all "Allow all tcp ports"
#nova secgroup-add-rule all TCP 1 65535 0.0.0.0/0
- Create a private ssh key for connecting to instances remotely.
#nova keypair-add admin
- Create admin.pem file and add private key from output of keypair-add command.
#vi /root/admin.pem
#chmod 400 /root/admin.pem
- List the network IDs.
#neutron net-list
 +--------------------------------------+---------+-------------------------------------------------------+
 | id | name | subnets |
 +--------------------------------------+---------+-------------------------------------------------------+
 | d4f3ed19-8be4-4d56-9f95-cfbac9fdf670 | private | 92d82f53-6e0b-4eef-b8b9-cae32cf40457 10.10.1.0/24     |
 | 37c024d6-8108-468c-bc25-1748db7f5e8f | public  | 22f2e901-186f-4041-ad93-f7b5ccc30a81 192.168.122.0/24 |
- Start an instance and make sure to replace network id from above command.
#nova boot --flavor m1.nano --image "Cirros 0.3.4" --nic net-id=e6c4e128-5a86-47a7-b501-737935680090 --key-name admin --security-groups all mycirros
- Create a floating IP and assign it to the mycirros instance.
#nova floating-ip-create
#nova floating-ip-associate mycirros <FLOATING IP>
- Connect to mycirros instance using the private ssh key stored in the admin.pem file.
#ssh -i admin.pem cirros@<FLOATING IP>
- Check the HA router namespace on node that is shown as active for router.
#ip netns show

qdhcp-e6c4e128-5a86-47a7-b501-737935680090
qrouter-e7d9bf3c-22a7-4413-9e44-c1fb450f1432
#ip netns exec qrouter-e7d9bf3c-22a7-4413-9e44-c1fb450f1432 ip a
1: lo: <LOOPBACK,UP,LOWER_UP> mtu 65536 qdisc noqueue state UNKNOWN
 link/loopback 00:00:00:00:00:00 brd 00:00:00:00:00:00
 inet 127.0.0.1/8 scope host lo
 valid_lft forever preferred_lft forever
 inet6 ::1/128 scope host
 valid_lft forever preferred_lft forever
12: ha-e0a8c860-c8: <BROADCAST,MULTICAST,UP,LOWER_UP> mtu 1500 qdisc noqueue state UNKNOWN
 link/ether fa:16:3e:ec:02:6d brd ff:ff:ff:ff:ff:ff
 inet 168.254.192.1/18 brd 168.254.255.255 scope global ha-e0a8c860-c8
 valid_lft forever preferred_lft forever
 inet 169.254.0.1/24 scope global ha-e0a8c860-c8
 valid_lft forever preferred_lft forever
 inet6 fe80::f816:3eff:feec:26d/64 scope link
 valid_lft forever preferred_lft forever
13: qr-4435cc42-ea: <BROADCAST,MULTICAST,UP,LOWER_UP> mtu 1500 qdisc noqueue state UNKNOWN
 link/ether fa:16:3e:c1:27:47 brd ff:ff:ff:ff:ff:ff
 inet 10.10.1.1/24 scope global qr-4435cc42-ea
 valid_lft forever preferred_lft forever
 inet6 fe80::f816:3eff:fec1:2747/64 scope link nodad
 valid_lft forever preferred_lft forever
14: qg-04e11260-25: <BROADCAST,MULTICAST,UP,LOWER_UP> mtu 1500 qdisc noqueue state UNKNOWN
 link/ether fa:16:3e:bb:5a:9f brd ff:ff:ff:ff:ff:ff
 inet 192.168.122.100/24 scope global qg-04e11260-25
 valid_lft forever preferred_lft forever
 inet 192.168.122.101/32 scope global qg-04e11260-25
 valid_lft forever preferred_lft forever
 inet6 fe80::f816:3eff:febb:5a9f/64 scope link nodad
 valid_lft forever preferred_lft forever
Notice the difference between the router namespace for the standby node. The tenant and floating ips are only configured on the active router.
Summary
In this article we have discussed the use case around Neutron L3 HA and seen how to configure L3 HA. In Neutron Layer 3 is responsible for external connectivity to and from instances. Floating IPs using SNAT/DNAT are configured that allow external connectivity for non-routable tenant IPs. Neutron HA router is required to protect against failures on L3 agent node and possible interruption to Floating IP traffic. The L3 HA router is mainly for OVS based networks, other SDNs will provide their own solutions for L3 HA. I hope you have found this article of use. If you have any feedback, please share.
Happy OpenStacking!
(c) 2016 Keith Tenzer